JAVASE
JAVASE
Hash
简介
Hash,一般翻译做散列、杂凑,或音译为哈希,是把任意长度的输入(又叫做预映射pre-image)通过散列算法变换成固定长度的输出,该输出就是散列值。这种转换是一种压缩映射,也就是,散列值的空间通常远小于输入的空间,不同的输入可能会散列成相同的输出,所以不可能从散列值来确定唯一的输入值。
若结构中存在和关键字K相等的记录,则必定在f(K)的存储位置上。由此,不需比较便可直接取得所查记录。称这个对应关系f为散列函数(Hash function),按这个事先建立的表为散列表。
对不同的关键字可能得到同一散列地址,即key1≠key2,而f(key1)=f(key2),这种现象称碰撞。具有相同函数值的关键字对该散列函数来说称做同义词。综上所述,根据散列函数H(key)和处理冲突的方法将一组关键字映射到一个有限的连续的地址集(区间)上,并以关键字在地址集中的“象” 作为记录在表中的存储位置,这种表便称为散列表,这一映象过程称为散列造表或散列,所得的存储位置称散列地址。
若对于关键字集合中的任一个关键字,经散列函数映象到地址集合中任何一个地址的概率是相等的,则称此类散列函数为均匀散列函数(Uniform Hash function),这就是使关键字经过散列函数得到一个“随机的地址”,从而减少冲突。
以上摘自百度百科
总结:
- hash:是一个函数,该函数中的实现就是一种算法,就是通过一系列的算法来得到一个hash值
- hash表:通过hash算法得到的hash值就在这张hash表中
也就是说,hash表就是所有的hash值组成的,有很多种hash函数,也就代表着有很多种算法得到hash值。
hashcode
hashcode就是通过hash函数得来的,通俗的说,就是通过某一种算法得到的,hashcode就是在hash表中有对应的位置。
每个对象都有hashcode,对象的hashcode怎么得来的呢?
首先一个对象肯定有物理地址,在别的博文中会将hashcode说成是代表对象的地址,这里肯定会让读者形成误区,对象的物理地址跟这个hashcode地址不一样,hashcode代表对象的地址说的是对象在hash表中的位置,物理地址说的对象存放在内存中的地址,那么对象如何得到hashcode呢?通过对象的内部地址(也就是物理地址)转换成一个整数,然后该整数通过hash函数的算法就得到了hashcode,所以,hashcode是什么呢?就是在hash表中对应的位置。这里如果还不是很清楚的话,举个例子,hash表中有 hashcode 为1、hashcode为2、(…)、3、4、5、6、7、8这样八个位置,有一个对象A,A的物理地址转换为一个整数17(这是假如),就通过直接取余算法,17%8=1,那么A的hashcode就为1,且A就在hash表中1的位置。
hashcode和equals
hashcode方法的主要作用是为了配合基于散列的集合一起正常运行,这样的散列集合包括HashSet、HashMap以及HashTable。即Java中的hashcode方法就是根据一定的规则将与对象相关的信息(比如对象的存储地址,对象的字段等)映射成一个数值,这个数值称作为散列值。
举例:
考虑一种情况,当向集合中插入对象时,如何判别在集合中是否已经存在该对象了?也许大多数人都会想到调用equals方法来逐个进行比较,这个方法确实可行。但是如果集合中已经存在一万条数据或者更多的数据,如果采用equals方法去逐一比较,效率必然是一个问题。
此时hashcode方法的作用就体现出来了,当集合要添加新的对象时,先调用这个对象的hashcode方法,得到对应的hashcode值,实际上在HashMap的具体实现中会用一个table保存已经存进去的对象的hashcode值,如果table中没有该hashcode值,它就可以直接存进去,不用再进行任何比较了;如果存在该hashcode值,就调用它的equals方法与新元素进行比较,相同的话就不存了,不相同就散列其它的地址,所以这里存在一个冲突解决的问题,这样一来实际调用equals方法的次数就大大降低了.
通过前面这个例子,大概可以知道,先通过hashcode来比较,如果hashcode相等,那么就用equals方法来比较两个对象是否相等,用个例子说明:上面说的hash表中的8个位置,就好比8个桶,每个桶里能装很多的对象,对象A通过hash函数算法得到将它放到1号桶中,当然肯定有别的对象也会放到1号桶中,如果对象B也通过算法分到了1号桶,那么它如何识别桶中其他对象是否和它一样呢,这时候就需要equals方法来进行筛选了。
- 如果两个对象equals相等,那么这两个对象的HashCode一定也相同
- 如果两个对象的HashCode相同,不代表两个对象就相同,只能说明这两个对象在散列存储结构中,存放于同一个位置
重写equals建议重写hashcode
因为Java相关规范规定了重写equals要重写hashcode,因为在很多Java集合中,例如HashMap首先会比较hashcode值是否相等,相等情况下再去比较equals值是否相等,所以重写equals要重写hashcode
比如:有个A类重写了equals方法,但是没有重写hashCode方法,看输出结果,对象a1和对象a2使用equals方法相等,按照上面的hashcode的用法,那么他们两个的hashcode肯定相等,但是这里由于没重写hashcode方法,他们两个hashcode并不一样,所以,我们在重写了equals方法后,尽量也重写了hashcode方法,通过一定的算法,使他们在equals相等时,也会有相同的hashcode值。
以上摘自:hashcode详解
Reflect
简介
运行状态中,对于任意一个类,都能够知道这个类的所有属性和方法;对于任意一个对象,都能调用它的任意一个方法和属性。这种动态获取信息及动态调用对象方法的功能叫Java的反射机制。
Class类的实例表示正在运行的Java应用程序中的类和接口,每个类只会产生一个Class对象,在类加载的时候自动创建。
类加载过程
- 在编译时,Java编译器编译好
.java文件之后,在磁盘中产生.class文件。.class文件是二进制文件,内容是只有JVM能够识别的机器码。 - JVM中的类加载器读取字节码文件,取出二进制数据,加载到内存中,解析
.class文件内的信息。类加载器会根据类的全限定名来获取此类的二进制字节流;然后,将字节流所代表的静态存储结构转化为方法区的运行时数据结构;接着,在内存中生成代表这个类的java.lang.Class对象。 - 加载结束后,JVM开始进行连接阶段(包含验证、准备、初始化)。经过这一系列操作,类的变量会被初始化。
Class对象
要想使用反射,首先需要获得待操作的类所对应的Class对象。Java 中,无论生成某个类的多少个对象,这些对象都会对应于同一个Class对象。这个Class对象是由JVM生成的,通过它能够获悉整个类的结构。所以java.lang.Class可以视为所有反射API的入口点。
反射的本质就是:在运行时,把Java类中的各种成分映射成一个个的 Java 对象。
例如: 一个类有成员变量、方法、构造方法、包等等信息,利用反射技术可以对一个类进行解剖,把各个组成部分映射成一个个对象,例如
Method,Constructor等。
举例来说,假如定义了以下代码:
1 | User user = new User(); |
步骤说明:
- JVM加载方法的时候,遇到
new User(),JVM会根据User的全限定名去加载User.class。 - JVM会去本地磁盘查找
User.class文件并加载JVM内存中。 - JVM通过调用类加载器自动创建这个类对应的
Class对象,并且存储在JVM的方法区。注意:一个类有且只有一个Class对象。
java.lang.reflect
Java 中的 java.lang.reflect 包提供了反射功能。java.lang.reflect 包中的类都没有 public 构造方法。java.lang.reflect 包的核心接口和类如下:
- Member 接口 - 反映关于单个成员(字段或方法)或构造函数的标识信息。
- Field 类 - 提供一个类的域的信息以及访问类的域的接口。
- Method 类 - 提供一个类的方法的信息以及访问类的方法的接口。
- Constructor 类 - 提供一个类的构造函数的信息以及访问类的构造函数的接口。
- Array 类 - 该类提供动态地生成和访问 JAVA 数组的方法。
- Modifier 类 - 提供了 static 方法和常量,对类和成员访问修饰符进行解码。
- Proxy 类 - 提供动态地生成代理类和类实例的静态方法。
获得Class对象
- T.class
- Object.getClass()
- Class.forName(“com.visionsly.entity.User”)
判断是否为某个类的实例
- 用 instanceof 关键字
- 用 Class 对象的 isInstance 方法(它是一个 Native 方法)
创建实例
- 用 Class 对象的 newInstance 方法
- 用 Constructor 对象的 newInstance 方法
1 | Class<?> c1 = StringBuilder.class; |
Field
Class 对象提供以下方法获取对象的成员(Field):
getFiled
根据名称获取公有的 public 类成员。
getDeclaredField
根据名称获取已声明的类成员,但不包括其父类的类成员。
getFields
获取所有公有的 public 类成员,包括其父类的 public 类成员。
getDeclaredFields
获取所有已声明的所有类成员,包括public、protected、默认(包)访问和 private 成员,但不包括其父类的类成员。
Method
Class 对象提供以下方法获取对象的方法(Method):
getMethod
返回类或接口的特定方法。其中第一个参数为方法名称,后面的参数为方法参数对应 Class 的对象。
getDeclaredMethod
返回类或接口的特定声明方法。其中第一个参数为方法名称,后面的参数为方法参数对应 Class 的对象。
getMethods
返回类或接口的所有 public 方法,包括其父类的 public 方法。
getDeclaredMethods
返回类或接口声明的所有方法,包括public、protected、默认(包)访问和 private 方法,但不包括其父类的方法。
获取一个 Method 对象后,可以用 invoke 方法来调用这个方法。
invoke 方法的原型为:
1 | public Object invoke(Object obj, Object... args) |
Constructor
Class 对象提供以下方法获取对象的构造方法(Constructor):
getConstructor
返回类的特定 public 构造方法。参数为方法参数对应 Class 的对象。
getDeclaredConstructor
返回类的特定构造方法。参数为方法参数对应 Class 的对象。
getConstructors
返回类的所有 public 构造方法。
getDeclaredConstructors
返回类的所有构造方法。
获取一个 Constructor 对象后,可以用 newInstance 方法来创建类实例。
Array
数组在 Java 里是比较特殊的一种类型,它可以赋值给一个对象引用。
1 | public class ReflectArrayDemo { |
其中的 Array 类为 java.lang.reflect.Array 类。我们通过 Array.newInstance 创建数组对象,它的原型是:
1 | public static Object newInstance(Class<?> componentType, int length) |
小总结
- getFields / getMethods 当前类以及父类所有 public 成员变量 / 方法
- getDeclaredFields / getDeclaredMethods 当前类所有 成员变量 / 方法
- getConstructors 当前类所有 public 构造方法,不包括父类构造方法
- getDeclaredConstructors 当前类所有构造方法,不包括父类构造方法
- 自定义类建议增加无参构造方法,有些架构使用反射时候会调用无参构造器
Annotation
简介
注解提供了一种安全的类似注释的机制,用来将任何的信息或元数据(metadata)与程序元素(类、方法、成员变量等)进行关联。为程序的元素(类、方法、成员变量)加上更直观的说明,这些说明信息是与程序的业务逻辑无关,并且供指定的工具或框架使用。Annontation像一种修饰符一样,应用于包、类型、构造方法、方法、成员变量、参数及本地变量的声明语句中。
简而言之:想像代码具有生命,注解就是对于代码中某些鲜活个体的贴上去的一张标签。简化来讲,注解如同一张标签。
注解定义
注解通过 @interface 关键字进行定义。
1 | public TestAnnotation { |
它的形式跟接口很类似,不过前面多了一个 @ 符号。上面的代码就创建了一个名字为 TestAnnotaion 的注解。
你可以简单理解为创建了一张名字为 TestAnnotation 的标签。
注解的应用
上面创建了一个注解,那么注解的的使用方法是什么呢。
1 |
|
创建一个类 Test,然后在类定义的地方加上 @TestAnnotation 就可以用 TestAnnotation 注解这个类了。
你可以简单理解为将 TestAnnotation 这张标签贴到 Test 这个类上面。
不过,要想注解能够正常工作,还需要介绍一下一个新的概念那就是元注解。
元注解
元注解是可以注解到注解上的注解,或者说元注解是一种基本注解,但是它能够应用到其它的注解上面。
如果难于理解的话,你可以这样理解。元注解也是一张标签,但是它是一张特殊的标签,它的作用和目的就是给其他普通的标签进行解释说明的。
@Retention
Retention 的英文意为保留期的意思。当 @Retention 应用到一个注解上的时候,它解释说明了这个注解的的存活时间。
它的取值如下:- RetentionPolicy.SOURCE 注解只在源码阶段保留,在编译器进行编译时它将被丢弃忽视。
- RetentionPolicy.CLASS 注解只被保留到编译进行的时候,它并不会被加载到 JVM 中。
- RetentionPolicy.RUNTIME 注解可以保留到程序运行的时候,它会被加载进入到 JVM 中,所以在程序运行时可以获取到它们。
我们可以这样的方式来加深理解,@Retention 去给一张标签解释的时候,它指定了这张标签张贴的时间。@Retention 相当于给一张标签上面盖了一张时间戳,时间戳指明了标签张贴的时间周期。
1
2
3
public TestAnnotation {
}上面的代码中,我们指定 TestAnnotation 可以在程序运行周期被获取到,因此它的生命周期非常的长。
@Documented
顾名思义,这个元注解肯定是和文档有关。它的作用是能够将注解中的元素包含到 Javadoc 中去。
@Target
Target 是目标的意思,@Target 指定了注解运用的地方。
你可以这样理解,当一个注解被 @Target 注解时,这个注解就被限定了运用的场景。
类比到标签,原本标签是你想张贴到哪个地方就到哪个地方,但是因为 @Target 的存在,它张贴的地方就非常具体了,比如只能张贴到方法上、类上、方法参数上等等。@Target 有下面的取值
- ElementType.ANNOTATION_TYPE 可以给一个注解进行注解
- ElementType.CONSTRUCTOR 可以给构造方法进行注解
- ElementType.FIELD 可以给属性进行注解
- ElementType.LOCAL_VARIABLE 可以给局部变量进行注解
- ElementType.METHOD 可以给方法进行注解
- ElementType.PACKAGE 可以给一个包进行注解
- ElementType.PARAMETER 可以给一个方法内的参数进行注解
- ElementType.TYPE 可以给一个类型进行注解,比如类、接口、枚举
@Inherited
Inherited 是继承的意思,但是它并不是说注解本身可以继承,而是说如果一个超类被 @Inherited 注解过的注解进行注解的话,那么如果它的子类没有被任何注解应用的话,那么这个子类就继承了超类的注解。
1 |
|
注解 Test 被 @Inherited 修饰,之后类 A 被 Test 注解,类 B 继承 A,类 B 也拥有 Test 这个注解。
可以这样理解:
老子非常有钱,所以人们给他贴了一张标签叫做富豪。
老子的儿子长大后,只要没有和老子断绝父子关系,虽然别人没有给他贴标签,但是他自然也是富豪。
老子的孙子长大了,自然也是富豪。
这就是人们口中戏称的富一代,富二代,富三代。虽然叫法不同,好像好多个标签,但其实事情的本质也就是他们有一张共同的标签,也就是老子身上的那张富豪的标签。
新增注解
- @SafeVarargs
Java 7 开始支持,忽略任何使用参数为泛型变量的方法或构造函数调用产生的警告。
- @FunctionalInterface
Java 8 开始支持,标识一个匿名函数或函数式接口。
- @Repeatable
Java 8 开始支持,标识某注解可以在同一个声明上使用多次。
Repeatable 自然是可重复的意思。@Repeatable 是 Java 1.8 才加进来的,所以算是一个新的特性。
什么样的注解会多次应用呢?通常是注解的值可以同时取多个。
举个例子,一个人他既是程序员又是产品经理,同时他还是个画家。
1 | Persons { |
注意上面的代码,@Repeatable 注解了 Person。而 @Repeatable 后面括号中的类相当于一个容器注解。
什么是容器注解呢?就是用来存放其它注解的地方。它本身也是一个注解。
我们再看看代码中的相关容器注解。
1 | Persons { |
按照规定,它里面必须要有一个 value 的属性,属性类型是一个被 @Repeatable 注解过的注解数组,注意它是数组。
如果不好理解的话,可以这样理解。Persons 是一张总的标签,上面贴满了 Person 这种同类型但内容不一样的标签。把 Persons 给一个 SuperMan 贴上,相当于同时给他贴了程序员、产品经理、画家的标签。
我们可能对于 @Person(role=”PM”) 括号里面的内容感兴趣,它其实就是给 Person 这个注解的 role 属性赋值为 PM ,大家不明白正常,马上就讲到注解的属性这一块。
注解的属性
注解的属性也叫做成员变量。注解只有成员变量,没有方法。注解的成员变量在注解的定义中以“无形参的方法”形式来声明,其方法名定义了该成员变量的名字,其返回值定义了该成员变量的类型。
1 |
|
上面代码定义了 TestAnnotation 这个注解中拥有 id 和 msg 两个属性。在使用的时候,我们应该给它们进行赋值。
赋值的方式是在注解的括号内以 value=”” 形式,多个属性之前用 ,隔开。
1 |
|
需要注意的是,在注解中定义属性时它的类型必须是 8 种基本数据类型外加 类、接口、注解及它们的数组。
注解中属性可以有默认值,默认值需要用 default 关键值指定。比如:
1 |
|
TestAnnotation 中 id 属性默认值为 -1,msg 属性默认值为 Hi。
它可以这样应用。
1 |
|
因为有默认值,所以无需要再在 @TestAnnotation 后面的括号里面进行赋值了,这一步可以省略。
另外,还有一种情况。如果一个注解内仅仅只有一个名字为 value 的属性时,应用这个注解时可以直接接属性值填写到括号内。
1 | public Check { |
上面代码中,Check 这个注解只有 value 这个属性。所以可以这样应用。
1 |
|
这和下面的效果是一样的
1 |
|
最后,还需要注意的一种情况是一个注解没有任何属性。比如
1 | public Perform {} |
那么在应用这个注解的时候,括号都可以省略。
1 |
|
Java预置注解
- @Deprecated
这个元素是用来标记过时的元素,想必大家在日常开发中经常碰到。编译器在编译阶段遇到这个注解时会发出提醒警告,告诉开发者正在调用一个过时的元素比如过时的方法、过时的类、过时的成员变量。
- @Override
提示子类要复写父类中被 @Override 修饰的方法
- @SuppressWarnings
阻止警告的意思。之前说过调用被 @Deprecated 注解的方法后,编译器会警告提醒,而有时候开发者会忽略这种警告,他们可以在调用的地方通过 @SuppressWarnings 达到目的。
- @SafeVarargs
参数安全类型注解。它的目的是提醒开发者不要用参数做一些不安全的操作,它的存在会阻止编译器产生 unchecked 这样的警告。它是在 Java 1.7 的版本中加入的。
- @FunctionalInterface
函数式接口注解,这个是 Java 1.8 版本引入的新特性。函数式编程很火,所以 Java 8 也及时添加了这个特性。
函数式接口 (Functional Interface) 就是一个具有一个方法的普通接口。
注解的提取
通过用标签来比作注解,前面的内容是讲怎么写注解,然后贴到哪个地方去,而现在我们要做的工作就是检阅这些标签内容。 形象的比喻就是你把这些注解标签在合适的时候撕下来,然后检阅上面的内容信息。
注解与反射
注解通过反射获取。首先可以通过 Class 对象的 isAnnotationPresent() 方法判断它是否应用了某个注解
1 | public boolean isAnnotationPresent(Class<? extends Annotation> annotationClass) {} |
然后通过 getAnnotation() 方法来获取 Annotation 对象。
1 | public <A extends Annotation> A getAnnotation(Class<A> annotationClass) {} |
或者是 getAnnotations() 方法。
1 | public Annotation[] getAnnotations() {} |
前一种方法返回指定类型的注解,后一种方法返回注解到这个元素上的所有注解。
如果获取到的 Annotation 如果不为 null,则就可以调用它们的属性方法了。比如
1 |
|
程序的运行结果是:
1 | id:-1 |
这个正是 TestAnnotation 中 id 和 msg 的默认值。
上面的例子中,只是检阅出了注解在类上的注解,其实属性、方法上的注解照样是可以的。同样还是要基于反射。
1 |
|
它们的结果如下:
1 | id:-1 |
需要注意的是,如果一个注解要在运行时被成功提取,那么@Retention(RetentionPolicy.RUNTIME) 是必须的。
注解使用场景
注解是一系列元数据,它提供数据用来解释程序代码,但是注解并非是所解释的代码本身的一部分。注解对于代码的运行效果没有直接影响。
注解有许多用处,主要如下:
- 提供信息给编译器: 编译器可以利用注解来探测错误和警告信息。
- 编译阶段时的处理: 软件工具可以用来利用注解信息来生成代码、Html文档或者做其它相应处理。
- 运行时的处理: 某些注解可以在程序运行的时候接受代码的提取,值得注意的是,注解不是代码本身的一部分。
Collection
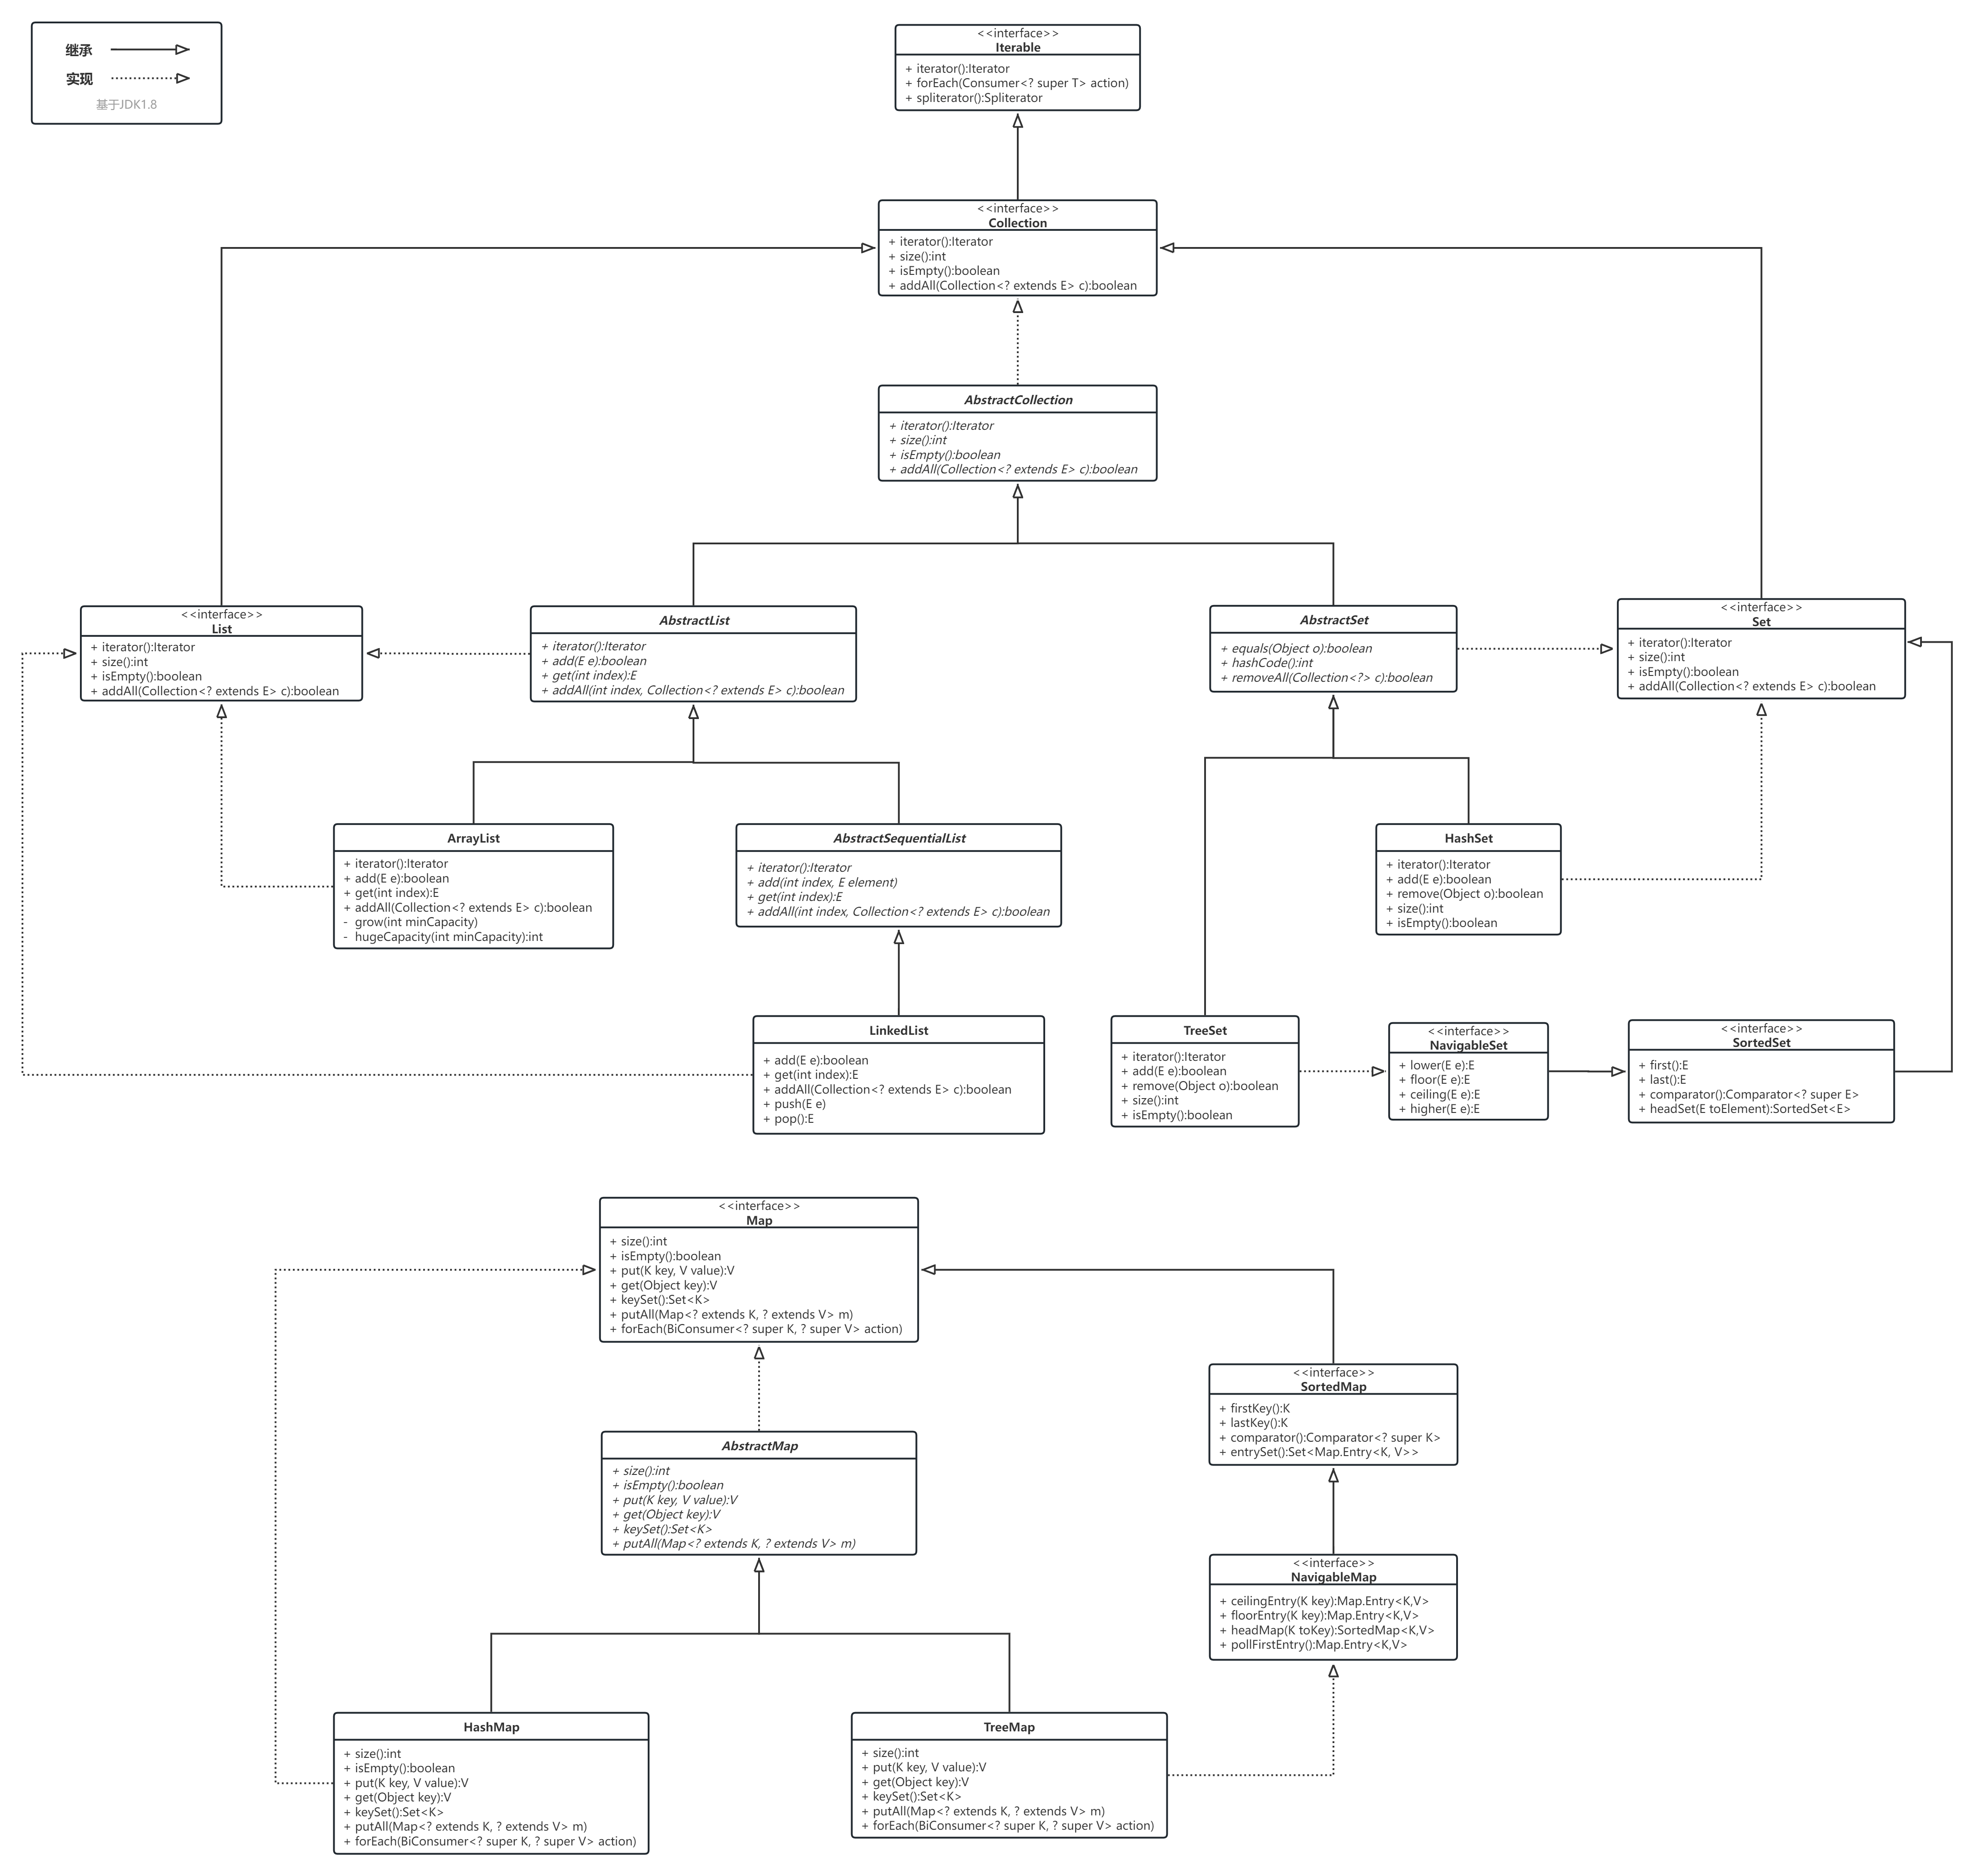
Collection
Collection 是最基本的集合接口,一个 Collection 代表一组 Object,即 Collection 的元素,Java不提供直接继承自Collection的类,只提供继承于的子接口(如List和set)。
Collection 接口存储一组不唯一,无序的对象。
List
List接口是一个有序的 Collection,使用此接口能够精确的控制每个元素插入的位置,能够通过索引(元素在List中位置,类似于数组的下标)来访问List中的元素,第一个元素的索引为 0,而且允许有相同的元素。
List 接口存储一组不唯一,有序(插入顺序)的对象。
ArrayList
ArrayList是一个动态数组,也是我们最常用的集合,是List类的典型实现。它允许任何符合规则的元素插入甚至包括null。每一个ArrayList都有一个初始容量(10),该容量代表了数组的大小。随着容器中的元素不断增加,容器的大小也会随着增加(1.5倍)。在每次向容器中增加元素的同时都会进行容量检查,当快溢出时,就会进行扩容操作。所以如果我们明确所插入元素的多少,最好指定一个初始容量值,避免过多的进行扩容操作而浪费时间、效率。
初始容量
1 | /** |
扩容机制
1 | /** |
ArrayList擅长于随机访问。同时ArrayList是非同步的。
LinkedList
LinkedList是List接口的另一个实现,除了可以根据索引访问集合元素外,LinkedList还实现了Deque接口,可以当作双端队列来使用,也就是说,既可以当作“栈”使用,又可以当作队列使用。
LinkedList的实现机制与ArrayList的实现机制完全不同,ArrayLiat内部以数组的形式保存集合的元素,所以随机访问集合元素有较好的性能;LinkedList内部以链表的形式保存集合中的元素,所以随机访问集合中的元素性能较差,但在插入删除元素时有较好的性能。
Vector
与ArrayList相似,但是Vector是同步的。所以说Vector是线程安全的动态数组。它的操作与ArrayList几乎一样。
Stack
Stack继承自Vector,实现一个后进先出的堆栈。Stack提供5个额外的方法使得Vector得以被当作堆栈使用。基本的push和pop方法,还有peek方法得到栈顶的元素,empty方法测试堆栈是否为空,search方法检测一个元素在堆栈中的位置。Stack刚创建后是空栈。
Set
Set 具有与 Collection 完全一样的接口,只是行为上不同,Set 不保存重复的元素。
Set 接口存储一组唯一,无序的对象。
HashSet
HashSet是Set集合最常用实现类,是其经典实现。HashSet是按照hash算法来存储元素的,因此具有很好的存取和查找性能。
HashSet特点
- 不能保证元素的顺序
- HashSet不是线程同步的,如果多线程操作HashSet集合,则应通过代码来保证其同步
- 集合元素值可以是null
HashSet存储原理
当向HashSet集合存储一个元素时,HashSet会调用该对象的hashCode()方法得到其hashCode值,然后根据hashCode值决定该对象的存储位置。HashSet集合判断两个元素相等的标准是
- (1) 两个对象通过equals()方法比较返回true;
- (2) 两个对象的hashCode()方法返回值相等。
因此,如果(1)和(2)有一个不满足条件,则认为这两个对象不相等,可以添加成功。如果两个对象的hashCode()方法返回值相等,但是两个对象通过equals()方法比较返回false,HashSet会以链式结构将两个对象保存在同一位置,这将导致性能下降,因此在编码时应避免出现这种情况。
HashSet查找原理
基于HashSet以上的存储原理,在查找元素时,HashSet先计算元素的HashCode值(也就是调用对象的hashCode方法的返回值),然后直接到hashCode值对应的位置去取出元素即可,这就是HashSet速度很快的原因。
重写hashCode()方法的基本原则
- 在程序运行过程中,同一个对象的hashCode()方法返回值应相同
- 当两个对象通过equals()方法比较返回true时,这两个对象的hashCode()方法返回值应该相等
- 对象中用作equals()方法比较标准的实例变量,都应该用于计算hashCode值
LinkedHashSet
LinkedHashSet是HashSet的一个子类,具有HashSet的特性,也是根据元素的hashCode值来决定元素的存储位置。但它使用链表维护元素的次序,元素的顺序与添加顺序一致。由于LinkedHashSet需要维护元素的插入顺序,因此性能略低于HashSet,但在迭代访问Set里的全部元素时由很好的性能。
TreeSet
TreeSet时SortedSet接口的实现类,TreeSet可以保证元素处于排序状态,它采用红黑树的数据结构来存储集合元素。TreeSet支持两种排序方法:自然排序和定制排序,默认采用自然排序。
自然排序
TreeSet会调用集合元素的compareTo(Object obj)方法来比较元素的大小关系,然后将元素按照升序排列,这就是自然排序。如果试图将一个对象添加到TreeSet集合中,则该对象必须实现Comparable接口,否则会抛出异常。当一个对象调用方法与另一个对象比较时,例如obj1.compareTo(obj2),如果该方法返回0,则两个对象相等;如果返回一个正数,则obj1大于obj2;如果返回一个负数,则obj1小于obj2。
Java常用类中已经实现了Comparable接口的类有以下几个:
- BigDecimal、BigDecimal以及所有数值型对应的包装类:按照它们对应的数值大小进行比较。
- Charchter:按照字符的unicode值进行比较。
- Boolean:true对应的包装类实例大于false对应的包装类实例。
- String:按照字符串中的字符的unicode值进行比较。
- Date、Time:后面的时间、日期比前面的时间、日期大。
对于TreeSet集合而言,它判断两个对象是否相等的标准是:两个对象通过compareTo(Object obj)方法比较是否返回0,如果返回0则相等。
定制排序
想要实现定制排序,需要在创建TreeSet集合对象时,提供一个Comparator对象与该TreeSet集合关联,由Comparator对象负责集合元素的排序逻辑。
综上:自然排序实现的是Comparable接口,定制排序实现的是Comparator接口。
Map
Map接口采用键值对Map<K,V>的存储方式,保存具有映射关系的数据,因此,Map集合里保存两组值,一组值用于保存Map里的key,另外一组值用于保存Map里的value,key和value可以是任意引用类型的数据。key值不允许重复,可以为null。如果添加key-value对时Map中已经有重复的key,则新添加的value会覆盖该key原来对应的value。常用实现类有HashMap、LinkedHashMap、TreeMap等。
Map 接口存储一组键值对象,提供key(键)到value(值)的映射。
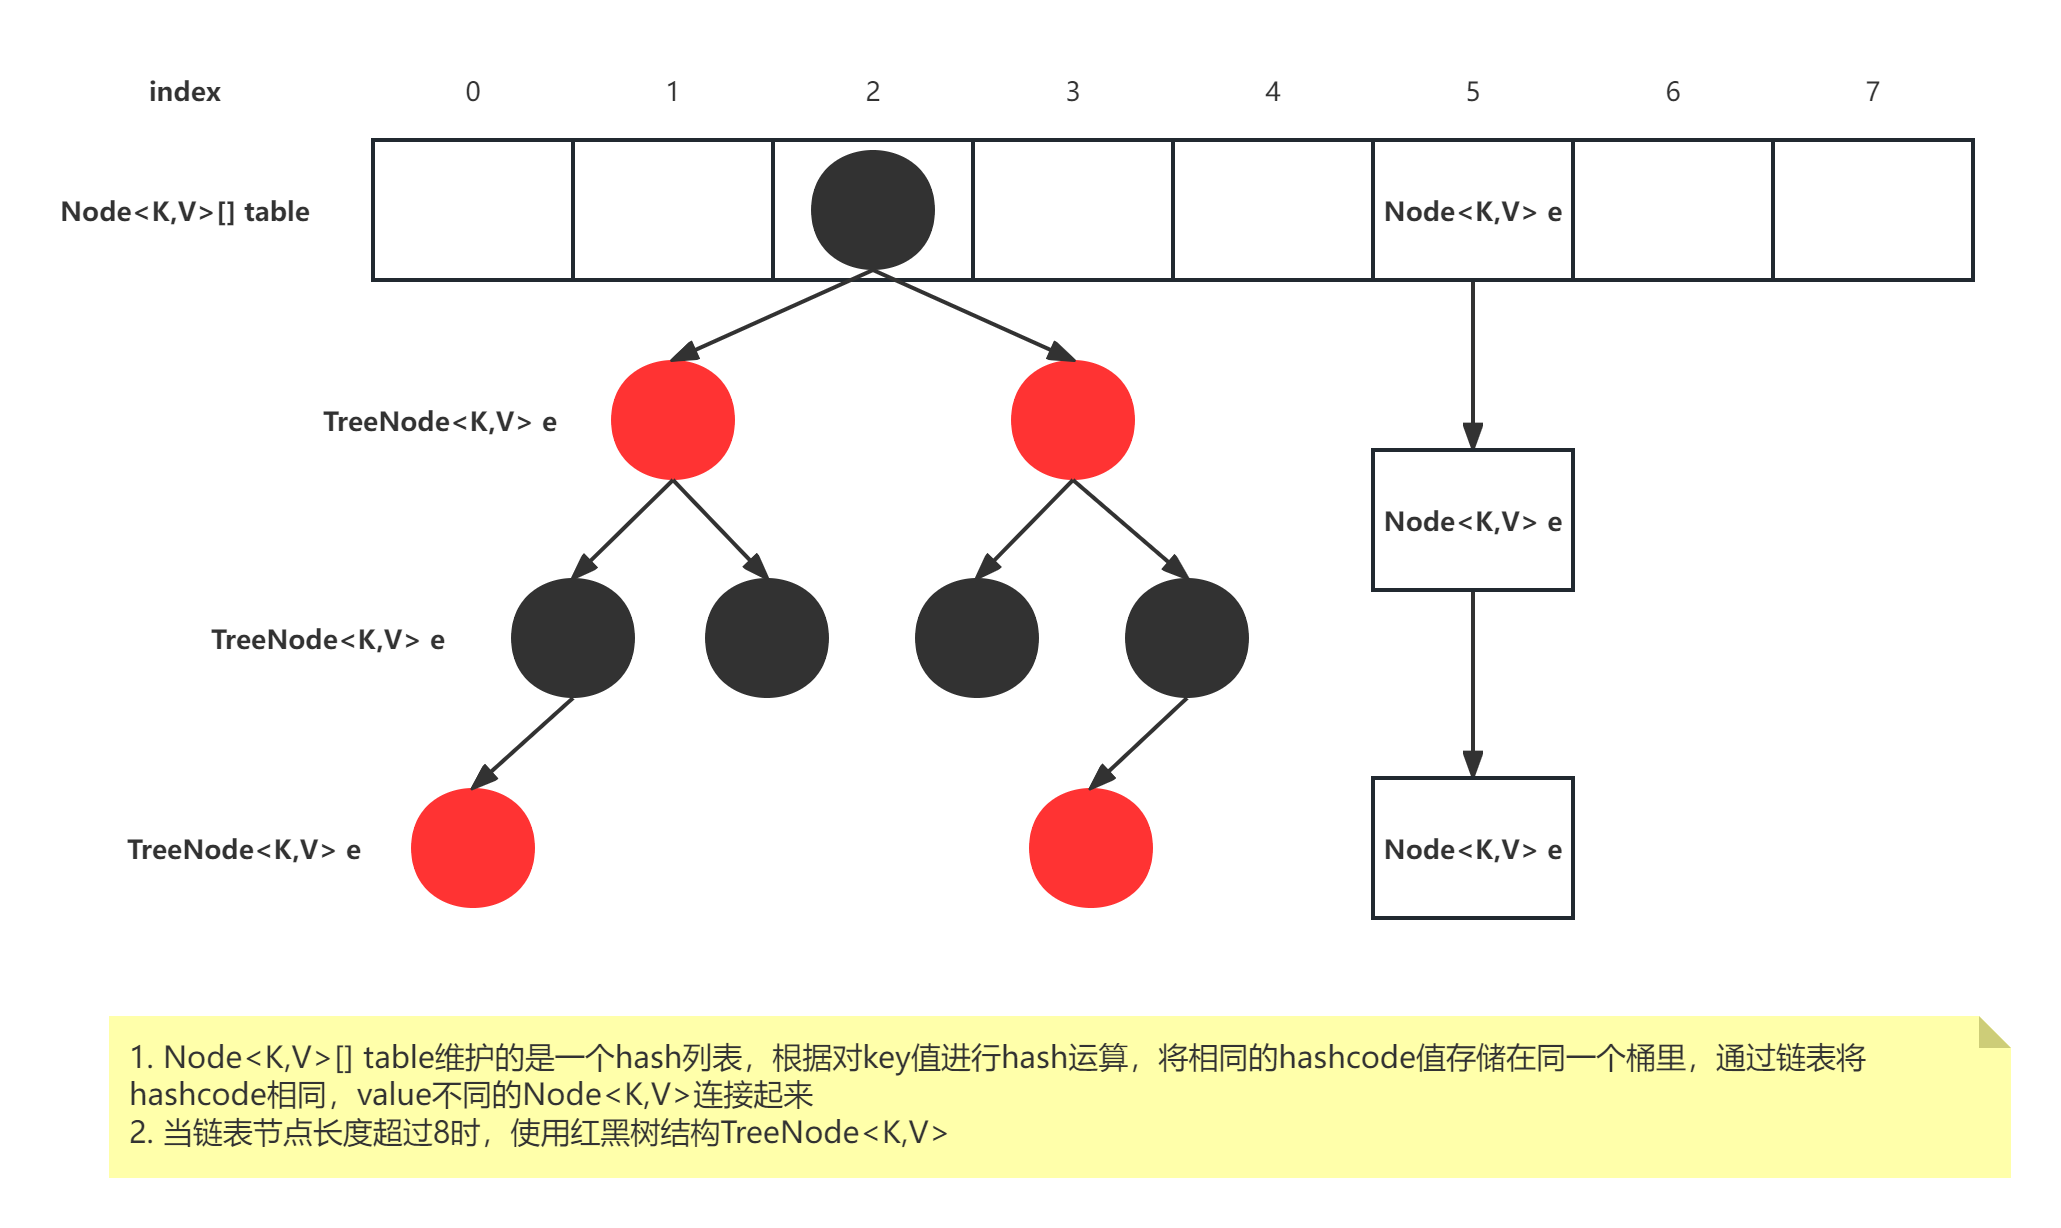
HashMap
随着JDK(Java Developmet Kit)版本的更新,JDK1.8对HashMap底层的实现进行了优化,例如引入红黑树的数据结构和扩容的优化等。JDK 1.8HashMap底层实现由之前的“数组+链表”改为“数组+链表+红黑树”。JDK1.8的HashMap的数据结构如下图所示,当链表节点较少时仍然是以链表存在,当链表节点较多时(链表长度大于8且数组长度大于等于64)会转为红黑树。
概述
HashMap:它根据键的hashCode值存储数据,大多数情况下可以直接定位到它的值,因而具有很快的访问速度,但遍历顺序却是不确定的。HashMap最多只允许一条记录的键为null,允许多条记录的值为null。HashMap非线程安全,即任一时刻可以有多个线程同时写HashMap,可能会导致数据的不一致。如果需要满足线程安全,可以用Collections的synchronizedMap方法使HashMap具有线程安全的能力,或者使用ConcurrentHashMap。
HashMap工作原理
HashMap基于hashing原理,通过put()和get()方法存储和获取对象。当我们将键值对传递给put()方法时,它调用建对象的hashCode()方法来计算hashCode值,然后找到bucket位置来储存值对象。当获取对象时,通过建对象的equals()方法找到正确的键值对,然后返回对象。HashMap使用链表来解决碰撞问题,当发生碰撞了,对象将会存储在链表的下一个节点中。
HashMap中一些常量值(jdk1.8)
1 | /** |
HashMap中put功能实现
定位哈希桶数组索引位置
不管增加、删除、查找键值对,定位到哈希桶数组的位置都是很关键的第一步。前面说过HashMap的数据结构是“数组+链表+红黑树”的结合,所以我们当然希望这个HashMap里面的元素位置尽量分布均匀些,尽量使得每个位置上的元素数量只有一个,那么当我们用hash算法求得这个位置的时候,马上就可以知道对应位置的元素就是我们要的,不用遍历链表/红黑树,大大优化了查询的效率。HashMap定位数组索引位置,直接决定了hash方法的离散性能。下面是定位哈希桶数组的源码:
1
2
3
4
5
6
7
8
9
10// 代码1
static final int hash(Object key) { // 计算key的hash值
int h;
// 1.先拿到key的hashCode值; 2.将hashCode的高16位进行^运算
return (key == null) ? 0 : (h = key.hashCode()) ^ (h >>> 16);
}
// 代码2
int n = tab.length;
// 将(tab.length - 1) 与 hash值进行&运算
int index = (n - 1) & hash;整个过程本质上就是三步:
a. 拿到key的hashCode值
b. 将hashCode的高位进行^运算,重新计算hash值
c. 将计算出来的hash值与(table.length - 1)进行&运算
方法解读:
对于任意给定的对象,只要它的hashCode()返回值相同,那么计算得到的hash值总是相同的。我们首先想到的就是把hash值对table长度取模运算,这样一来,元素的分布相对来说是比较均匀的。
但是模运算消耗还是比较大的,我们知道计算机比较快的运算为位运算,因此JDK团队对取模运算进行了优化,使用上面代码2的位与运算来代替模运算。这个方法非常巧妙,它通过 “(table.length -1) & h” 来得到该对象的索引位置,这个优化是基于以下公式:x mod 2n = x & (2n - 1)。我们知道HashMap底层数组的长度总是2的n次方,并且取模运算为“h mod table.length”,对应上面的公式,可以得到该运算等同于“h & (table.length - 1)”。这是HashMap在速度上的优化,因为&比%具有更高的效率。
在JDK1.8的实现中,还优化了高位运算的算法,将hashCode的高16位与hashCode进行异或运算,主要是为了在table的length较小的时候,让高位也参与运算,并且不会有太大的开销。
分析HashMap的put方法
a. 判断键值对数组table[i]是否为空或为null,否则执行resize()进行扩容;
b. 根据键值key计算hash值得到插入的数组索引i,如果table[i]==null,直接新建节点添加,转向f,如果table[i]不为空,转向c;
c. 判断table[i]的首个元素是否和key一样,如果相同直接覆盖value,否则转向d,这里的相同指的是hashCode以及equals;
d. 判断table[i] 是否为treeNode,即table[i] 是否是红黑树,如果是红黑树,则直接在树中插入键值对,否则转向e;
e. 遍历table[i],判断链表长度是否大于8,大于8的话把链表转换为红黑树,在红黑树中执行插入操作,否则进行链表的插入操作;遍历过程中若发现key已经存在直接覆盖value即可;
f. 插入成功后,判断实际存在的键值对数量size是否超多了最大容量threshold,如果超过,进行扩容。
put方法源码:
1
2
3
4
5
6
7
8
9
10
11
12
13
14
15
16
17
18
19
20
21
22
23
24
25
26
27
28
29
30
31
32
33
34
35
36
37
38
39
40
41
42
43
44
45
46
47
48
49
50
51
52
53
54
55
56
57
58
59public V put(K key, V value) {
// 四个参数,第一个hash值,第四个参数表示如果该key存在值,如果为null的话,则插入新的value,最后一个参数,在hashMap中没有用,可以不用管,使用默认的即可
return putVal(hash(key), key, value, false, true);
}
final V putVal(int hash, K key, V value, boolean onlyIfAbsent,
boolean evict) {
// tab 哈希数组,p 该哈希桶的首节点,n hashMap的长度,i 计算出的数组下标
Node<K,V>[] tab; Node<K,V> p; int n, i;
// table是否为空或者length等于0,如果是则调用resize方法进行初始化
if ((tab = table) == null || (n = tab.length) == 0)
n = (tab = resize()).length;
// 通过hash值计算索引位置,如果table表该索引位置节点为空则新增一个
if ((p = tab[i = (n - 1) & hash]) == null)// 将索引位置的头节点赋值给p
tab[i] = newNode(hash, key, value, null);
// table表该索引位置不为空,即发生了哈希冲突(分为三种情况)
else {
// e 临时节点的作用, k 存放该当前节点的key
Node<K,V> e; K k;
// 第一种,插入的key-value的hash值,key都与当前节点的相等,e = p,则表示为首节点
if (p.hash == hash && // 判断p节点的hash值和key值是否跟传入的hash值和key值相等
((k = p.key) == key || (key != null && key.equals(k))))
e = p; // 如果相等,则p节点即为要查找的目标节点,赋值给e
// 第二种,hash值不等于首节点,判断该p是否属于红黑树的节点(TreeNode), 如果是则调用红黑树的putTreeVal方法查找目标节点
else if (p instanceof TreeNode)
e = ((TreeNode<K,V>)p).putTreeVal(this, tab, hash, key, value);
// 第三种,hash值不等于首节点,不为红黑树的节点,则为链表的节点
else { // 走到这代表p节点为普通链表节点
for (int binCount = 0; ; ++binCount) { // 遍历此链表, binCount用于统计节点数
if ((e = p.next) == null) { // p.next为空代表不存在目标节点则新增一个节点插入链表尾部
p.next = newNode(hash, key, value, null);
// 计算节点是否超过8个, 减一是因为循环是从p节点的下一个节点开始的
if (binCount >= TREEIFY_THRESHOLD - 1)
treeifyBin(tab, hash);// 如果超过8个,调用treeifyBin方法将该链表转换为红黑树
break;
}
if (e.hash == hash && // e节点的hash值和key值都与传入的相等, 则e即为目标节点,跳出循环
((k = e.key) == key || (key != null && key.equals(k))))
break;
p = e; // 将p指向下一个节点
}
}
// e不为空则代表根据传入的hash值和key值查找到了节点,将该节点的value覆盖,返回oldValue
if (e != null) {
V oldValue = e.value;
if (!onlyIfAbsent || oldValue == null)
e.value = value;
afterNodeAccess(e); // 用于LinkedHashMap
return oldValue;
}
}
// 到了此步骤,则表明待插入的key-value是没有key的重复,因为插入成功e节点的值为null
// 修改次数+1
++modCount;
if (++size > threshold) // 插入节点后超过阈值则进行扩容
resize();
afterNodeInsertion(evict); // 用于LinkedHashMap 尾插法
return null;
}扩容机制
1
2
3
4
5
6
7
8
9
10
11
12
13
14
15
16
17
18
19
20
21
22
23
24
25
26
27
28
29
30
31
32
33
34
35
36
37
38
39
40
41
42
43
44
45
46
47
48
49
50
51
52
53
54
55
56
57
58
59
60
61
62
63
64
65
66
67
68
69
70
71
72
73
74
75
76
77
78
79
80final Node<K,V>[] resize() {
Node<K,V>[] oldTab = table;
int oldCap = (oldTab == null) ? 0 : oldTab.length;
int oldThr = threshold;
int newCap, newThr = 0;
if (oldCap > 0) { // 老table不为空
if (oldCap >= MAXIMUM_CAPACITY) { // 老table的容量超过最大容量值
threshold = Integer.MAX_VALUE; // 设置阈值为Integer.MAX_VALUE
return oldTab;
}
// 如果容量*2<最大容量并且>=16, 则将阈值设置为原来的两倍
else if ((newCap = oldCap << 1) < MAXIMUM_CAPACITY &&
oldCap >= DEFAULT_INITIAL_CAPACITY)
newThr = oldThr << 1; // double threshold
}
else if (oldThr > 0) // 老表的容量为0, 老表的阈值大于0, 是因为初始容量被放入阈值
newCap = oldThr; // 则将新表的容量设置为老表的阈值
else { // 老表的容量为0, 老表的阈值为0, 则为空表,设置默认容量和阈值
newCap = DEFAULT_INITIAL_CAPACITY;
newThr = (int)(DEFAULT_LOAD_FACTOR * DEFAULT_INITIAL_CAPACITY);
}
if (newThr == 0) { // 如果新表的阈值为空, 则通过新的容量*负载因子获得阈值
float ft = (float)newCap * loadFactor;
newThr = (newCap < MAXIMUM_CAPACITY && ft < (float)MAXIMUM_CAPACITY ?
(int)ft : Integer.MAX_VALUE);
}
threshold = newThr; // 将当前阈值赋值为刚计算出来的新的阈值
// 定义新表,容量为刚计算出来的新容量
Node<K,V>[] newTab = (Node<K,V>[])new Node[newCap];
table = newTab; // 将当前的表赋值为新定义的表
if (oldTab != null) { // 如果老表不为空, 则需遍历将节点赋值给新表
for (int j = 0; j < oldCap; ++j) {
Node<K,V> e;
if ((e = oldTab[j]) != null) { // 将索引值为j的老表头节点赋值给e
oldTab[j] = null; // 将老表的节点设置为空, 以便垃圾收集器回收空间
// 如果e.next为空, 则代表老表的该位置只有1个节点,
// 通过hash值计算新表的索引位置, 直接将该节点放在该位置
if (e.next == null)
newTab[e.hash & (newCap - 1)] = e;
else if (e instanceof TreeNode)
// 调用treeNode的hash分布(跟下面最后一个else的内容几乎相同)
((TreeNode<K,V>)e).split(this, newTab, j, oldCap);
else { // preserve order
Node<K,V> loHead = null, loTail = null; // 存储跟原索引位置相同的节点
Node<K,V> hiHead = null, hiTail = null; // 存储索引位置为:原索引+oldCap的节点
Node<K,V> next;
do {
next = e.next;
//如果e的hash值与老表的容量进行与运算为0,则扩容后的索引位置跟老表的索引位置一样
if ((e.hash & oldCap) == 0) {
if (loTail == null) // 如果loTail为空, 代表该节点为第一个节点
loHead = e; // 则将loHead赋值为第一个节点
else
loTail.next = e; // 否则将节点添加在loTail后面
loTail = e; // 并将loTail赋值为新增的节点
}
//如果e的hash值与老表的容量进行与运算为1,则扩容后的索引位置为:老表的索引位置+oldCap
else {
if (hiTail == null) // 如果hiTail为空, 代表该节点为第一个节点
hiHead = e; // 则将hiHead赋值为第一个节点
else
hiTail.next = e; // 否则将节点添加在hiTail后面
hiTail = e; // 并将hiTail赋值为新增的节点
}
} while ((e = next) != null);
if (loTail != null) {
loTail.next = null; // 最后一个节点的next设为空
newTab[j] = loHead; // 将原索引位置的节点设置为对应的头结点
}
if (hiTail != null) {
hiTail.next = null; // 最后一个节点的next设为空
newTab[j + oldCap] = hiHead; // 将索引位置为原索引+oldCap的节点设置为对应的头结点
}
}
}
}
}
return newTab;
}
多线程安全问题
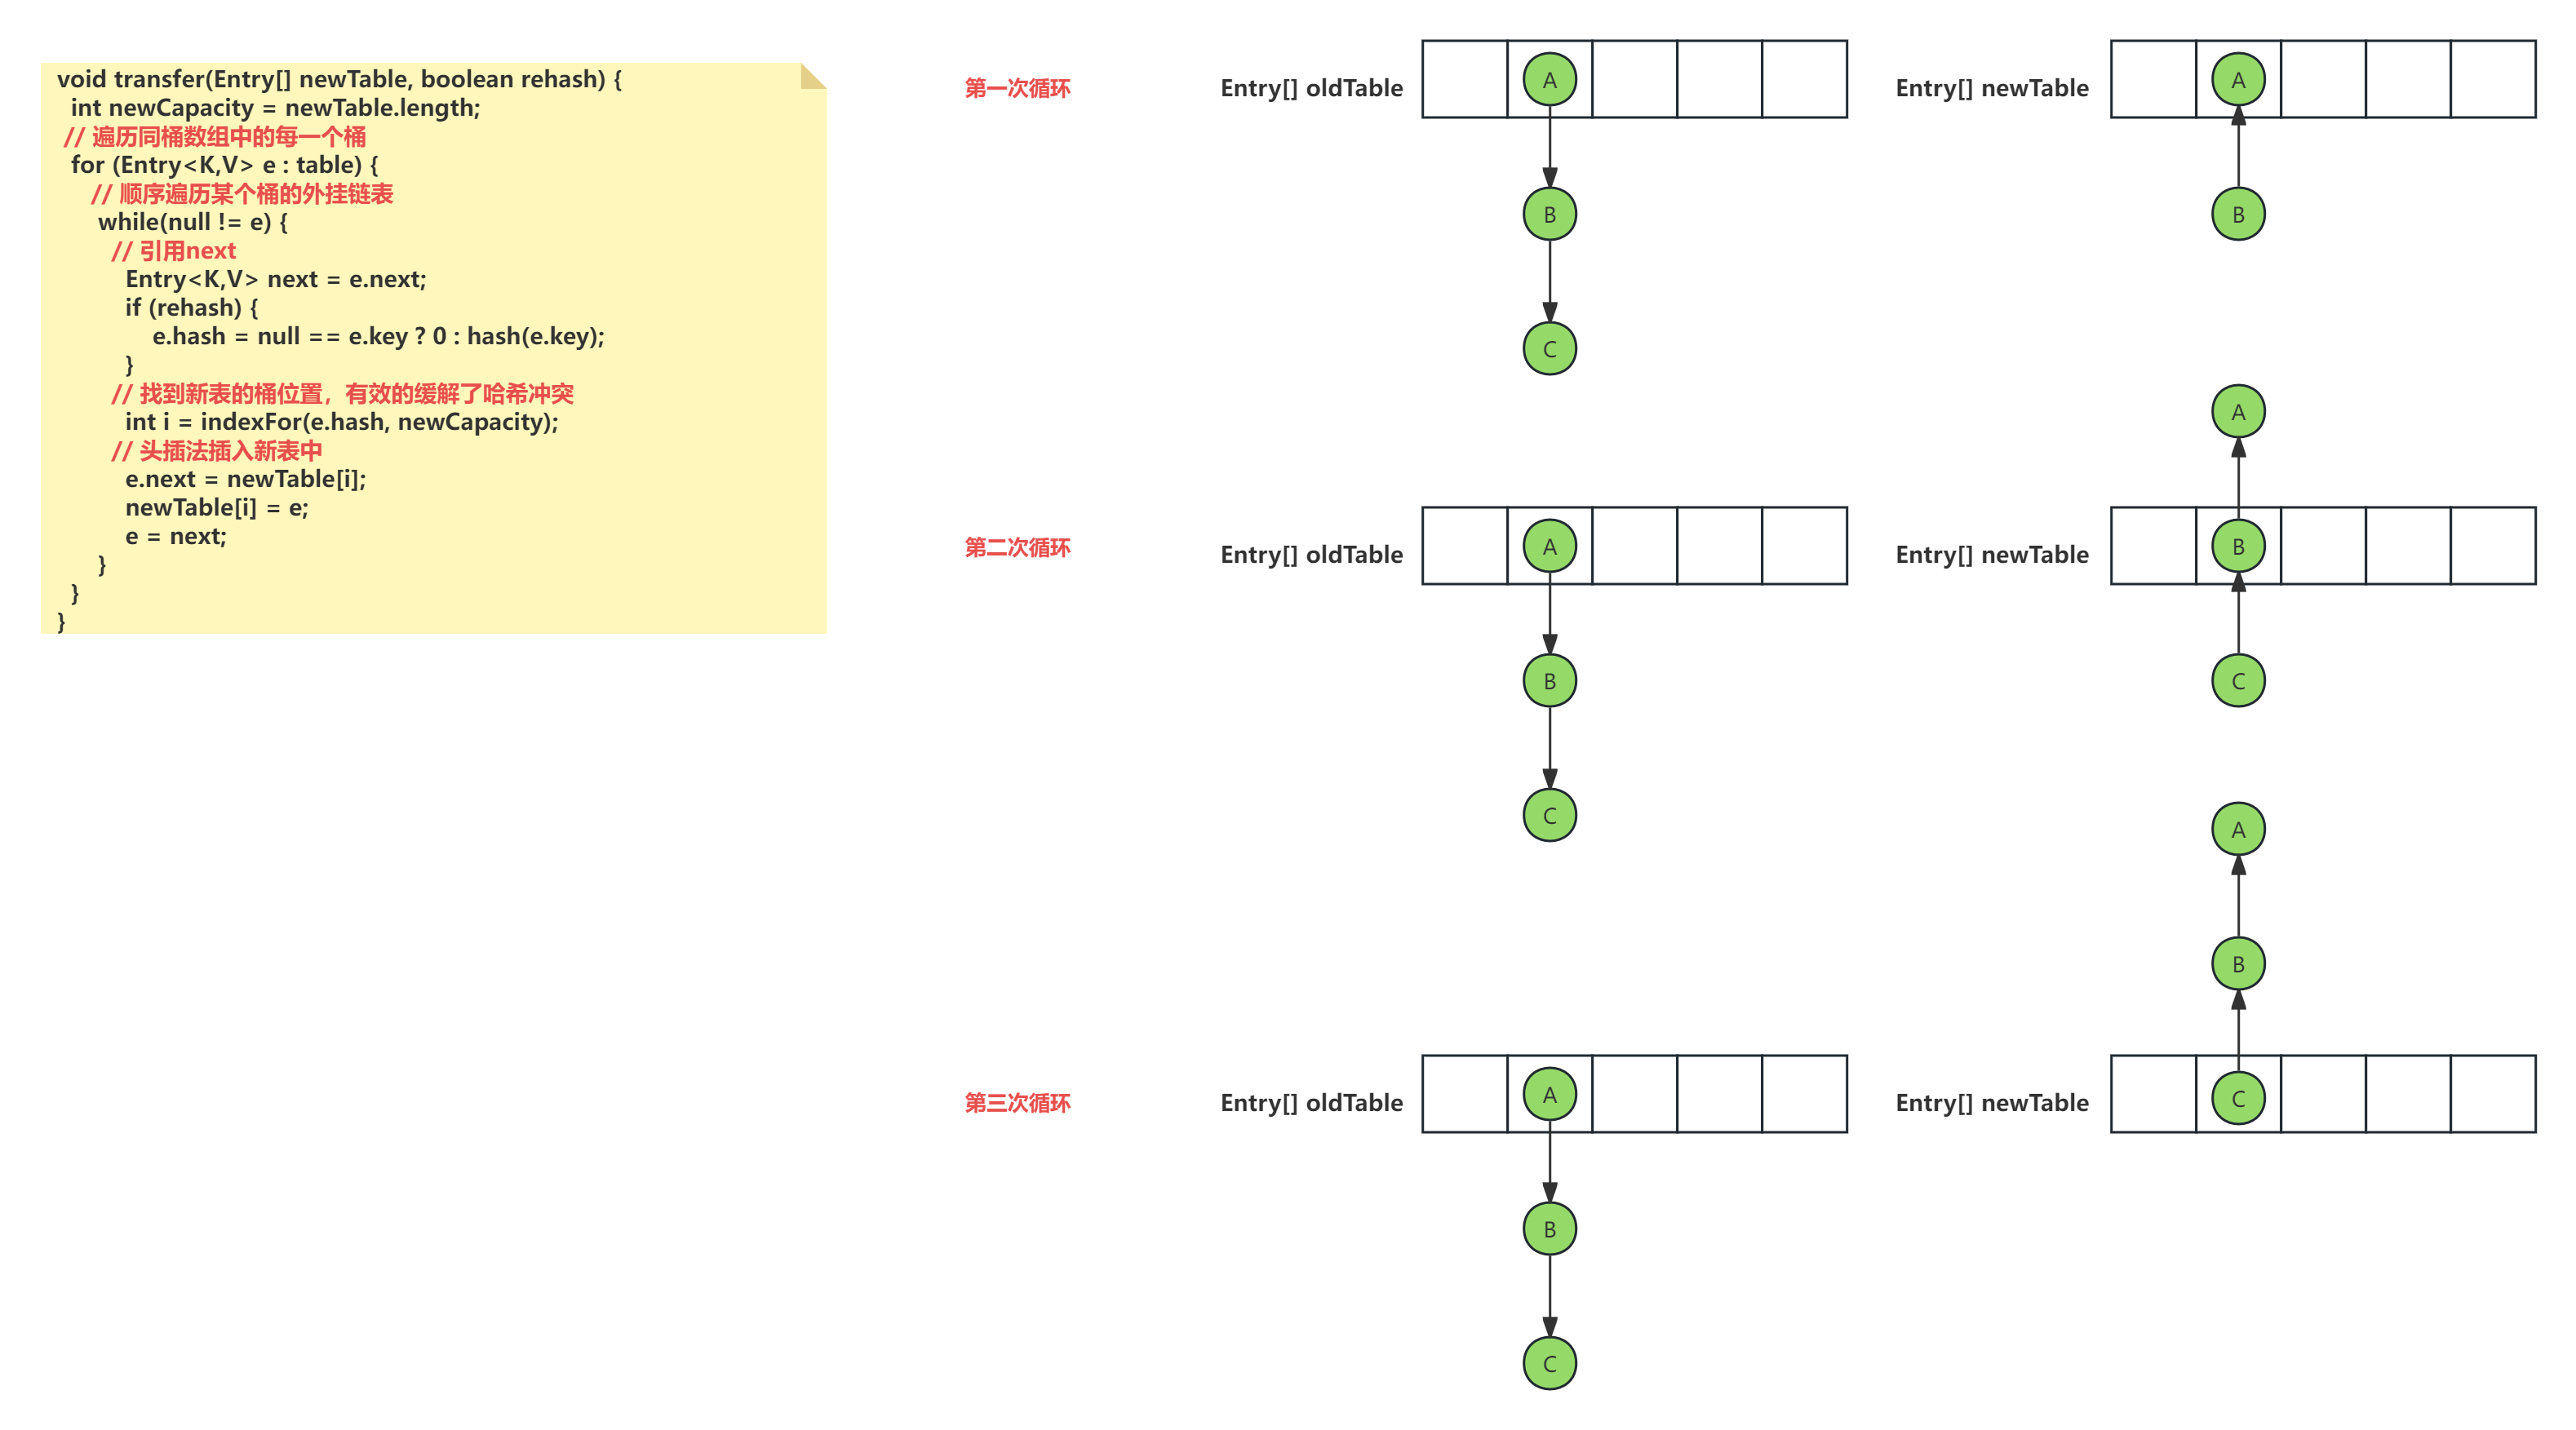
JDK1.7
JDK1.7使用的是头插法,当多线程T1,T2执行resize()中的transfer()方法扩容时,当前T1,T2指向:
1
2T1 -> A,T1.NEXT -> B;
T2 -> A,T2.NEXT -> B,而这时T2线程休眠,T1线程执行扩容程序,本来原本的链表顺序是
A -> B -> C,因为是头插法,转移新的链表顺序是C -> B -> A,此时T2程序唤醒,T2指向没有改变,因为 T1 执行完扩容之后 B 节点的下一个节点是 A,而 T2 线程指向的首节点是 A,第二个节点是 B,这个顺序刚好和 T1 扩完容完之后的节点顺序是相反的。T1 执行完之后的顺序是 B 到 A,而 T2 的顺序是 A 到 B,这样 A 节点和 B 节点就形成死循环了,这就是 HashMap 死循环导致的原因。1
2
3
4
5
6
7
8
9
10
11
12
13
14
15
16
17
18
19
20
21
22
23/**
* Transfers all entries from current table to newTable.
*/
void transfer(Entry[] newTable, boolean rehash) {
int newCapacity = newTable.length;
// 遍历同桶数组中的每一个桶
for (Entry<K,V> e : table) {
// 顺序遍历某个桶的外挂链表
while(null != e) {
// 引用next
Entry<K,V> next = e.next;
if (rehash) {
e.hash = null == e.key ? 0 : hash(e.key);
}
// 找到新表的桶位置;原桶数组中的某个桶上的同一链表中的Entry此刻可能被分散到不同的桶中去了,有效的缓解了哈希冲突。
int i = indexFor(e.hash, newCapacity);
// 头插法插入新表中
e.next = newTable[i];
newTable[i] = e;
e = next;
}
}
}
JDK1.8
如果线程A和线程B同时进行put操作,刚好这两条不同的数据hash值一样,并且该位置数据为null,所以这线程A、B都会进入第6行代码(
if ((p = tab[i = (n - 1) & hash]) == null))中。假设一种情况,线程A进入后还未进行数据插入时挂起,而线程B正常执行,从而正常插入数据,然后线程A获取CPU时间片,此时线程A不用再进行hash判断了,问题出现:线程A会把线程B插入的数据给覆盖,发生线程不安全。1
2
3
4
5
6
7
8
9
10
11
12
13
14
15
16
17
18
19
20
21
22
23
24
25
26
27
28
29
30
31
32
33
34
35
36
37
38
39
40
41
42
43
44
45
46
47
48
49
50
51
52/**
* Implements Map.put and related methods
*
* @param hash hash for key
* @param key the key
* @param value the value to put
* @param onlyIfAbsent if true, don't change existing value
* @param evict if false, the table is in creation mode.
* @return previous value, or null if none
*/
final V putVal(int hash, K key, V value, boolean onlyIfAbsent,
boolean evict) {
Node<K,V>[] tab; Node<K,V> p; int n, i;
if ((tab = table) == null || (n = tab.length) == 0)
n = (tab = resize()).length;
if ((p = tab[i = (n - 1) & hash]) == null)
tab[i] = newNode(hash, key, value, null);
else {
Node<K,V> e; K k;
if (p.hash == hash &&
((k = p.key) == key || (key != null && key.equals(k))))
e = p;
else if (p instanceof TreeNode)
e = ((TreeNode<K,V>)p).putTreeVal(this, tab, hash, key, value);
else {
for (int binCount = 0; ; ++binCount) {
if ((e = p.next) == null) {
p.next = newNode(hash, key, value, null);
if (binCount >= TREEIFY_THRESHOLD - 1) // -1 for 1st
treeifyBin(tab, hash);
break;
}
if (e.hash == hash &&
((k = e.key) == key || (key != null && key.equals(k))))
break;
p = e;
}
}
if (e != null) { // existing mapping for key
V oldValue = e.value;
if (!onlyIfAbsent || oldValue == null)
e.value = value;
afterNodeAccess(e);
return oldValue;
}
}
++modCount;
if (++size > threshold)
resize();
afterNodeInsertion(evict);
return null;
}
总结
- HashMap的底层是个Node数组(Node<K,V>[] table),在数组的具体索引位置,如果存在多个节点,则可能是以链表或红黑树的形式存在。
- 增加、删除、查找键值对时,定位到哈希桶数组的位置是很关键的一步,源码中是通过下面3个操作来完成这一步:1)拿到key的hashCode值;2)将hashCode的高位参与运算,重新计算hash值;3)将计算出来的hash值与(table.length - 1)进行&运算。
- HashMap的默认初始容量(capacity)是16,capacity必须为2的幂次方;默认负载因子(load factor)是0.75;实际能存放的节点个数(threshold,即触发扩容的阈值)= capacity * load factor。
- HashMap在触发扩容后,阈值会变为原来的2倍,容量也会变成原来的2倍,并且会进行重hash,重hash后索引位置index的节点的新分布位置最多只有两个:原索引位置或原索引+oldCap位置。例如capacity为16,索引位置5的节点扩容后,只可能分布在新报索引位置5和索引位置21(5+16)。
- 导致HashMap扩容后,同一个索引位置的节点重hash最多分布在两个位置的根本原因是:1)table的长度始终为2的n次方;2)索引位置的计算方法为“(table.length - 1) & hash”。HashMap扩容是一个比较耗时的操作,定义HashMap时尽量给个接近的初始容量值。
- HashMap有threshold属性和loadFactor属性,但是没有capacity属性。初始化时,如果传了初始化容量值,该值是存在threshold变量,并且Node数组是在第一次put时才会进行初始化,初始化时会将此时的threshold值作为新表的capacity值,然后用capacity和loadFactor计算新表的真正threshold值。
- 当同一个索引位置的节点在增加后达到9个时,会触发链表节点(Node)转红黑树节点(TreeNode,间接继承Node),转成红黑树节点后,其实链表的结构还存在,通过next属性维持。链表节点转红黑树节点的具体方法为源码中的treeifyBin(Node<K,V>[] tab, int hash)方法。
- 当同一个索引位置的节点在移除后达到6个时,并且该索引位置的节点为红黑树节点,会触发红黑树节点转链表节点。红黑树节点转链表节点的具体方法为源码中的untreeify(HashMap<K,V> map)方法。
- HashMap在JDK1.8之后不再有死循环的问题,JDK1.8之前存在死循环的根本原因是在扩容后同一索引位置的节点顺序会反掉。
- HashMap是非线程安全的,在并发场景下使用ConcurrentHashMap来代替。
其他文章
HashMap1.7 vs 1.8 / HashMap 在 JDK 1.8 后新增的红黑树结构 / HashMap面试题总结 / Java源码分析:HashMap 1.8 相对于1.7 到底更新了什么
HashMap与HashTable
HashMap与HashTable是Map接口的两个典型实现,它们之间的关系完全类似于ArrayList与Vertor。HashTable是一个古老的Map实现类,它提供的方法比较繁琐,目前基本不用了,HashMap与HashTable主要存在以下两个典型区别:
- HashMap是线程不安全,HashTable是线程安全的。
- HashMap可以使用null值最为key或value;HashTable不允许使用null值作为key和value,如果把null放进HashTable中,将会发生空指针异常。
为了成功的在HashMap和HashTable中存储和获取对象,用作key的对象必须实现hashCode()方法和equals()方法。
LinkedHashMap
LinkedHashMap使用双向链表来维护key-value对的次序(其实只需要考虑key的次序即可),该链表负责维护Map的迭代顺序,与插入顺序一致,因此性能比HashMap低,但在迭代访问Map里的全部元素时有较好的性能。
TreeMap
TreeMap是SortedMap的实现类,是一个红黑树的数据结构,每个key-value对作为红黑树的一个节点。TreeMap存储key-value对时,需要根据key对节点进行排序。TreeMap也有两种排序方式:
- 自然排序:TreeMap的所有key必须实现Comparable接口,而且所有的key应该是同一个类的对象,否则会抛出ClassCastException。
- 定制排序:创建TreeMap时,传入一个Comparator对象,该对象负责对TreeMap中的所有key进行排序。
Iterator
Iterator是一个接口,它是集合的迭代器。集合可以通过Iterator去遍历集合中的元素。Iterator提供的API接口如下:
- boolean hasNext():判断集合里是否存在下一个元素。如果有,hasNext()方法返回 true。
- Object next():返回集合里下一个元素。
- void remove():删除集合里上一次next方法返回的元素。
ListIterator接口继承Iterator接口,提供了专门操作List的方法。ListIterator接口在Iterator接口的基础上增加了以下几个方法:
- boolean hasPrevious():判断集合里是否存在上一个元素。如果有,该方法返回 true。
- Object previous():返回集合里上一个元素。
- void add(Object o):在指定位置插入一个元素。
以上两个接口相比较,不难发现,ListIterator增加了向前迭代的功能(Iterator只能向后迭代),ListIterator还可以通过add()方法向List集合中添加元素(Iterator只能删除元素)。
以上摘自Java集合框架概述
Lambda
简介
- lambda表达式可以替代只有一个抽象方法的接口实现,告别匿名内部类,代码看起来更简洁易懂
- lambda表达式同时还提升了对集合、框架的迭代、遍历、过滤数据的操作
- lambda可以极大的减少代码冗余,同时代码的可读性要好过冗长的内部类,匿名类
语法
1 | (Object ... args) -> { |
- ()小括号中根据函数式接口里面抽象的参数个数来决定,可以写任意个参数,如果多个参数,要使用逗号隔开;当参数只有一个的时候,()可以省略
- -> 是一个运算符,表示指向性动作
- {}大括号中的方法体以及 return 返回值的写法和方法一样,当expr逻辑非常简单的时候,{}和return可以省略
使用条件
Lambda 表达式需要函数式接口的支持
- 函数式接口:接口中只有一个抽象方法的接口,称为函数式接口。可以使用注解 @FunctionalInterface 修饰,可以检查是否是函数式接口。
- 函数式接口可以有默认方法和静态方法。
- 任何满足单一抽象方法法则的接口,都会被自动视为函数接口。这包括 Runnable 和 Callable 等传统接口,以及您自己构建的自定义接口。
函数式接口
| 函数式接口 | 参数类型 | 返回类型 | 用途 |
|---|---|---|---|
| Consumer |
T | void | 对类型为T的对象应用操作。void accept(T t); |
| Supplier |
无 | T | 返回类型为T的对象。 T get(); |
| Function<T, R>(函数型接口) | T | R | 对类型为T的对象应用操作并返回R类型的对象。R apply(T t); |
| Predicate |
T | boolean | 确定类型为T的对象是否满足约束。boolean test(T t); |
简写格式
1 | 1. 无参方法,返回值为5 |
方法引用
| 类型 | 语法 | lambda表达式 |
|---|---|---|
| 静态方法引用 | 类名::staticMethod | (args) -> 类名.staticMethod(args) |
| 实例方法引用 | instance::instanceMethod | (args) -> instance.instanceMethod(args) |
| 对象方法引用 | 类名::instanceMethod | (instance, args) -> 类名.instanceMethod(args) |
| 构造方法引用 | 类名::new | (args) -> new 类名(args) |
- 静态方法引用
1 | public class Test { |
- 实例方法引用
1 | public class Test { |
- 对象方法引用
1 | public class Test { |
- 构造方法引用
1 | public class Test { |
Stream API
Stream 是一组用来处理数组,集合的API
Stream特性
- 不是数据结构,没有内部存储
- 不支持索引访问
- 延迟计算
- 支持并行
- 很容易生成数组或集合
- 支持过滤,查找,转换,汇总,聚合等操作
Stream常用API
- 循环 forEach
- 计算 min max count average
- 匹配 anyMatch allMatch noneMatch findFirst findAny
- 汇聚 reduce
- 收集器 toArray collect
案例使用
1 | public class Person { |
JUC
基础概念
程序,进程,线程
- 程序 - Program
- 进程 - Process
- 线程 - Thread
一个进程包含1~n个线程,多个线程共享进程内存空间
线程生命周期

创建线程的四种方式
- 继承Thread类,重写run()方法
- 实现Runnable接口,重写run()方法
- 实现Callable接口,重写call()方法
- Lambda 表达式
1 | package org.spring.study; |
Callable 与 Future
与 Runnable 功能类似,但是多一个返回值,可以通过 Future 来获取返回值。
- Runnable
1 |
|
- Callable
1 |
|
- Future
1 | public interface Future<V> { |
关于 Callable 与 Future 的案例:
1 | public static void main(String[] args) throws ExecutionException, InterruptedException { |
sleep & yield & join & wait & notify
sleep
1 | // 当前线程休眠500毫秒,休眠结束进入就绪状态 |
yield
1 | // 当前线程让出CPU,进入就绪状态 |
join
1 | // 表示让线程t先执行,等待线程t执行完后再执行其他线程 |
wait
1 | synchronized (this) { |
notify / notifyAll
1 | synchronized (this) { |
synchronized
锁的是对象,不能锁String常量、Integer、Long等基础类型。
1 | // 这里synchronized的是当前对象this |
可重入锁
当线程请求一个由其它线程持有的对象锁时,该线程会阻塞,而当线程请求由自己持有的对象锁时,如果该锁是重入锁,请求就会成功,否则阻塞。
synchronized 是可重入锁,针对同一线程,同一对象,也是重量级锁。
重入锁实现可重入性原理或机制是:每一个锁关联一个线程持有者和计数器,当计数器为 0 时表示该锁没有被任何线程持有,那么任何线程都可能获得该锁而调用相应的方法;当某一线程请求成功后,JVM会记下锁的持有线程,并且将计数器置为 1;此时其它线程请求该锁,则必须等待;而该持有锁的线程如果再次请求这个锁,就可以再次拿到这个锁,同时计数器会递增;当线程退出同步代码块时,计数器会递减,如果计数器为 0,则释放该锁。
程序之中如果出现异常,锁会被释放
非公平锁
Synchronized 是一种非公平锁,它选择要获得锁的线程是随机的,而不考虑等待时间的长短。这就意味着一个线程可能会连续获取到锁,而其他线程需要一直等待,这就造成了线程的不公平竞争。
锁升级
[无锁] -> [偏向锁(markword 记录这个线程ID)] -竞争-> [自旋锁] -10次以后-> [重量级锁]
线程数少 - 自旋锁
线程数多 - 重量级锁
操作消耗时间长 - 重量级锁
锁优化
锁细化
锁粒度细化,要锁的东西加锁就好
锁粗化
锁粒度粗化,当存在很多锁的时候,可以粗化些锁
volatile
volatile不能替代synchronized,不能保证原子性
保证线程可见性
线程之间对同一个变量的操作不可见,则会导致线程t1对变量的更改,而线程t2不知道
底层使用 MESI 缓存一致性协议
不能保证线程原子性
禁止指令重排序
例子:DCL单例
CAS
Compare And Swap 自旋 乐观锁
AtomicXXX 底层由CAS实现
cas(V, Expected, NewValue)
- V 被修改的对象(基础类型没有ABA问题)
- Expected 期望值
- NewValue 新的值
例:cas(o, 1, 2); 当整型o的值是期望值1时,将1改为2
Unsafe类底层实现
1 | public final int getAndAddInt(Object var1, long var2, int var4) { |
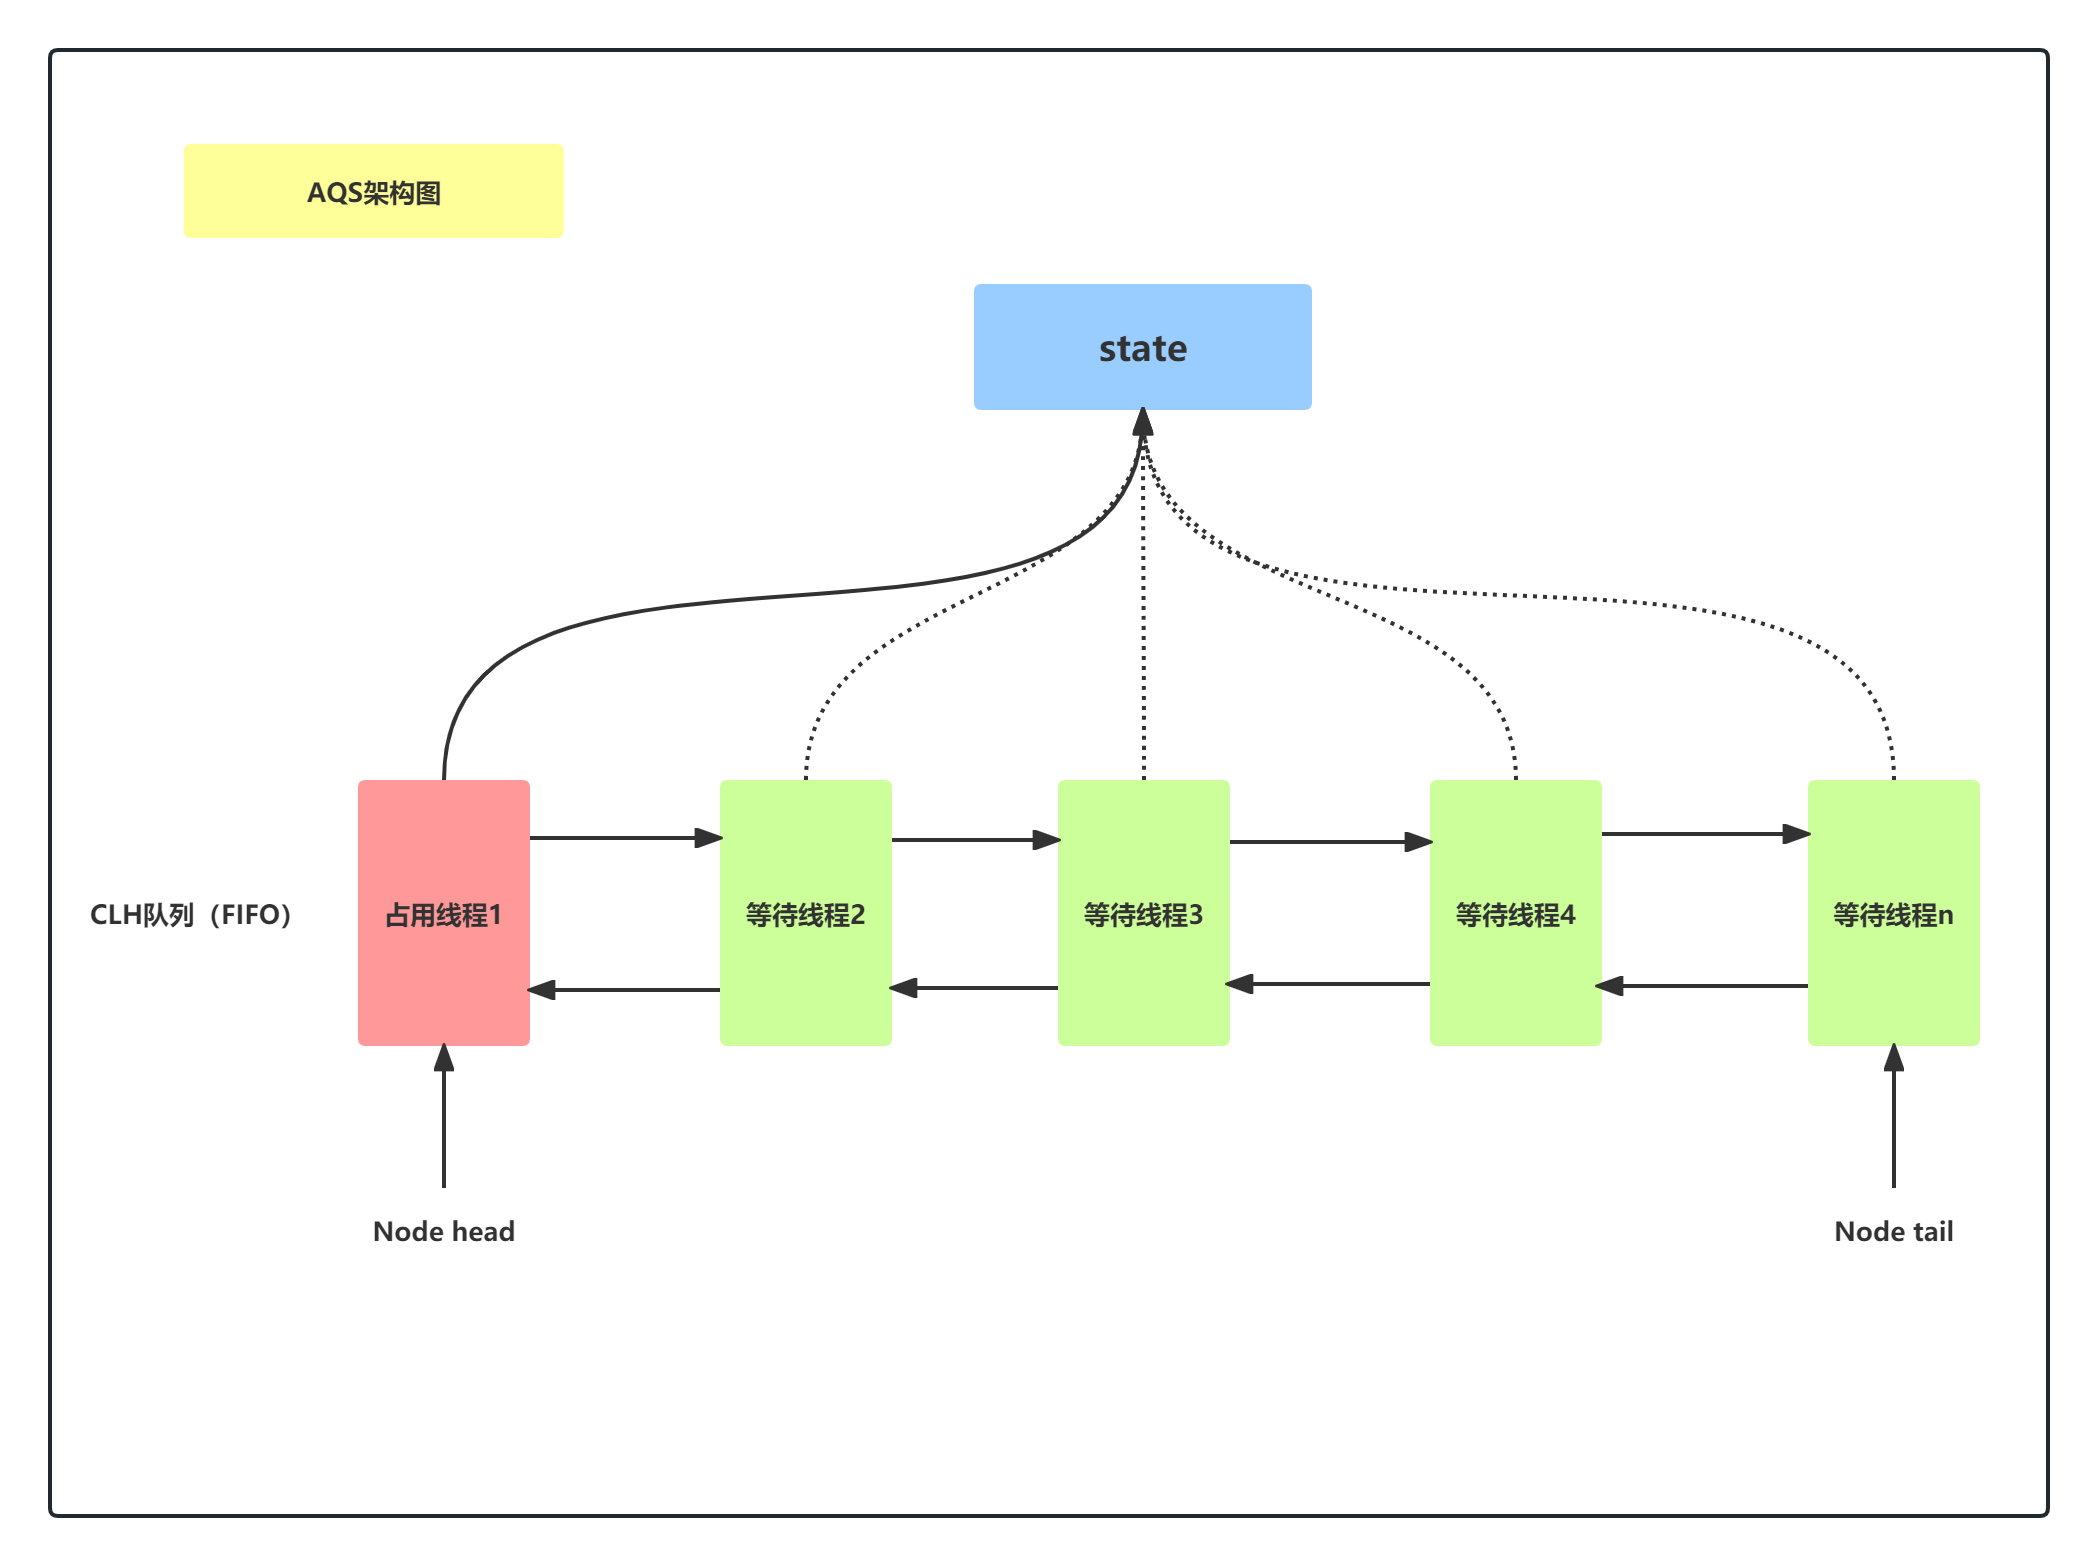
AQS
AbstractQueuedSynchronizer
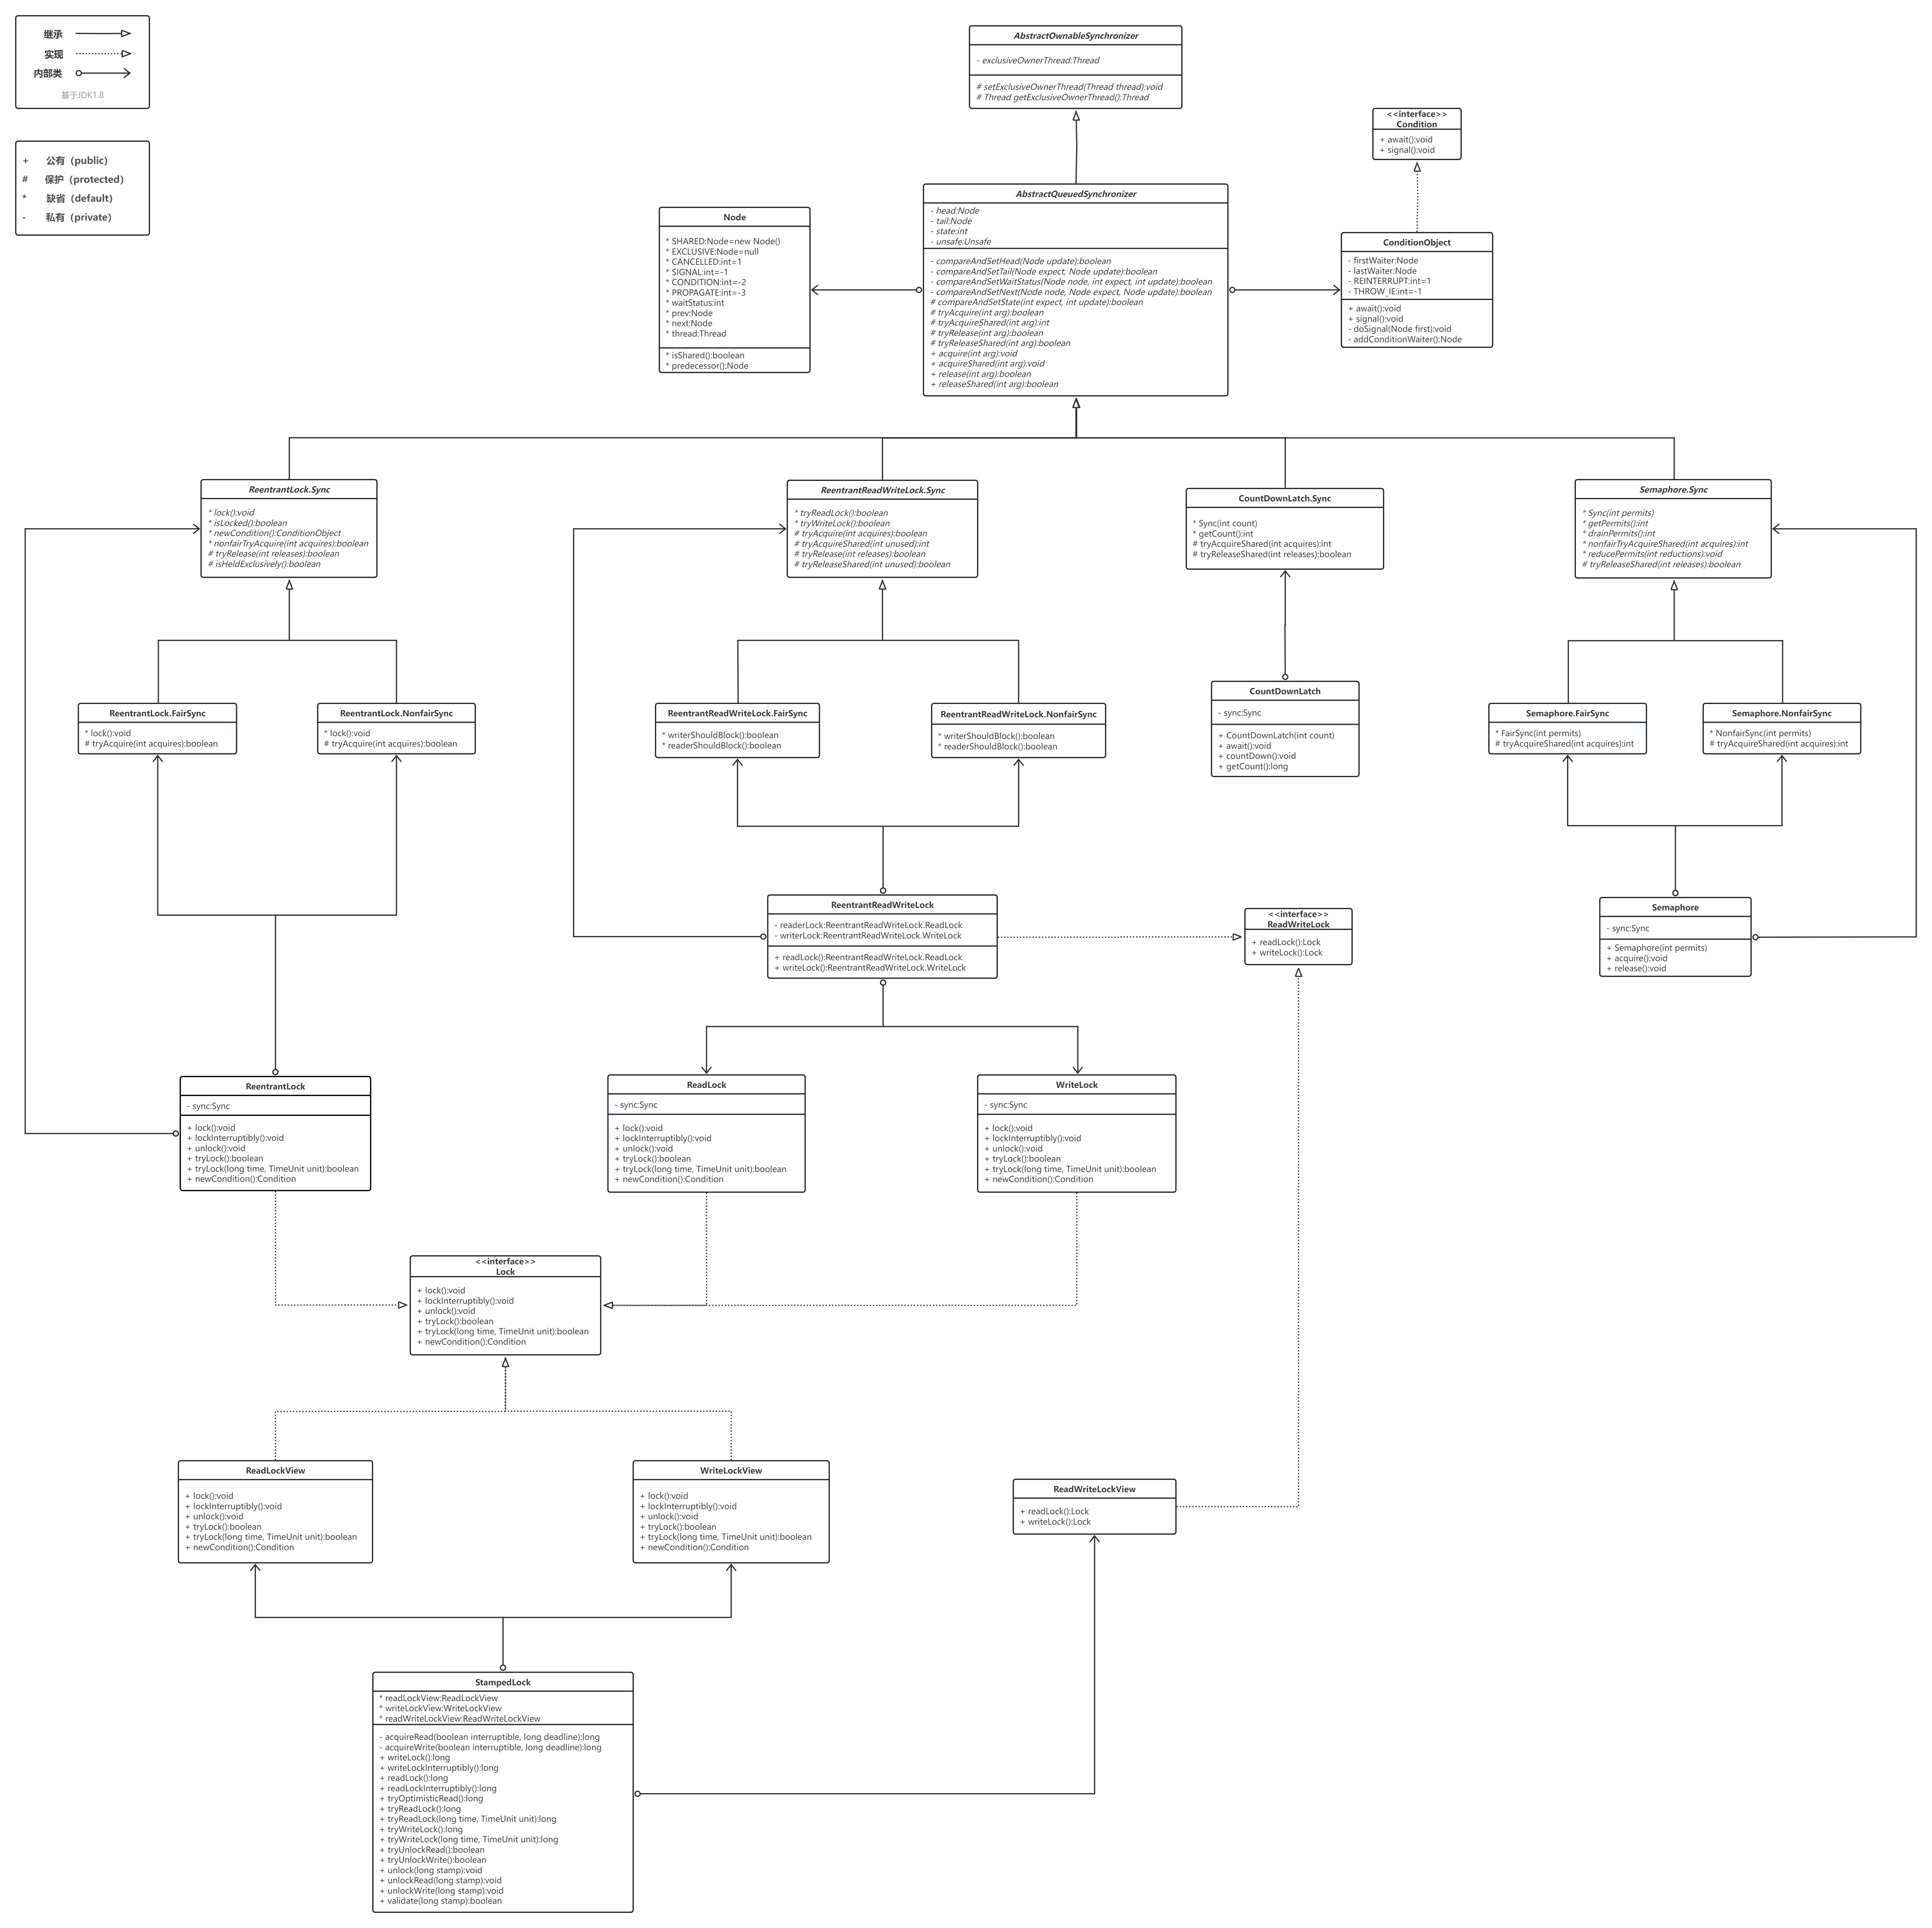
概论
volatile int state + 监控state的CLH队列(双向链表-FIFO),每个node装的是线程
- State
1 | /** |
- Node
1 | static final class Node { |
资源共享方式
Exclusive
独占,只有一个线程能执行,如ReentrantLock。
Share
共享,多个线程可同时执行,如Semaphore / CountDownLatch。
state的访问方式
getState()
返回同步状态(state)当前值
1
2
3
4
5
6
7
8/**
* Returns the current value of synchronization state.
* This operation has memory semantics of a {@code volatile} read.
* @return current state value
*/
protected final int getState() {
return state;
}setState()
设置同步状态(state)值
1
2
3
4
5
6
7
8/**
* Sets the value of synchronization state.
* This operation has memory semantics of a {@code volatile} write.
* @param newState the new state value
*/
protected final void setState(int newState) {
state = newState;
}compareAndSetState()
如果当前同步状态(state)是期望的expect值,则将同步状态(state)的值设置为update值。(CAS操作)
1
2
3
4
5
6
7
8
9
10
11
12
13
14
15/**
* Atomically sets synchronization state to the given updated
* value if the current state value equals the expected value.
* This operation has memory semantics of a {@code volatile} read
* and write.
*
* @param expect the expected value
* @param update the new value
* @return {@code true} if successful. False return indicates that the actual
* value was not equal to the expected value.
*/
protected final boolean compareAndSetState(int expect, int update) {
// See below for intrinsics setup to support this
return unsafe.compareAndSwapInt(this, stateOffset, expect, update);
}
自定义同步器
不同的自定义同步器争用共享资源的方式也不同。 自定义同步器在实现时只需要实现共享资源state的获取与释放方式即可 ,至于具体线程等待队列的维护(如获取资源失败入队/唤醒出队等),AQS已经在顶层实现好了。自定义同步器实现时主要实现以下几种方法:
tryAcquire(int)
独占方式。尝试获取资源,成功则返回true,失败则返回false。
tryRelease(int)
独占方式。尝试释放资源,成功则返回true,失败则返回false。
tryAcquireShared(int)
共享方式。尝试获取资源。负数表示失败;0表示成功,但没有剩余可用资源;正数表示成功,且有剩余资源。
tryReleaseShared(int)
共享方式。尝试释放资源,如果释放后允许唤醒后续等待结点返回true,否则返回false。
isHeldExclusively()
该线程是否正在独占资源。只有用到condition才需要去实现它。
以ReentrantLock为例,state初始化为0,表示未锁定状态。A线程lock()时,会调用tryAcquire()独占该锁并将state+1。此后,其他线程再tryAcquire()时就会失败,直到A线程unlock()到state=0(即释放锁)为止,其它线程才有机会获取该锁。当然,释放锁之前,A线程自己是可以重复获取此锁的(state会累加),这就是可重入的概念。但要注意,获取多少次就要释放多么次,这样才能保证state是能回到零态的。
再以CountDownLatch以例,任务分为N个子线程去执行,state也初始化为N(注意N要与线程个数一致)。这N个子线程是并行执行的,每个子线程执行完后countDown()一次,state会CAS减1。等到所有子线程都执行完后(即state=0),会unpark()主调用线程,然后主调用线程就会从await()函数返回,继续后余动作。
一般来说,自定义同步器要么是独占方法,要么是共享方式,他们也只需实现tryAcquire-tryRelease、tryAcquireShared-tryReleaseShared中的一种即可。但AQS也支持自定义同步器同时实现独占和共享两种方式,如ReentrantReadWriteLock。
部分摘自 Java并发之AQS详解
Lock
ReentrantLock
- 可重入锁
- 底层是CAS
- 可以tryLock()
- 可以有公平锁(排队)
- 可以替代sync,但是需要解锁,写在finally
源码分析
基于JDK1.8
AbstractQueuedSynchronizer
1
2
3
4
5
6
7
8
9
10
11
12
13
14
15
16
17
18
19
20
21
22
23
24
25
26
27
28
29
30
31
32
33
34
35
36
37
38
39
40
41
42
43
44
45
46
47
48
49
50
51
52
53
54
55
56
57
58
59
60
61
62
63
64
65
66
67
68
69
70
71
72
73
74
75
76
77
78
79
80
81
82
83
84
85
86
87
88
89
90
91
92
93
94
95
96
97
98
99
100
101
102
103
104
105
106
107
108
109
110
111
112
113
114
115
116
117
118
119
120
121
122
123
124
125
126
127
128
129
130
131
132
133
134
135
136
137
138
139
140
141
142
143
144
145
146
147
148
149
150
151
152
153
154
155
156
157
158
159
160
161
162
163
164
165
166
167
168
169
170
171
172public abstract class AbstractQueuedSynchronizer
extends AbstractOwnableSynchronizer {
/**
* <p>To enqueue into a CLH lock, you atomically splice it in as new
* tail. To dequeue, you just set the head field.
* <pre>
* +------+ prev +-----+ +-----+
* head | | <---- | | <---- | | tail
* +------+ +-----+ +-----+
* </pre>
*/
static final class Node {
/** Marker to indicate a node is waiting in shared mode */
static final Node SHARED = new Node();
/** Marker to indicate a node is waiting in exclusive mode */
static final Node EXCLUSIVE = null;
/** waitStatus value to indicate thread has cancelled */
static final int CANCELLED = 1;
/** waitStatus value to indicate successor's thread needs unparking */
static final int SIGNAL = -1;
/** waitStatus value to indicate thread is waiting on condition */
static final int CONDITION = -2;
/** waitStatus value to indicate the next acquireShared should unconditionally propagate */
static final int PROPAGATE = -3;
volatile int waitStatus;
volatile Node prev;
volatile Node next;
volatile Thread thread;
Node nextWaiter;
...
}
private transient volatile Node head;// 头节点
private transient volatile Node tail;// 尾节点
private volatile int state;// AQS核心参数变量state
// 核心acquire方法,用于获取锁资源
public final void acquire(int arg) {
// 模板方法,交由子类实现
// 1. 先去尝试抢锁,抢锁成功返回true,抢锁失败进入第二步
// 2. 抢锁失败将线程加入队列尾部排队(入队)
// 3. 让线程在队列中排队并等待获取锁(自旋)
if (!tryAcquire(arg) &&
acquireQueued(addWaiter(Node.EXCLUSIVE), arg))
selfInterrupt();// 若等待过程中被中断,补上中断标记
}
// 核心release方法,用于释放锁资源
public final boolean release(int arg) {
// 模板方法,交由子类实现
if (tryRelease(arg)) {
Node h = head;// 获取同步队列的头节点
if (h != null && h.waitStatus != 0)
unparkSuccessor(h);// 唤醒后继节点
return true;
}
return false;
}
// 加入队列尾部排队
private Node addWaiter(Node mode) {
Node node = new Node(Thread.currentThread(), mode);// 创建节点
Node pred = tail;
if (pred != null) {// 队列非空,尝试快速插入尾部
node.prev = pred;
if (compareAndSetTail(pred, node)) {// CAS 更新尾指针
pred.next = node;
return node;
}
}
enq(node);// 队列为空或 CAS 失败,通过自旋插入
return node;
}
// 队列中自旋等待锁
final boolean acquireQueued(final Node node, int arg) {
boolean failed = true;
try {
boolean interrupted = false;
for (;;) {// 自旋循环
final Node p = node.predecessor();// 获取前驱节点
if (p == head && tryAcquire(arg)) {// 只有前驱是头节点才尝试获取锁
setHead(node);// 成功获取,设置为新头节点(原头出队)
p.next = null; // help GC
failed = false;
return interrupted;// 返回中断状态
}
if (shouldParkAfterFailedAcquire(p, node) && // 是否需要挂起
parkAndCheckInterrupt())// 挂起线程,并检查中断状态
interrupted = true;// 标记中断状态
}
} finally {
if (failed)
cancelAcquire(node);// 异常处理(如取消获取)
}
}
// 判断是否需要挂起
private static boolean shouldParkAfterFailedAcquire(Node pred, Node node) {
int ws = pred.waitStatus;
if (ws == Node.SIGNAL)// 前驱状态为 SIGNAL,表示会通知当前节点
return true;// 安全挂起
if (ws > 0) {// 前驱已取消(CANCELLED),跳过这些节点
do {
node.prev = pred = pred.prev;// 跳过已取消的节点
} while (pred.waitStatus > 0);
pred.next = node;
} else {
compareAndSetWaitStatus(pred, ws, Node.SIGNAL);// 设置前驱为 SIGNAL
}
return false;
}
// 挂起线程并检查中断
private final boolean parkAndCheckInterrupt() {
LockSupport.park(this);// 挂起当前线程(通过 Unsafe.park()),线程进入 WAITING 状态
return Thread.interrupted();// 返回是否被中断,并清除中断标记,无状态变化
}
// 恢复中断标记,确保中断请求不丢失
static void selfInterrupt() {
Thread.currentThread().interrupt();// 唤醒线程转为 RUNNABLE 状态
}
// 唤醒链表里面的下个节点
private void unparkSuccessor(Node node) {
int ws = node.waitStatus;
if (ws < 0)
compareAndSetWaitStatus(node, ws, 0);// 清除头节点的状态(避免重复唤醒)
Node s = node.next;// 找到第一个未被取消的后继节点
if (s == null || s.waitStatus > 0) {// s.waitStatus > 0 表示节点已取消
s = null;
// 从尾向前遍历,找到离头节点最近的有效节点(避免并发问题)
for (Node t = tail; t != null && t != node; t = t.prev)
if (t.waitStatus <= 0)// 找到最靠前的有效节点
s = t;
}
if (s != null) // 唤醒该节点关联的线程
LockSupport.unpark(s.thread);// 唤醒线程
}
// 存在前驱节点(非当前线程)
public final boolean hasQueuedPredecessors() {
Node t = tail;
Node h = head;
Node s;
return h != t &&
((s = h.next) == null || s.thread != Thread.currentThread());
}
/**
* 模板方法,提供模板,让子类实现
*/
protected boolean tryAcquire(int arg) {
throw new UnsupportedOperationException();
}
protected boolean tryRelease(int arg) {
throw new UnsupportedOperationException();
}
protected int tryAcquireShared(int arg) {
throw new UnsupportedOperationException();
}
protected boolean tryReleaseShared(int arg) {
throw new UnsupportedOperationException();
}
protected boolean isHeldExclusively() {
throw new UnsupportedOperationException();
}
}ReentrantLock
1
2
3
4
5
6
7
8
9
10
11
12
13
14
15
16
17
18
19
20
21
22
23
24
25
26
27
28
29
30
31
32
33
34
35
36
37
38
39
40
41
42
43
44
45
46
47
48
49
50
51
52
53
54
55
56
57
58
59
60
61
62
63
64
65
66
67
68
69
70
71
72
73
74
75
76
77
78
79
80
81
82
83
84
85
86
87
88
89
90
91
92
93
94
95
96
97
98
99
100
101
102
103
104
105
106
107
108
109
110
111
112
113
114
115
116
117
118
119
120
121
122
123
124
125
126
127
128
129
130
131public class ReentrantLock implements Lock {
private final Sync sync;
// 继承AQS类
abstract static class Sync extends AbstractQueuedSynchronizer {
abstract void lock();
// 非公平方式获取锁
final boolean nonfairTryAcquire(int acquires) {
final Thread current = Thread.currentThread(); // 获取当前线程
int c = getState(); // 获取当前state变量
if (c == 0) {// 如果等于0,相当于还没有线程获取到锁
// CAS的方式修改state状态
if (compareAndSetState(0, acquires)) {
// 成功修改,设置为独占,返回成功
setExclusiveOwnerThread(current);
return true;
}
}
else if (current == getExclusiveOwnerThread()) {// 如果当前线程重新来获取锁
// 可重入锁,state + 1
int nextc = c + acquires;
if (nextc < 0) // overflow
throw new Error("Maximum lock count exceeded");
setState(nextc);
return true;
}
return false;
}
// 释放锁
protected final boolean tryRelease(int releases) {
// 释放锁,state - 1
int c = getState() - releases;
// 当前线程不是独占,抛异常
if (Thread.currentThread() != getExclusiveOwnerThread())
throw new IllegalMonitorStateException();
boolean free = false;
if (c == 0) {
free = true;
setExclusiveOwnerThread(null);// state 为 0 ,释放锁成功,将独占线程清空
}
setState(c);
return free;
}
// 是否独占
protected final boolean isHeldExclusively() {
// While we must in general read state before owner,
// we don't need to do so to check if current thread is owner
return getExclusiveOwnerThread() == Thread.currentThread();
}
...
}
// 非公平锁实现类
static final class NonfairSync extends Sync {
private static final long serialVersionUID = 7316153563782823691L;
final void lock() {
// 上来先用CAS方式抢锁
if (compareAndSetState(0, 1))
// 抢成功设置独占
setExclusiveOwnerThread(Thread.currentThread());
else
// 否则调用AQS获取锁的代码
acquire(1);
}
// 使用非公平方式抢锁
protected final boolean tryAcquire(int acquires) {
return nonfairTryAcquire(acquires);
}
}
// 公平锁的实现类
static final class FairSync extends Sync {
final void lock() {
acquire(1);
}
// 公平方式抢锁
protected final boolean tryAcquire(int acquires) {
final Thread current = Thread.currentThread(); // 获取当前线程
int c = getState(); // 获取当前state变量
if (c == 0) {// 如果等于0,相当于还没有线程获取到锁
if (!hasQueuedPredecessors() && // 检查是否有前驱节点等待
compareAndSetState(0, acquires)) {// CAS 设置状态
// 成功修改,设置为独占,返回成功
setExclusiveOwnerThread(current);
return true;
}
}
else if (current == getExclusiveOwnerThread()) {// 如果当前线程重新来获取锁
// 可重入锁,state + 1
int nextc = c + acquires;
if (nextc < 0)
throw new Error("Maximum lock count exceeded");
setState(nextc);
return true;
}
return false;
}
}
// 默认非公平锁
public ReentrantLock() {
sync = new NonfairSync();
}
// 可传入参数公平还是非公平锁
public ReentrantLock(boolean fair) {
sync = fair ? new FairSync() : new NonfairSync();
}
// 加锁
public void lock() {
// 调用 Sync 的 lock 方法
sync.lock();
}
// 释放锁
public void unlock() {
// 调用 AQS 的 release 方法
sync.release(1);
}
}
使用方法
1 | import java.util.concurrent.TimeUnit; |
CountDownLatch
1 | public class T06_TestCountDownLatch { |
CyclicBarrier
1 | public class T07_TestCyclicBarrier { |
Phaser
1 | public class T08_TestPhaser { |
ReadWriteLock
1 | public class T10_TestReadWriteLock { |
Semaphore
1 | public class T11_TestSemaphore { |
Exchanger
1 | public class T12_TestExchanger { |
LockSupport
1 | public class T13_TestLockSupport { |
线程池
线程池继承关系图
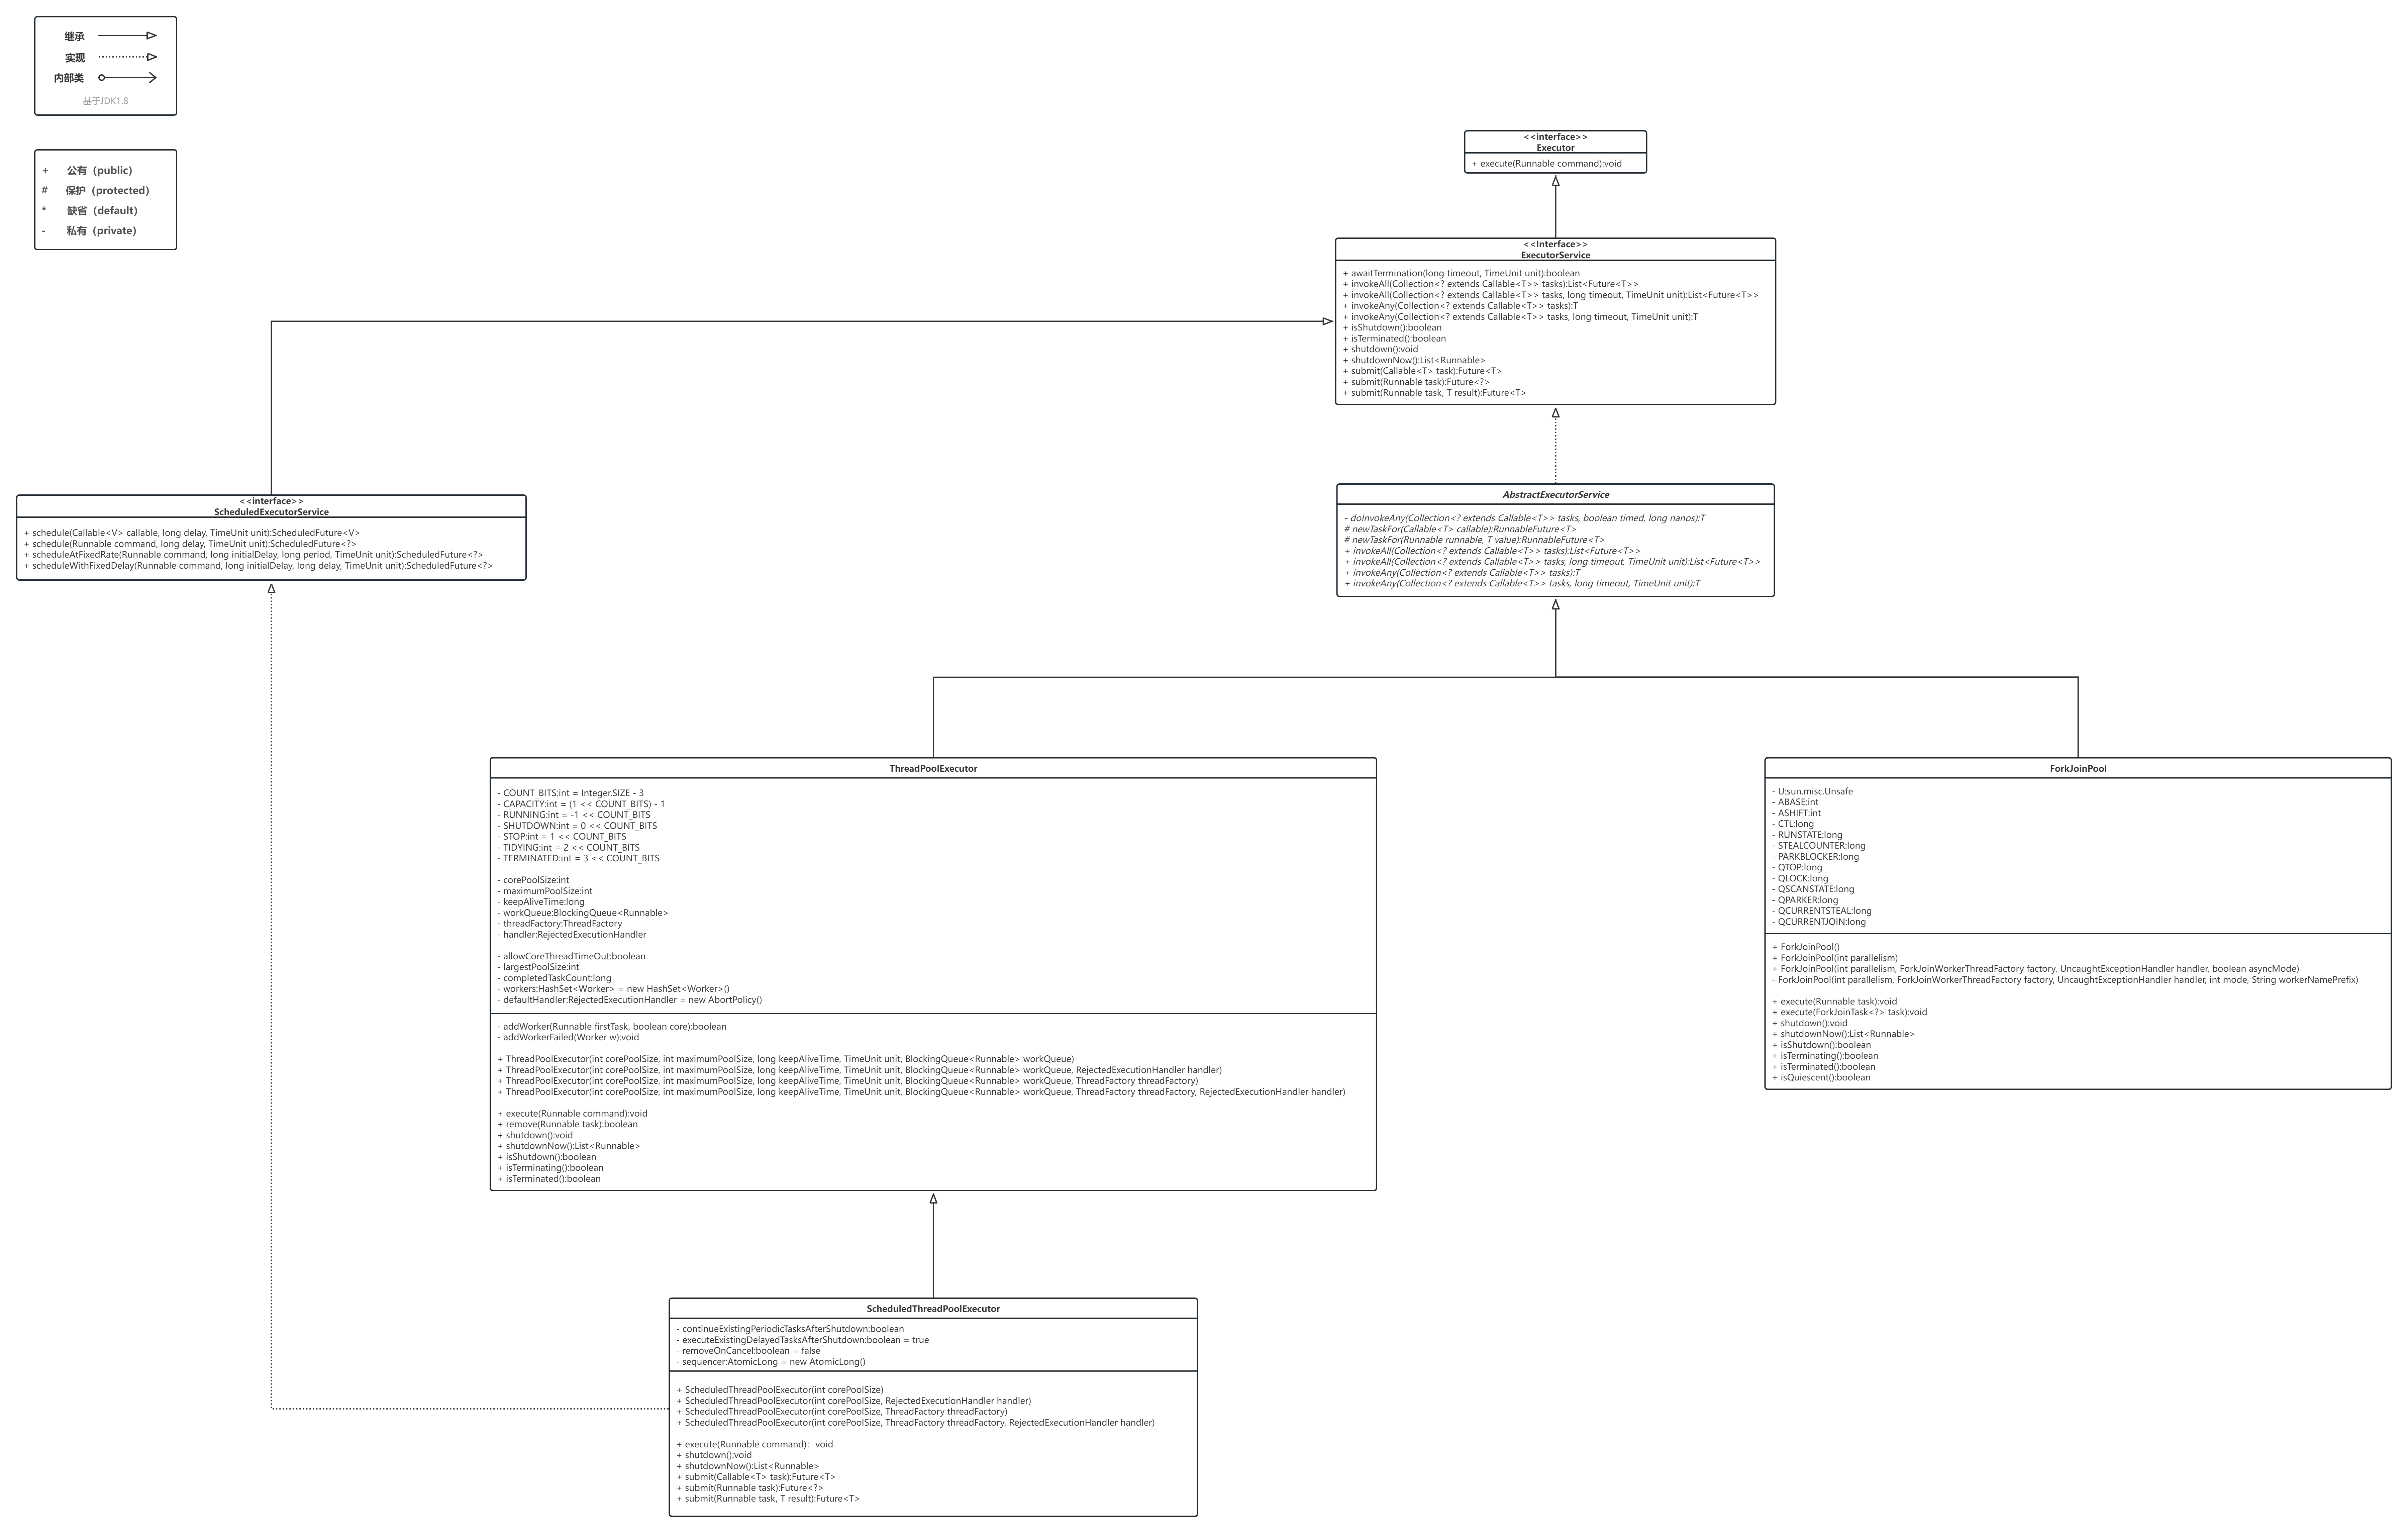
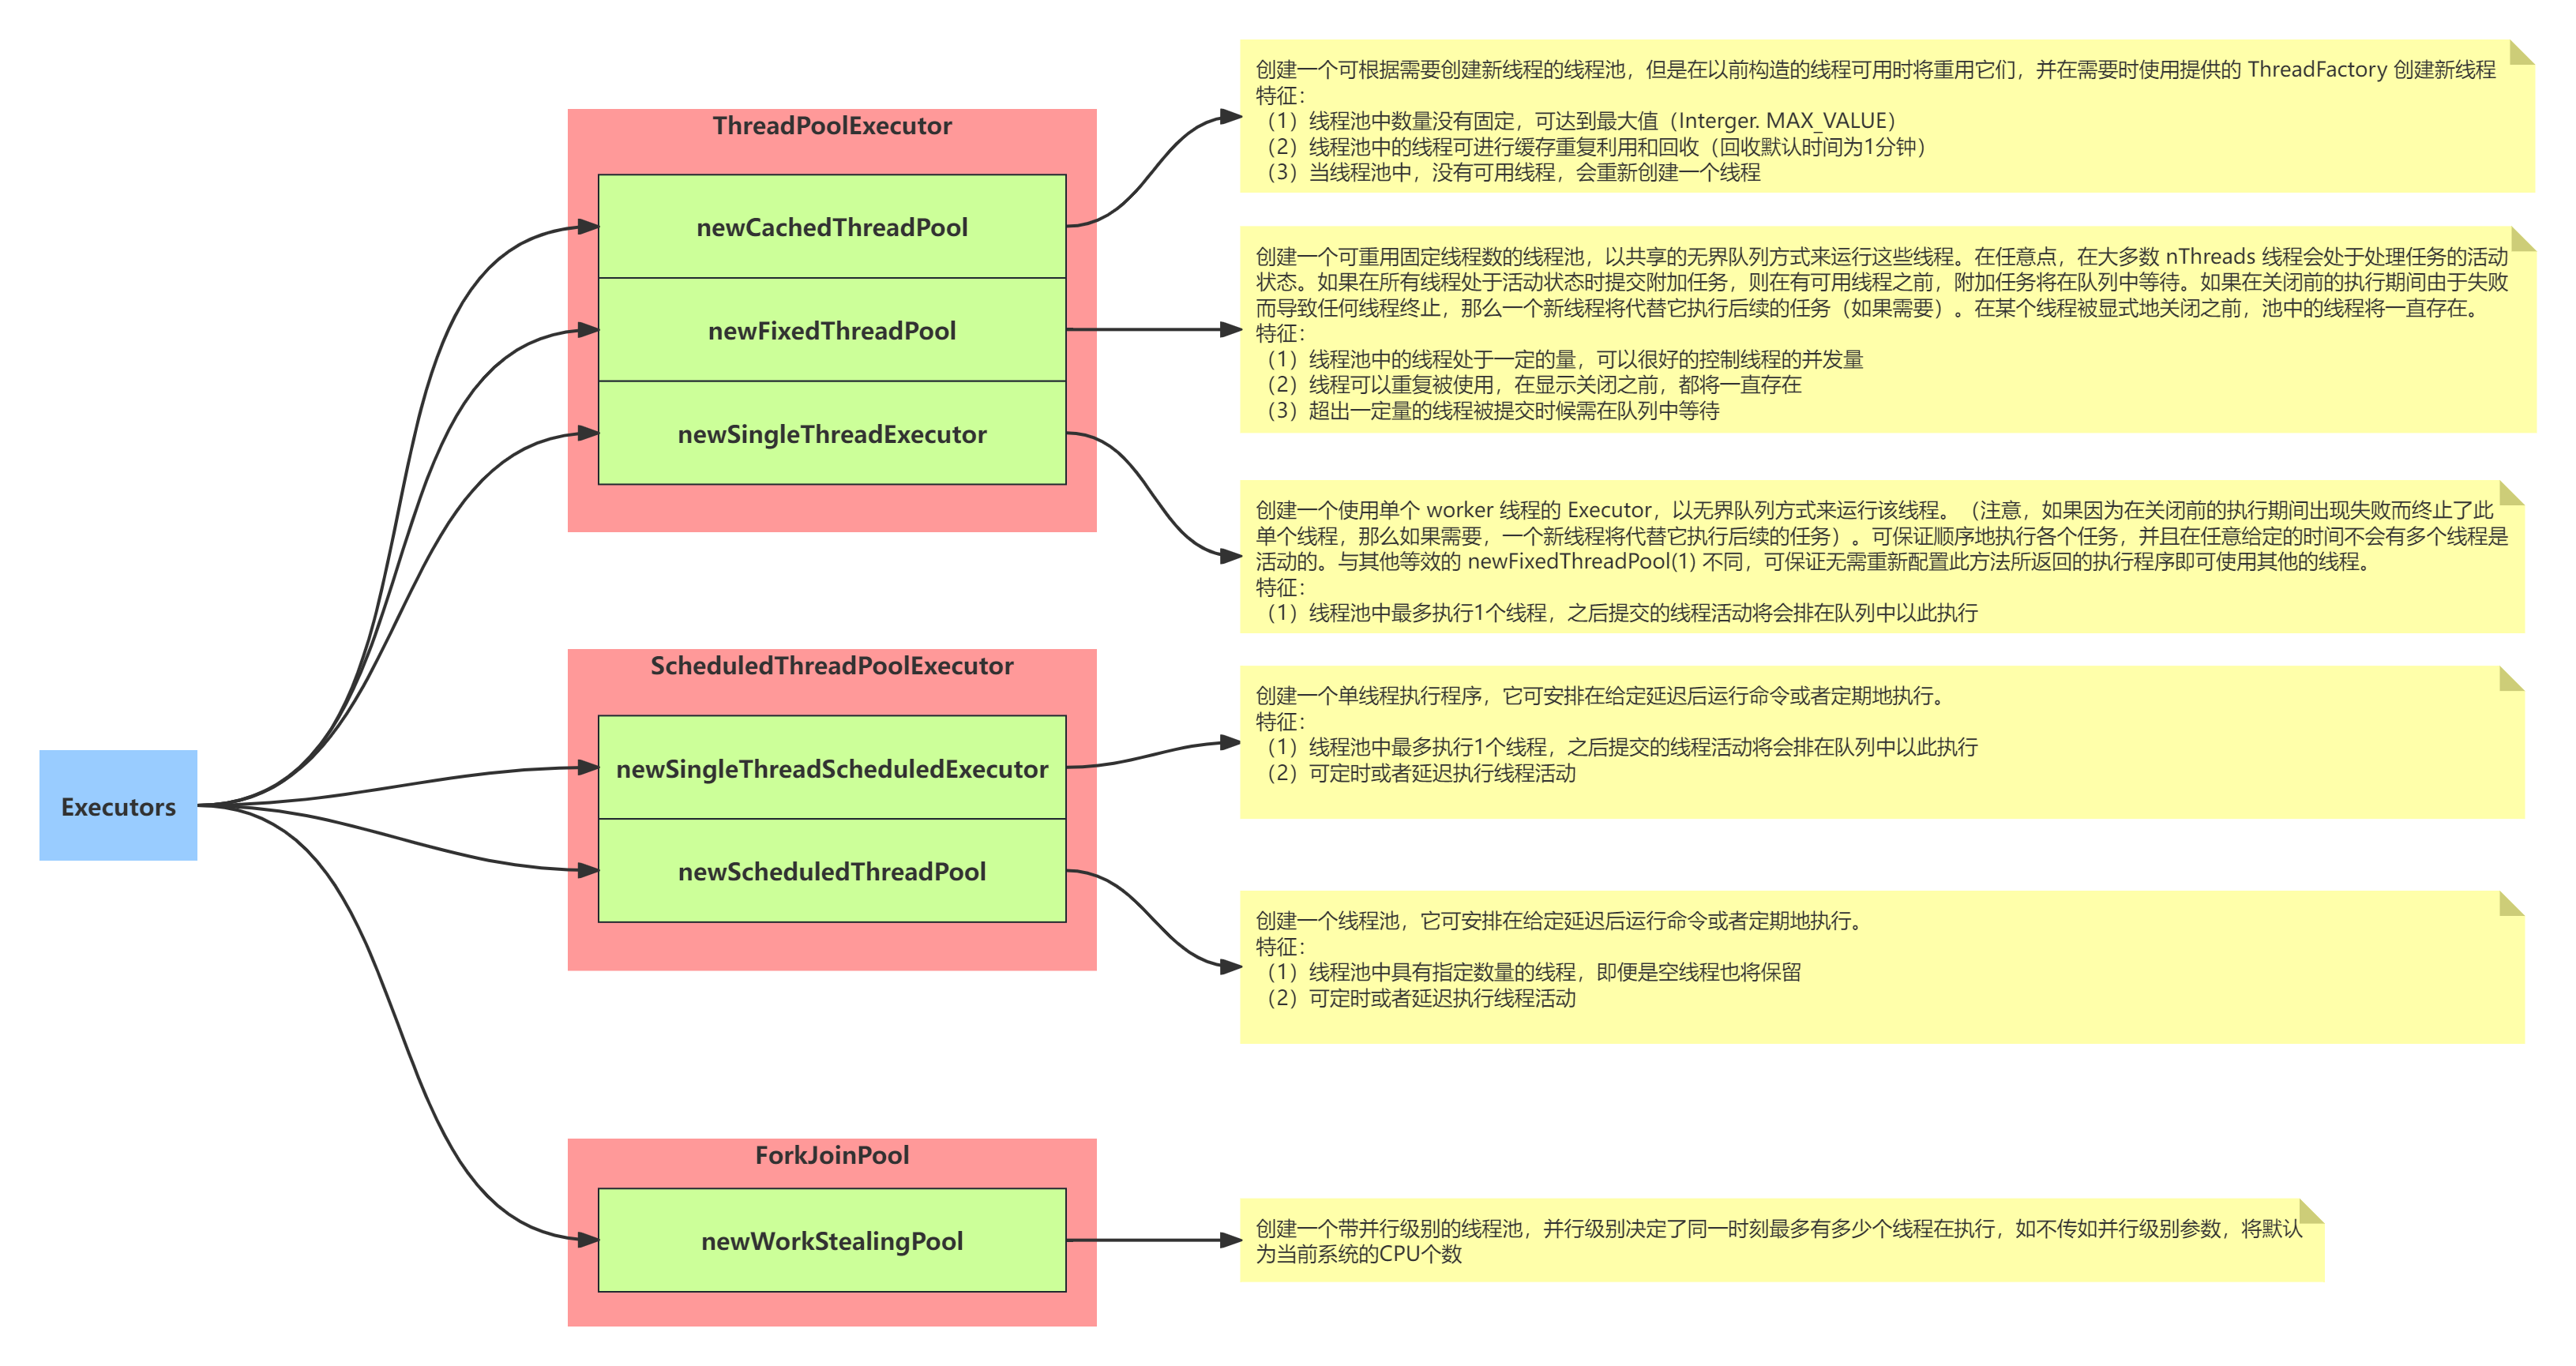
线程池分类
线程池生命周期

ThreadPoolExecutor源码解析
基础知识
- 构造方法
1 | /* |
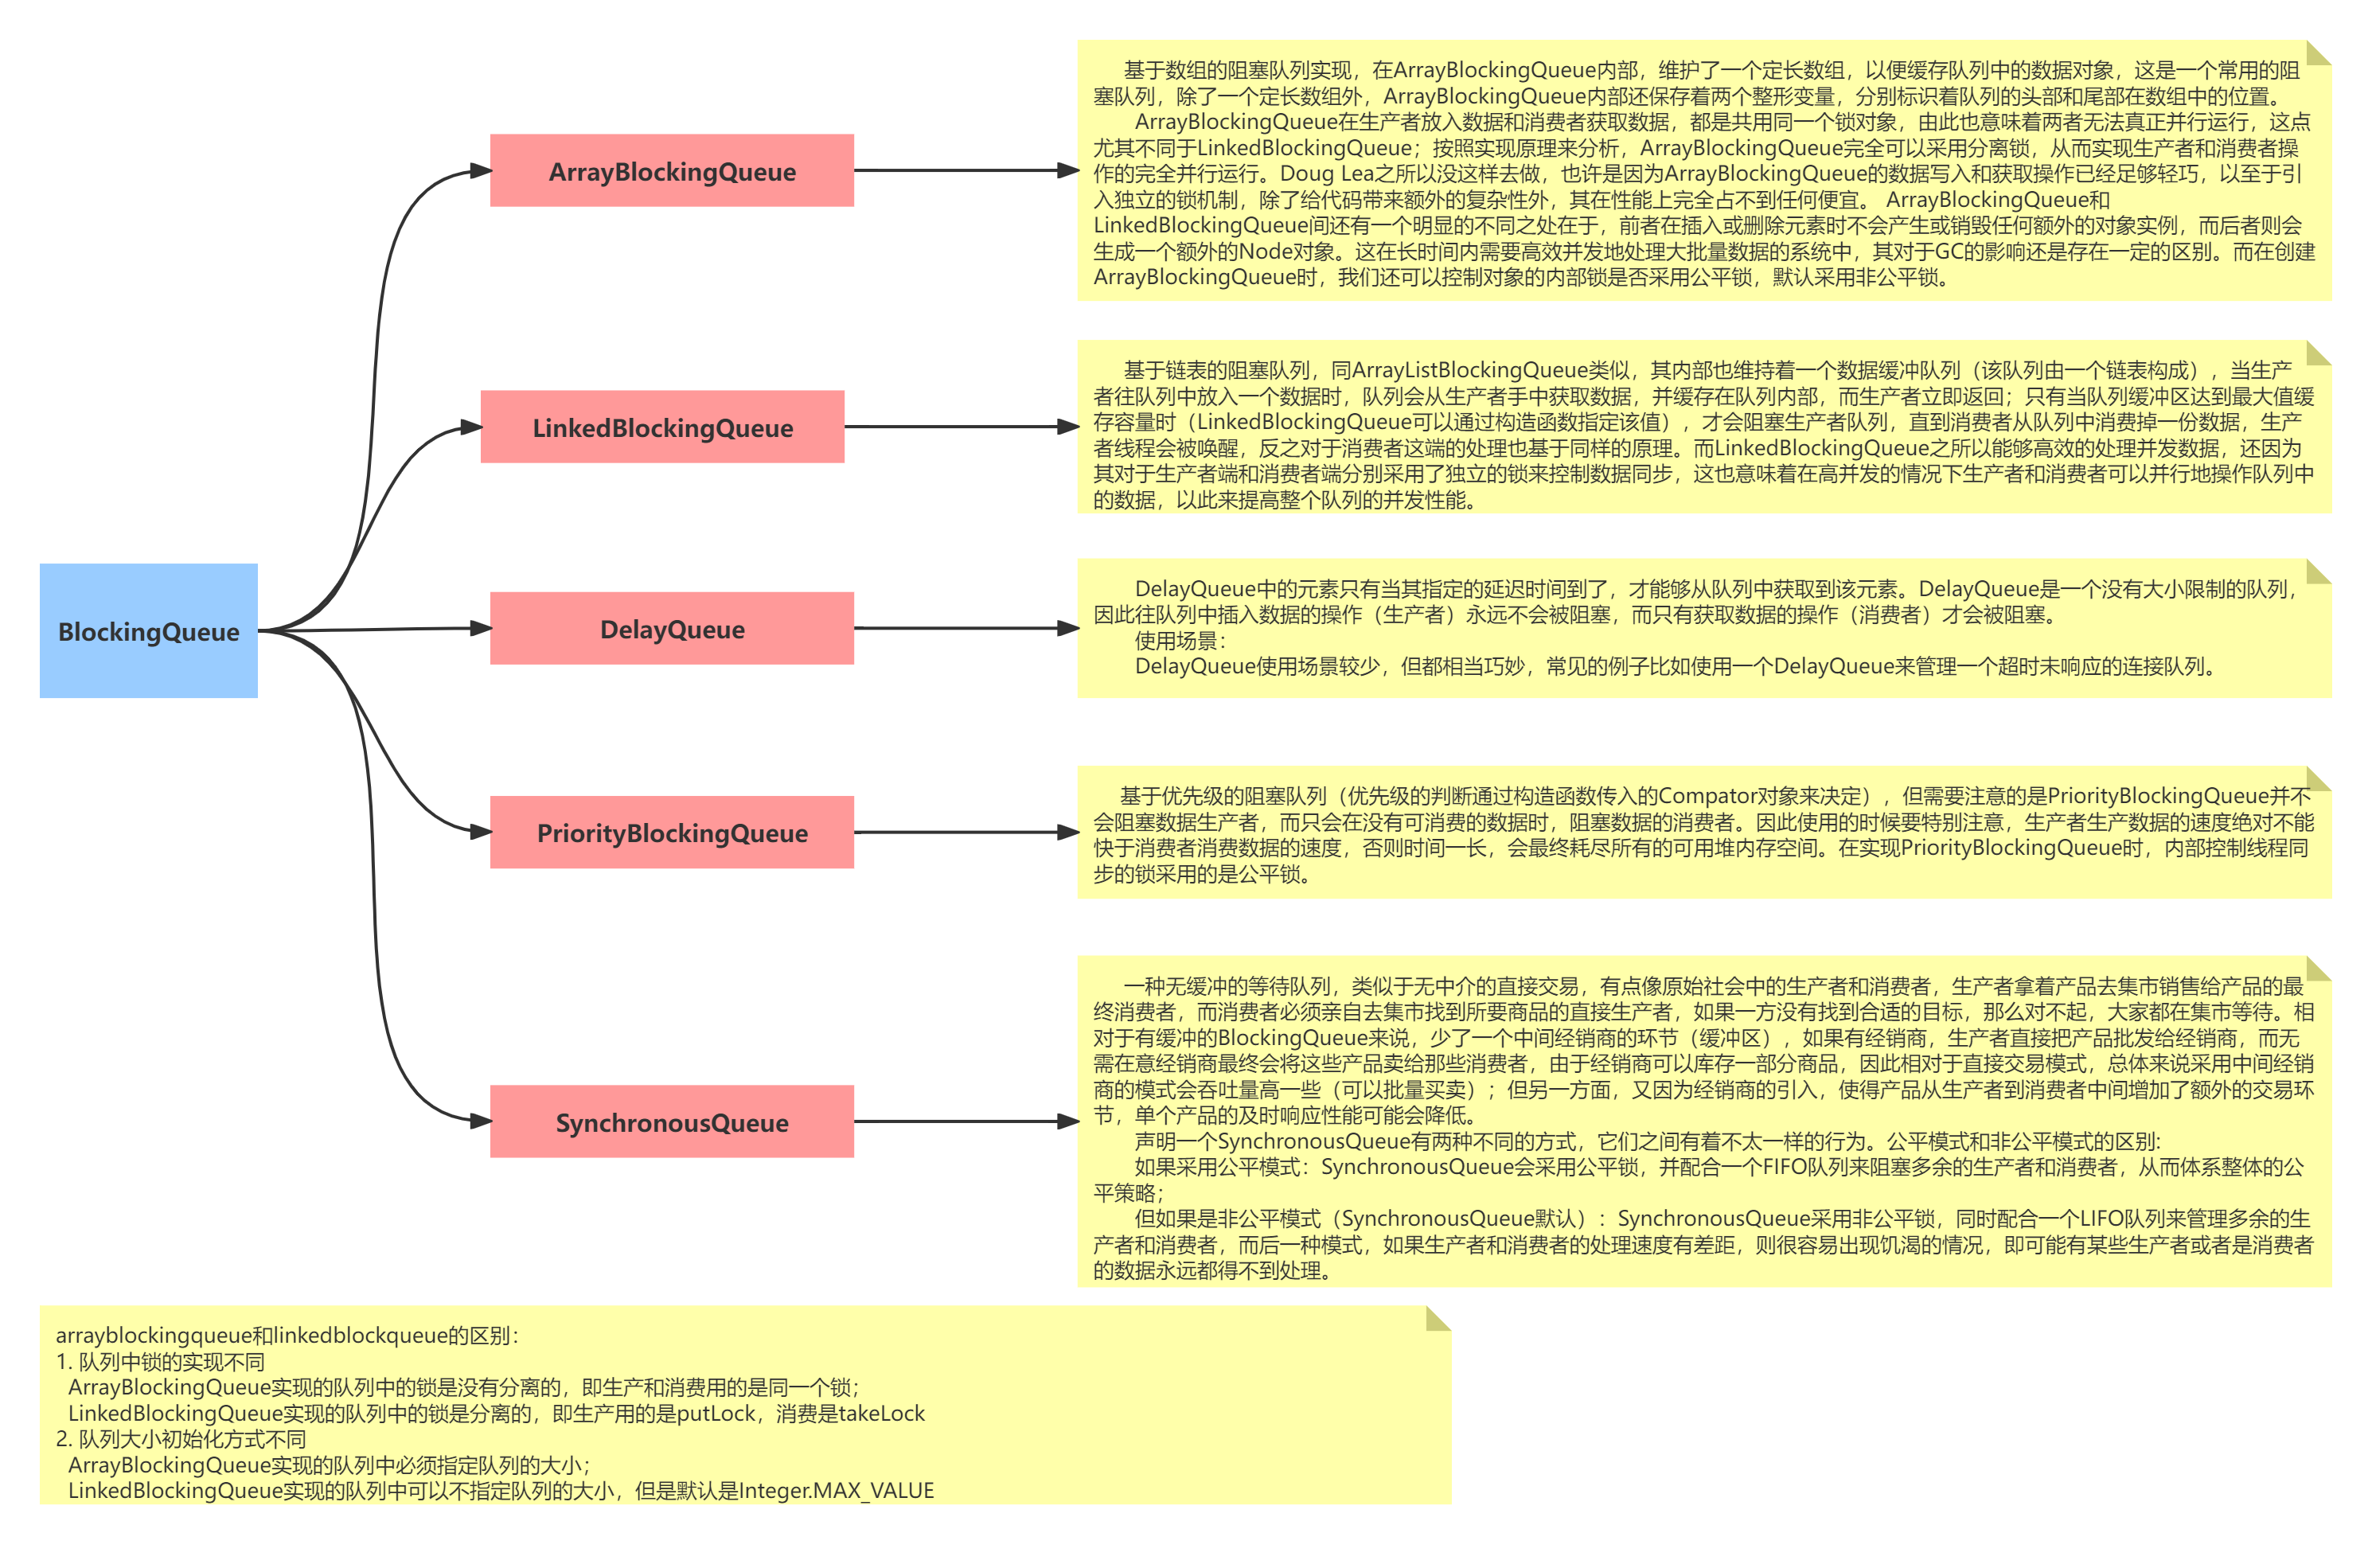
阻塞队列
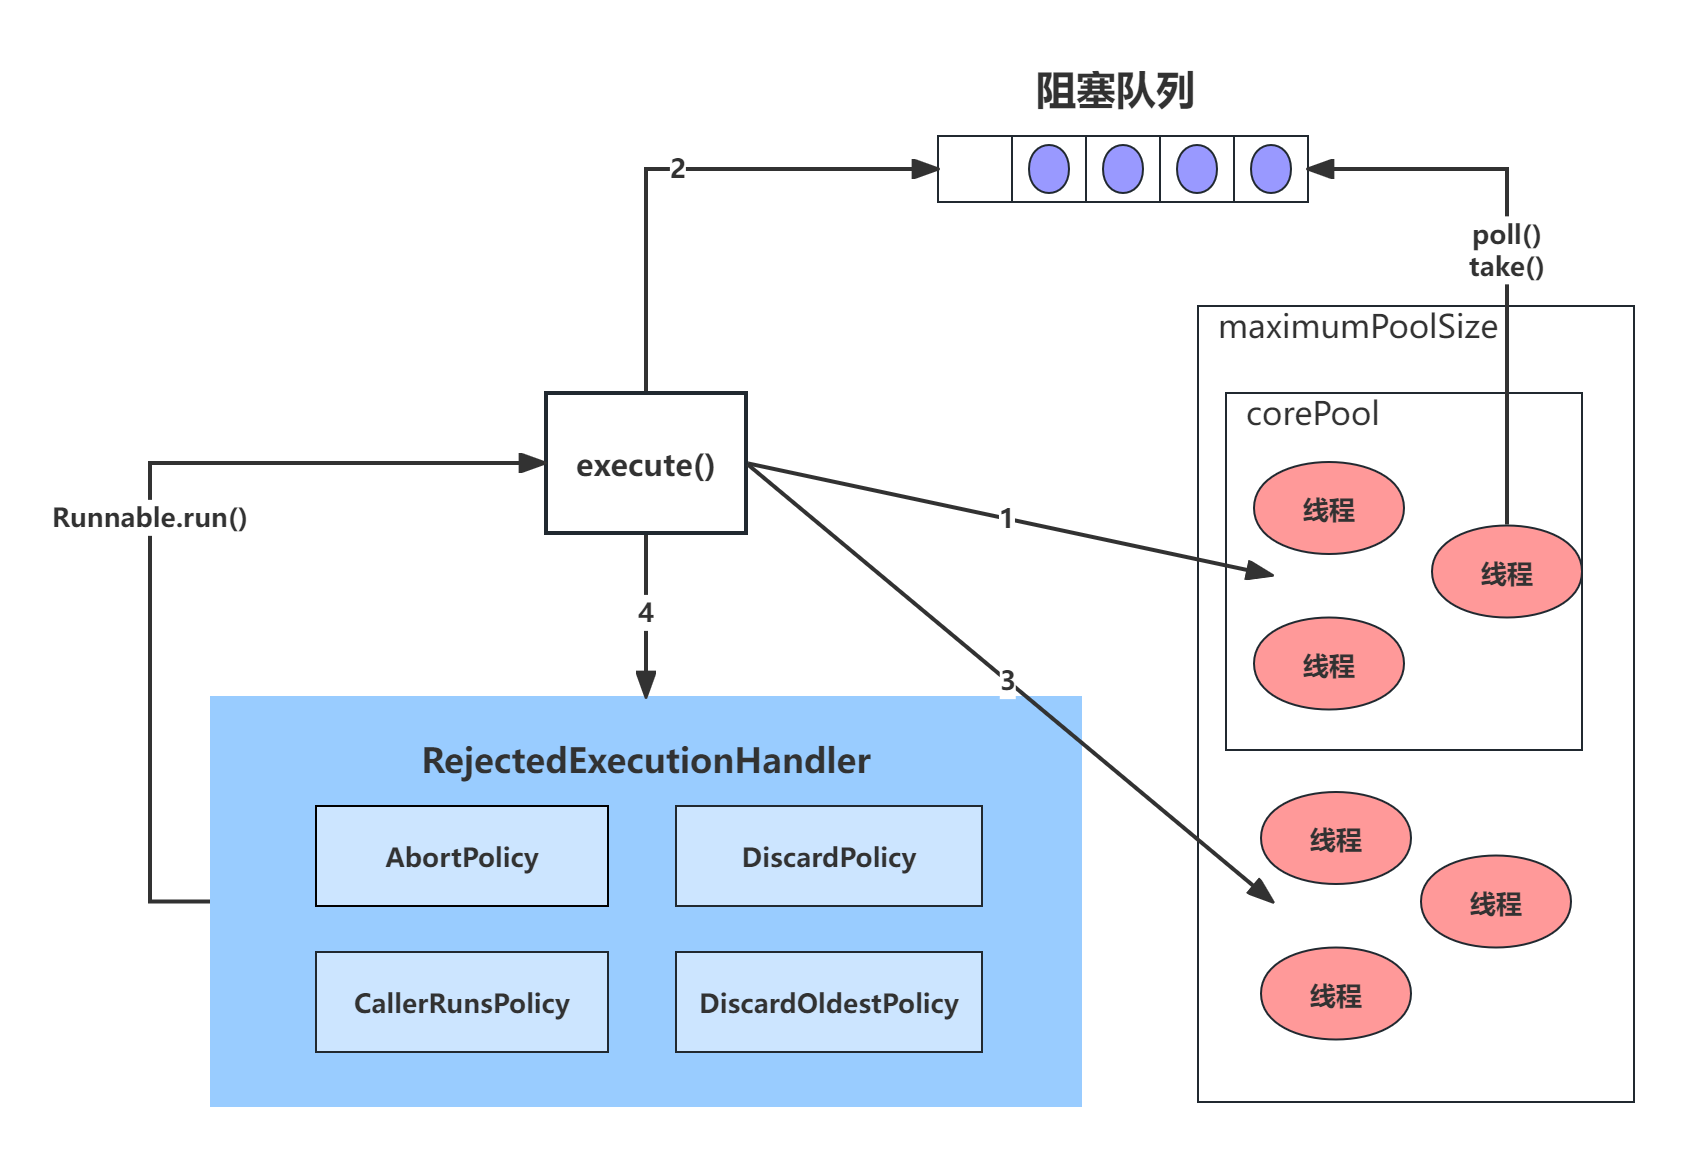
拒绝策略
1 | ThreadPoolExecutor.AbortPolicy // 丢弃任务并抛出RejectedExecutionException异常 |
- 执行方法
1 | public void execute(Runnable command) { |
常用变量的解释
1 | // 1. `ctl`,可以看做一个int类型的数字,高3位表示线程池状态,低29位表示worker数量 |
提交执行task的过程
1 | public void execute(Runnable command) { |
addworker源码解析
1 | private boolean addWorker(Runnable firstTask, boolean core) { |
线程池worker任务单元
1 | private final class Worker |
核心线程执行逻辑-runworker
1 | final void runWorker(Worker w) { |
ThreadLocal
多线程访问同一个共享变量的时候容易出现并发问题,特别是多个线程对一个变量进行写入的时候,为了保证线程安全,一般使用者在访问共享变量的时候需要进行额外的同步措施才能保证线程安全性。ThreadLocal是除了加锁这种同步方式之外的一种保证一种规避多线程访问出现线程不安全的方法,当我们在创建一个变量后,如果每个线程对其进行访问的时候访问的都是线程自己的变量这样就不会存在线程不安全问题。
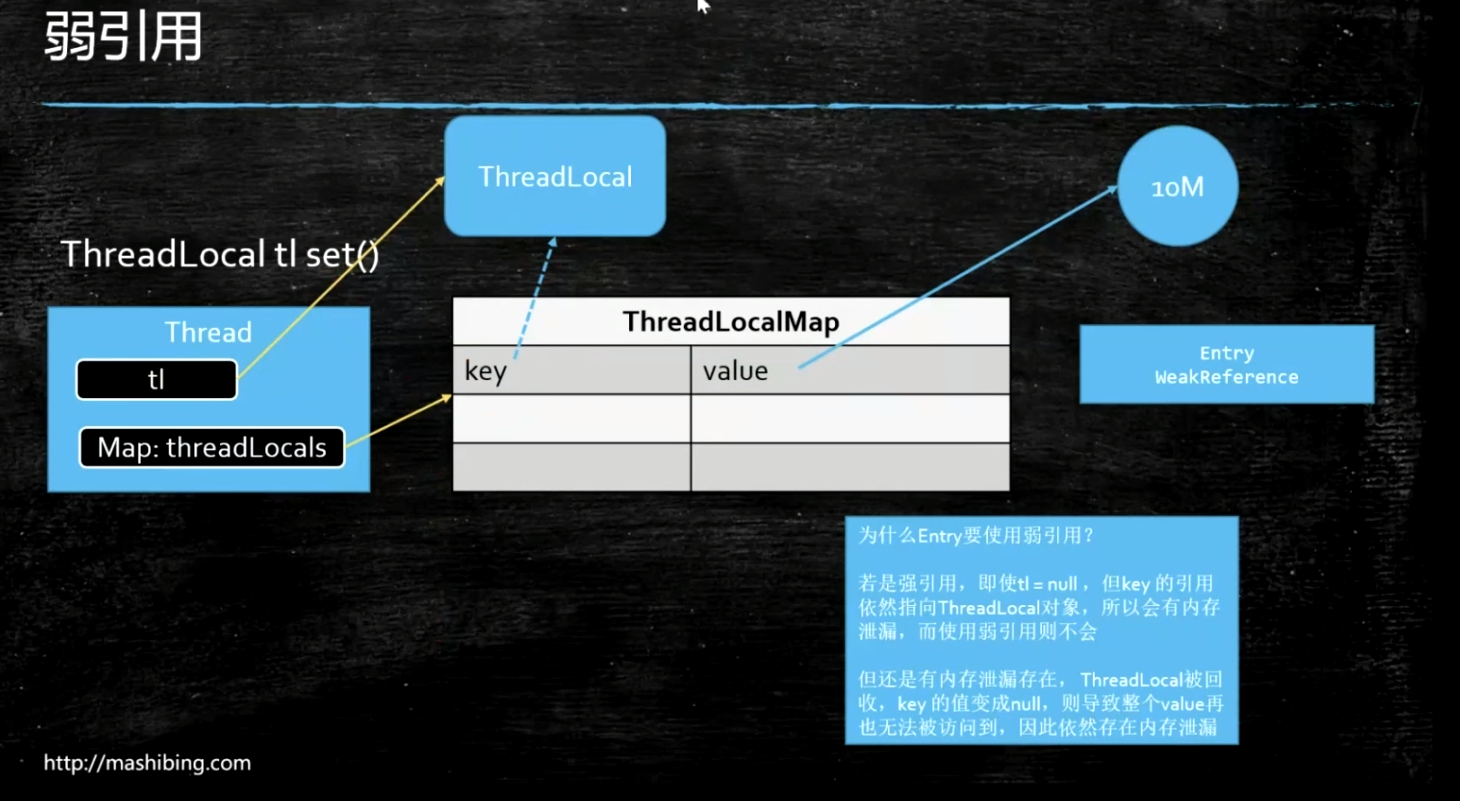
ThreadLocal是JDK包提供的,它提供线程本地变量,使用 set(T value) 方法时,设置变量到了当前线程的 ThreadLocalMap 中,即调用了 ThreadLocalMap 中的 set(ThreadLocal<?> key, Object value) 方法,key 是指向 ThreadLocal 弱引用。所以访问该变量时候是访问的当前线程里的变量的值,在实际多线程操作的时候,操作的是自己本地内存中的变量,从而规避了线程安全问题。
每个Thread维护一个ThreadLocalMap映射表,这个映射表的key是ThreadLocal实例本身,value是真正需要存储的Object。也就是说ThreadLocal本身并不存储值,它只是作为一个key来让线程从ThreadLocalMap获取value。ThreadLocalMap是使用ThreadLocal的弱引用作为Key的,弱引用的对象在GC时会被回收。
Thread
1 | /* ThreadLocal values pertaining to this thread. This map is maintained |
ThreadLocal
1 | public class ThreadLocal<T> { |
使用方法
参考上述图例,tl指向ThreadLocal,key也指向ThreadLocal(但是是弱引用),这里只创建了一个ThreadLocal实例
1 | ThreadLocal<M> tl = new ThreadLocal<>(); |
ThreadLocal的内存泄漏
key的内存泄漏
当一个方法执行完毕,tl弹栈走了,但是当前线程还在。所以为了解决key的内存泄漏问题,ThreadLocal作为key存在时,是一个weak弱引用的存在,因为弱引用只要执行GC时,没有强引用指向,必然会被回收。
value的内存泄漏
首先一般是针对线程池的操作,如果线程执行完操作可以自行销毁,可以不关注value的内存泄漏。但是大多数操作都是基于线程池的,所以value的内存泄漏不能不管。只需要在使用完毕当前ThreadLocal后,及时调用remove方法。
多个ThreadLocal实例
实际上,一个线程(Thread 实例)包含一个 ThreadLocal.ThreadLocalMap 对象,而 ThreadLocal.ThreadLocalMap 可以存储多个键值对。这里的键是 ThreadLocal 的实例(不是线程本身),而值是与这些 ThreadLocal 实例关联的线程局部变量的值。每个 ThreadLocalMap 中的键值对都是一个 Entry 对象。
所以,本质上:
- 每个线程包含一个 ThreadLocalMap。
- 每个 ThreadLocalMap 包含多个 Entry 对象(实际是 ThreadLocal 类的静态内部类 ThreadLocalMap.Entry 的实例)。
- 每个 Entry 对象包含一个键值对,其中键是 ThreadLocal 实例的引用,值是与该 ThreadLocal 实例关联的线程局部变量的值。
因此,每个线程可以有多个 ThreadLocal 变量,每个 ThreadLocal 变量在 ThreadLocalMap 中都有自己的键值对。这样设计的目的是使每个线程可以保存自己独立的变量副本,而这些变量通过自己的 ThreadLocal 实例来访问。
这里是一个简单的例子来展示如何理解 ThreadLocalMap 和它存储的键值对:
- 假设有两个 ThreadLocal 变量 threadLocalA 和 threadLocalB。
- 每个线程会创建自己的 ThreadLocalMap。
- 当线程调用 threadLocalA.set(valueA) 时,ThreadLocalMap 会创建一个 Entry,键是 threadLocalA 的引用,值是 valueA。
- 当线程调用 threadLocalB.set(valueB) 时,ThreadLocalMap 会创建另一个 Entry,键是 threadLocalB 的引用,值是 valueB。
- 因此,在同一个线程的 ThreadLocalMap 中,既存储了 threadLocalA 关联的值 valueA,也存储了 threadLocalB 关联的值 valueB。
最终结果就是,每个线程都有自己的 ThreadLocalMap,其中可以包含多个 ThreadLocal 实例作为键,且每个键对应一个不同的值。
补充知识
内存溢出
当JVM因为没有足够的内存来为对象分配空间并且垃圾回收器也已经没有空间可回收时,就会抛出OOM。
内存泄露
关于内存泄漏相关知识:java内存泄露
当某些对象不再被应用程序所使用,但是由于仍然被引用而导致垃圾收集器不能释放他们。
例如:
1
2
3
4
5
6
7public class Test {
Object object;
public void test() {
object = new Object();
//...其他代码
}
}解决办法:
- 在test方法结束处,显示给object = null
- 将object作为test方法内部的局部变量
Reference
强引用
强引用用来描述普通的 new 对象。
平常使用的对象引用就是强引用,当 object = null;时,内存空间被回收。
1 | Object object = new Object(); |
软引用
软引用是用来描述一些还有用但并非必须的对象,一般用作缓存。
对于软引用关联着的对象,在系统将要发生内存溢出异常之前,将会把这些对象列进回收范围进行第二次回收。如果这次回收还没有足够的内存,才会抛出内存溢出异常。
当内存不够用时,软引用所指向的内存空间才会被回收,即使让 m = null;内存空间也不会被回收,除非内存不足。
1 | SoftReference<byte[]> m = new SoftReference<>(new byte[1024*1024*10]); |
弱引用
弱引用遭到gc就会回收,一般用在容器里,参考ThreadLocal。
1 | WeakReference<M> m = new WeakReference<>(new M()); |
- ThreadLocal
1 | public class ThreadLocal<T> { |
虚引用
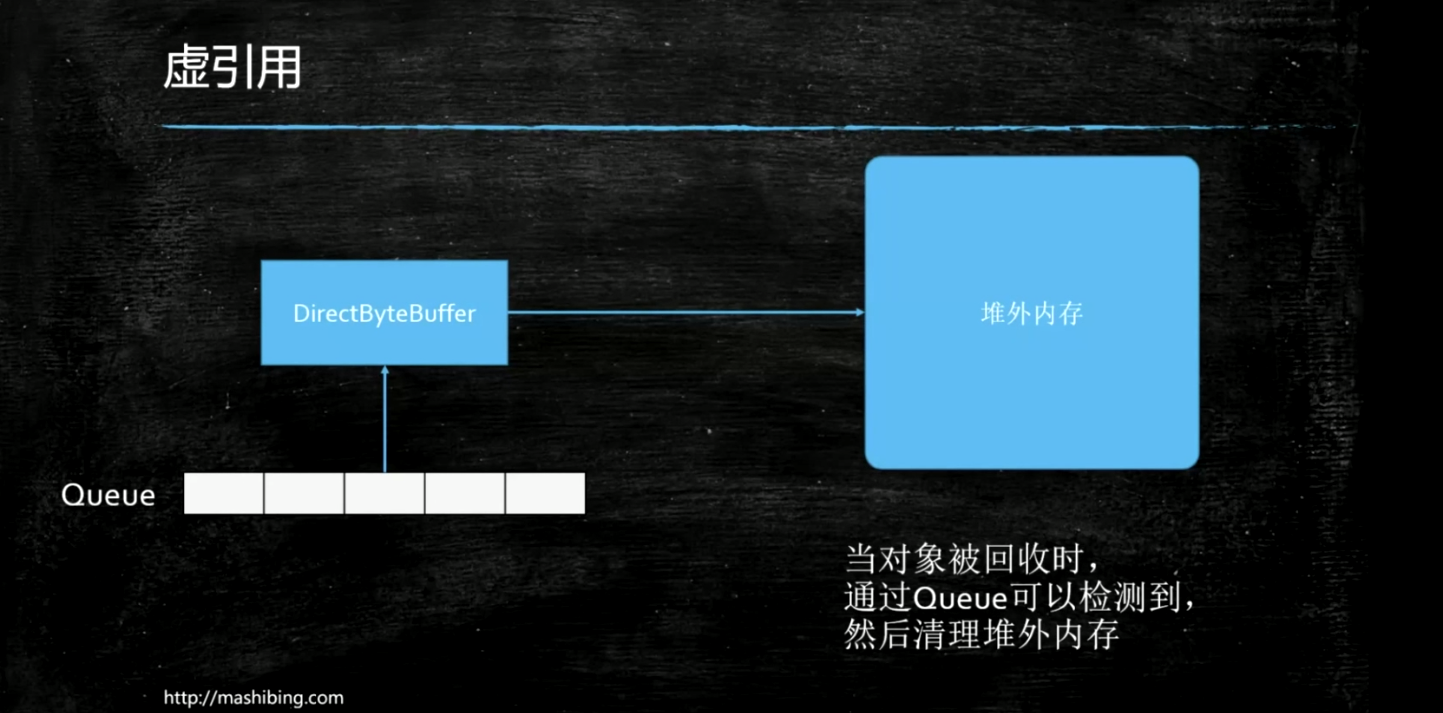
一个对象是否有虚引用的存在,完全不会对其生存时间构成影响,也无法通过虚引用来获取一个对象的实例。为一个对象设置虚引用关联的唯一目的就是能在这个对象被收集器回收时收到一个系统通知。虚引用和弱引用对关联对象的回收都不会产生影响,如果只有虚引用活着弱引用关联着对象,那么这个对象就会被回收。它们的不同之处在于弱引用的get方法,虚引用的get方法始终返回null,弱引用可以使用ReferenceQueue,虚引用必须配合ReferenceQueue使用。
jdk中直接内存的回收就用到虚引用,由于jvm自动内存管理的范围是堆内存,而直接内存是在堆内存之外(其实是内存映射文件,自行去理解虚拟内存空间的相关概念),所以直接内存的分配和回收都是有Unsafe类去操作,java在申请一块直接内存之后,会在堆内存分配一个对象保存这个堆外内存的引用,这个对象被垃圾收集器管理,一旦这个对象被回收,相应的用户线程会收到通知并对直接内存进行清理工作。
事实上,虚引用有一个很重要的用途就是用来做堆外内存的释放,DirectByteBuffer就是通过虚引用来实现堆外内存的释放的。
1 | ReferenceQueue<M> QUEUE = new ReferenceQueue<>(); |