Spring
框架
框架就是一些类和接口的集合,通过这些类和接口协调来完成一系列的程序实现。JAVA框架可以分为三层:表示层,业务层和物理层。框架又叫做开发中的半成品,它不能提供整个WEB应用程序的所有东西,但是有了框架,我们就可以集中精力进行业务逻辑的开发而不用去关心它的技术实现以及一些辅助的业务逻辑。大家熟知的Structs和Spring就是表示层和业务层框架的强力代表。
框架就是某些个人或者组织定义了一系列的类或者接口,提前定义好了一些实现,用户可以在这些类和接口的基础之上,使用这些类来迅速的形成某个领域或者某个行业的解决方案,简化开发的过程,提高开发的效率。就好比:你要盖一座房子,先把柱子,房梁等先建设好,然后只需要向房子中填充就可以了,可以按照自己的需求进行设计,其实我们做的项目、系统都是类似的方式,如果所有的代码全部都需要自己实现,那么这个工程就太庞大了,所以可以先创建出一些基础的模板框架,开发人员只需要按照自己的需求向架子中填充内容,完成自己独特需求即可,这就是框架存在的意义。其实我们之前定义的简单的工具类这些东西也是类似的原理,只不过比较单一简单而已,因此,在现在的很多项目系统开发的过程中都是利用框架进行开发。
架构设计
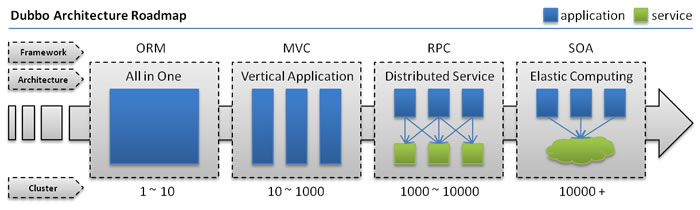
随着互联网的发展,网站应用的规模不断扩大,常规的垂直应用架构已无法应对,分布式服务架构以及流动计算架构势在必行,亟需一个治理系统确保架构有条不紊的演进。
-
单一应用架构
当网站流量很小时,只需一个应用,将所有功能都部署在一起,以减少部署节点和成本。此时,用于简化增删改查工作量的数据访问框架(ORM)是关键。
-
垂直应用架构
当访问量逐渐增大,单一应用增加机器带来的加速度越来越小,提升效率的方法之一是将应用拆成互不相干的几个应用,以提升效率。此时,用于加速前端页面开发的Web框架(MVC)是关键。
-
分布式服务架构
当垂直应用越来越多,应用之间交互不可避免,将核心业务抽取出来,作为独立的服务,逐渐形成稳定的服务中心,使前端应用能更快速的响应多变的市场需求。此时,用于提高业务复用及整合的分布式服务框架(RPC)是关键。
-
流动计算架构
当服务越来越多,容量的评估,小服务资源的浪费等问题逐渐显现,此时需增加一个调度中心基于访问压力实时管理集群容量,提高集群利用率。此时,用于提高机器利用率的资源调度和治理中心(SOA)是关键。
Java主流框架演变之路
- JSP + Servlet + JavaBean
- MVC三层架构
- 使用EJB进行应用的开发,但是EJB是重量级框架(在使用的时候,过多的接口和依赖,侵入性强),在使用上比较麻烦
- Struts1/Struts2 + Hibernate + Spring(SSH)
- SpringMVC + Mybatis + Spring(SSM)
- SpringBoot开发,约定大于配置
Spring官网
- 官网地址:https://spring.io/projects/spring-framework#overview
- Spring中文翻译:https://github.com/DocsHome/spring-docs/blob/master/pages/core/IoC-container.md
- 压缩包下载地址:https://repo.spring.io/release/org/springframework/spring/
- 源码地址:https://github.com/spring-projects/spring-framework
核心解释
- Spring是一个开源框架。
- Spring是为了简化企业开发而生的,使得开发变得更加优雅和简洁。
- Spring是一个IOC和AOP的容器框架。
- IOC:控制反转
- AOP:面向切面编程
- 容器:包含并管理应用对象的生命周期,就好比用桶装水一样,Spring就是桶,而对象就是水
使用Spring的优点
- Spring通过DI、AOP和消除样板式代码来简化企业级Java开发
- Spring框架之外还存在一个构建在核心框架之上的庞大生态圈,它将Spring扩展到不同的领域,如Web服务、REST、移动开发以及NoSQL
- 低侵入式设计,代码的污染极低
- 独立于各种应用服务器,基于Spring框架的应用,可以真正实现Write Once,Run Anywhere的承诺
- Spring的IoC容器降低了业务对象替换的复杂性,提高了组件之间的解耦
- Spring的AOP支持允许将一些通用任务如安全、事务、日志等进行集中式处理,从而提供了更好的复用
- Spring的ORM和DAO提供了与第三方持久层框架的的良好整合,并简化了底层的数据库访问
- Spring的高度开放性,并不强制应用完全依赖于Spring,开发者可自由选用Spring框架的部分或全部
如何简化开发
- 基于POJO的轻量级和最小侵入性编程
- 通过依赖注入和面向接口实现松耦合
- 基于切面和惯例进行声明式编程
- 通过切面和模板减少样板式代码
Spring的模块划分图
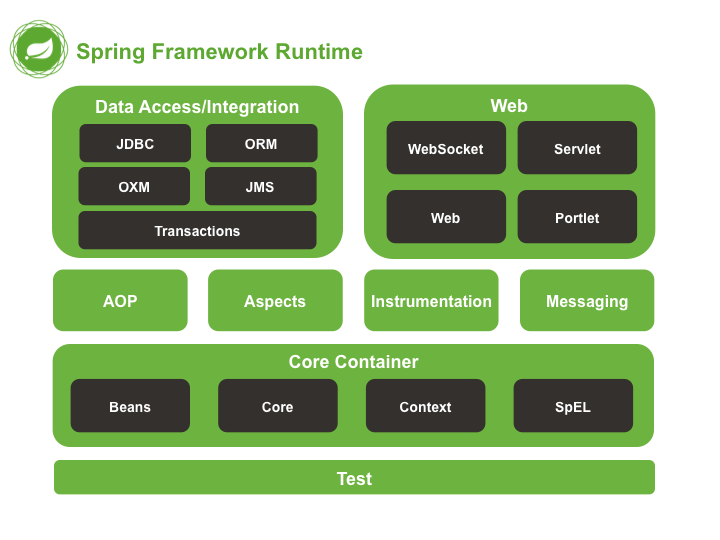
模块解释:
- Test:Spring的单元测试模块
- Core Container:核心容器模块
- AOP + Aspects:面向切面编程模块
- Instrumentation:提供了class instrumentation支持和类加载器的实现来在特定的应用服务器上使用,几乎不用
- Messaging:包括一系列的用来映射消息到方法的注解,几乎不用
- Data Access/Integration:数据的获取/整合模块,包括了JDBC,ORM,OXM,JMS和事务模块
- Web:提供面向web整合特性
IOC(Inversion of Control):控制反转
介绍
- 英文原版
1.1. Introduction to the Spring IoC Container and Beans
This chapter covers the Spring Framework implementation of the Inversion of Control (IoC) principle. IoC is also known as dependency injection (DI). It is a process whereby objects define their dependencies (that is, the other objects they work with) only through constructor arguments, arguments to a factory method, or properties that are set on the object instance after it is constructed or returned from a factory method. The container then injects those dependencies when it creates the bean. This process is fundamentally the inverse (hence the name, Inversion of Control) of the bean itself controlling the instantiation or location of its dependencies by using direct construction of classes or a mechanism such as the Service Locator pattern.
The org.springframework.beans and org.springframework.context packages are the basis for Spring Framework’s IoC container. The BeanFactory interface provides an advanced configuration mechanism capable of managing any type of object. ApplicationContext is a sub-interface of BeanFactory. It adds:
Easier integration with Spring’s AOP features
Message resource handling (for use in internationalization)
Event publication
Application-layer specific contexts such as the WebApplicationContext for use in web applications.
In short, the BeanFactory provides the configuration framework and basic functionality, and the ApplicationContext adds more enterprise-specific functionality. The ApplicationContext is a complete superset of the BeanFactory and is used exclusively in this chapter in descriptions of Spring’s IoC container. For more information on using the BeanFactory instead of the ApplicationContext, see The BeanFactory.
In Spring, the objects that form the backbone of your application and that are managed by the Spring IoC container are called beans. A bean is an object that is instantiated, assembled, and managed by a Spring IoC container. Otherwise, a bean is simply one of many objects in your application. Beans, and the dependencies among them, are reflected in the configuration metadata used by a container.
1.2. Container Overview
The org.springframework.context.ApplicationContext interface represents the Spring IoC container and is responsible for instantiating, configuring, and assembling the beans. The container gets its instructions on what objects to instantiate, configure, and assemble by reading configuration metadata. The configuration metadata is represented in XML, Java annotations, or Java code. It lets you express the objects that compose your application and the rich interdependencies between those objects.
Several implementations of the ApplicationContext interface are supplied with Spring. In stand-alone applications, it is common to create an instance of ClassPathXmlApplicationContext or FileSystemXmlApplicationContext. While XML has been the traditional format for defining configuration metadata, you can instruct the container to use Java annotations or code as the metadata format by providing a small amount of XML configuration to declaratively enable support for these additional metadata formats.
In most application scenarios, explicit user code is not required to instantiate one or more instances of a Spring IoC container. For example, in a web application scenario, a simple eight (or so) lines of boilerplate web descriptor XML in the web.xml file of the application typically suffices (see Convenient ApplicationContext Instantiation for Web Applications). If you use the Spring Tools for Eclipse (an Eclipse-powered development environment), you can easily create this boilerplate configuration with a few mouse clicks or keystrokes.
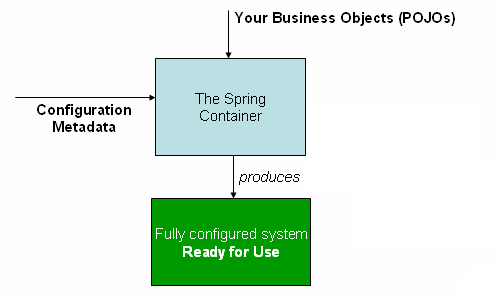
The following diagram shows a high-level view of how Spring works. Your application classes are combined with configuration metadata so that, after the ApplicationContext is created and initialized, you have a fully configured and executable system or application.
- 翻译版
1.1. Spring IOC容器和bean的介绍
本章介绍Spring框架中控制反转 Inversion of Control 的实现. IOC与大家熟知的依赖注入同理,. 这是一个通过依赖注入对象的过程 也就是说,它们所使用的对象,是通过构造函数参数,工厂方法的参数或这是从工厂方法的构造函数或返回值的对象实例设置的属性,然后容器在创建bean时注入这些需要的依赖。 这个过程相对普通创建对象的过程是反向的(因此称之为IOC),bean本身通过直接构造类来控制依赖关系的实例化或位置,或提供诸如服务定位器模式之类的机制。

org.springframework.beans 和 org.springframework.context 是实现Spring IOC容器框架的基础. BeanFactory 接口提供了一种更先进的配置机制来管理任意类型的对象. ApplicationContext 是BeanFactory的子接口. 他提供了:

更容易与Spring的AOP特性集成

消息资源处理(用于国际化)

事件发布

应用层特定的上下文,如用于web应用程序的WebApplicationContext.

简而言之,BeanFactory提供了配置框架的基本功能,ApplicationContext添加了更多特定于企业的功能。 ApplicationContext完全扩展了BeanFactory的功能,这些内容将在介绍Spring IOC容器的章节专门讲解。有关使用BeanFactory更多信息,请参见BeanFactory。

在Spring中,由Spring IOC容器管理的,构成程序的骨架的对象成为Bean。bean对象是指经过IOC容器实例化,组装和管理的对象。此外,bean就是应用程序中众多对象之一 。bean和bean的依赖由容器所使用的配置元数据反射而来。


1.2. 容器概述
org.springframework.context.ApplicationContext是Spring IOC容器实现的代表,它负责实例化,配置和组装Bean。容器通过读取配置元数据获取有关实例化、配置和组装哪些对象的说明 。配置元数据可以使用XML、Java注解或Java代码来呈现。它允许你处理应用程序的对象与其他对象之间的互相依赖关系。

Spring提供了ApplicationContext接口的几个实现。 在独立应用程序中,通常创建ClassPathXmlApplicationContext或FileSystemXmlApplicationContext的实例。虽然XML一直是定义配置元数据的传统格式, 但是您可以指定容器使用Java注解或编程的方式编写元数据格式,并通过提供少量的XML配置以声明对某些额外元数据的支持。

在大多数应用场景中,不需要用户显式的编写代码来实例化IOC容器的一个或者多个实例。例如,在Web应用场景中,只需要在web.xml中添加大概8行简单的web描述样板就行了。( 便捷的ApplicationContext实例化Web应用程序) 如果你使用的是基于Eclipse的Spring Tool Suite开发环境,该样板配置只需点击几下鼠标或按几下键盘就能创建了。

下图展示了Spring工作方式的高级视图,应用程序的类与元数据配置相互配合,这样,在ApplicationContext创建和初始化后,你立即拥有一个可配置的,可执行的系统或应用程序。
思考
- 谁控制谁:在之前的编码过程中,都是需要什么对象自己去创建什么对象,由程序员自己来控制对象,而有了IOC容器之后,就会变成由IOC容器来控制对象,
- 控制什么:在实现过程中所需要的对象及需要依赖的对象
- 什么是反转:在没有IOC容器之前我们都是在对象中主动去创建依赖的对象,这是正转的,而有了IOC之后,依赖的对象直接由IOC容器创建后注入到对象中,由主动创建变成了被动接受,这是反转
- 哪些方面被反转:依赖的对象
IOC和DI是从不同的角度描述的同一件事,IOC是从容器的角度描述,而DI是从应用程序的角度来描述,也可以这样说,IOC是设计思想,而DI是具体的实现方式
IOC容器配置
- Spring的pom依赖
<!-- https://mvnrepository.com/artifact/org.springframework/spring-context -->
<dependency>
    <groupId>org.springframework</groupId>
    <artifactId>spring-context</artifactId>
    <version>5.3.3</version>
</dependency>
- 使用XML文件的方式注册bean到IOC容器
<?xml version="1.0" encoding="UTF-8"?>
<beans xmlns="http://www.springframework.org/schema/beans"
    xmlns:xsi="http://www.w3.org/2001/XMLSchema-instance"
    xsi:schemaLocation="http://www.springframework.org/schema/beans
        https://www.springframework.org/schema/beans/spring-beans.xsd">

    <!--
    id : The id attribute is a string that identifies the individual bean definition.
    class : The class attribute defines the type of the bean and uses the fully qualified classname.
    -->
    <bean id="..." class="...">
        <!-- collaborators and configuration for this bean go here -->
    </bean>

    <bean id="..." class="...">
        <!-- collaborators and configuration for this bean go here -->
    </bean>

    <!-- more bean definitions go here -->
    <!--
    autowire:
    当一个对象中需要引用另外一个对象的时候,在之前的配置中我们都是通过property标签来进行手动配置的,其实在Spring中还提供了一个非常强大的功能就是自动装配,可以按照我们指定的规则进行配置,配置的方式有以下几种:
    1. default/no:不自动装配
    2. byName:按照名字进行装配,以属性名作为id去容器中查找组件,进行赋值,如果找不到则装配null
    3. byType:按照类型进行装配,以属性的类型作为查找依据去容器中找到这个组件,如果有多个类型相同的bean对象,那么会报异常,如果找不到则装配null
    4. constructor:按照构造器进行装配,先按照有参构造器参数的类型进行装配,没有就直接装配null;如果按照类型找到了多个,那么就使用参数名作为id继续匹配,找到就装配,找不到就装配null

    scope:
    bean的作用域:singleton、prototype、request、session
    默认情况下是单例的
    1. prototype:多实例的
        容器启动的时候不会创建多实例bean,只有在获取对象的时候才会创建该对象,销毁的时候不会有任何的调用
        每次创建都是一个新的对象
    2. singleton:默认的单例对象
        在容器启动完成之前就已经创建好对象,关闭的时候会销毁创建的bean
        获取的所有对象都是同一个

    -->
    <bean id="person" class="com.visionsly.entity.Person" autowire="byType" scope="singleton">
        <property id="id" value="1"></property>
        <property id="name" value="SLy"></property>
        <property id="age" value="20"></property>
    </bean>

    <!--
    Spring创建第三方bean对象 - 数据库连接池
    加载外部配置文件,在加载外部依赖文件的时候需要context命名空间
	-->
    <context:property-placeholder location="classpath:dbconfig.properties"/>
    <bean id="dataSource" class="com.alibaba.druid.pool.DruidDataSource">
        <property name="username" value="${username}"></property>
        <property name="password" value="${password}"></property>
        <property name="url" value="${url}"></property>
        <property name="driverClassName" value="${driverClassName}"></property>
    </bean>
</beans>
public static void main(String[] args) {
    /*
     * ApplicationContext:表示IOC容器入口,想要获取对象,必须要创建该类
     *      该类有两个读取配置文件的实现类
     *      ClassPathXmlApplicationContext:表示从classpath中读取数据
     *      FileSystemXmlApplicationContext:表示从当前文件系统读取数据
     */
    ApplicationContext context = new ClassPathXmlApplicationContext("spring.xml");
    // 获取具体的bean实例对象,需要进行强制类型转换
    Person person = (Person)context.getBean("person");

    // 获取对象的时候不需要强制类型转换
    // Person person = context.getBean("person", Person.class);

    System.out.println(person);
}
- 使用注解的方式注册bean到IOC容器中
<?xml version="1.0" encoding="UTF-8"?>
<beans xmlns="http://www.springframework.org/schema/beans"
       xmlns:xsi="http://www.w3.org/2001/XMLSchema-instance"
       xmlns:context="http://www.springframework.org/schema/context"
       xsi:schemaLocation="http://www.springframework.org/schema/beans
       http://www.springframework.org/schema/beans/spring-beans.xsd
        http://www.springframework.org/schema/context
        http://www.springframework.org/schema/context/spring-context.xsd">

    <!--
    如果想要将自定义的bean对象添加到IOC容器中,需要在类上添加某些注解
    Spring中包含4个主要的组件添加注解:
    1. @Controller:控制器,推荐给controller层添加此注解
    2. @Service:业务逻辑,推荐给业务逻辑层添加此注解
    3. @Repository:仓库管理,推荐给数据访问层添加此注解
    4. @Component:给不属于以上基层的组件添加此注解
    注意:我们虽然人为的给不同的层添加不同的注解,但是在Spring看来,可以在任意层添加任意注解,Spring底层是不会给具体的层次验证注解,这样写的目的只是为了提高可读性,最偷懒的方式就是给所有想交由IOC容器管理的bean对象添加component注解

    使用注解需要如下步骤:
    1. 添加上述四个注解中的任意一个
    2. 添加自动扫描注解的组件,此操作需要依赖context命名空间
    3. 添加自动扫描的标签context:component-scan

	注意:当使用注解注册组件和使用配置文件注册组件是一样的,但是要注意:
		1. 组件的id默认就是组件的类名首字符小写,如果非要改名字的话,直接在注解中添加即可
		2. 组件默认情况下都是单例的,如果需要配置多例模式的话,可以在注解下添加@Scope注解
    -->
    <!-- 定义自动扫描的基础包:base-package:指定扫描的基础包,Spring在启动的时候会将基础包及子包下所有加了注解的类都自动扫描进IOC容器 -->
    <context:component-scan base-package="com.visionsly" use-default-filters="false">
        <!--
        当定义好基础扫描的包之后,可以排除包中的某些类,使用如下的方式:
        1. type:表示指定过滤的规则
           - annotation:按照注解进行排除,标注了指定注解的组件不要,expression表示要过滤的注解
           - assignable:指定排除某个具体的类,按照类排除,expression表示不注册的具体类名
           - aspectj:后面讲aop的时候说明要使用的aspectj表达式,不用
           - custom:定义一个typeFilter,自己写代码决定哪些类被过滤掉,不用
           - regex:使用正则表达式过滤,不用

        2. expression:表达式
        -->

        <!--指定要排除扫描哪些组件 -->
        <!--  <context:exclude-filter type="annotation" expression="org.springframework.stereotype.Controller"/> -->

        <!--指定只扫描哪些组件,默认情况下是全部扫描的,所以此时要配置的话需要在component-scan标签中添加 use-default-filters="false" -->
        <context:include-filter type="assignable" expression="com.visionsly.service.PersonService"/>
    </context:component-scan>
</beans>
- 自动装配的注解@Autowired,@Resource
在使用自动装配的时候,除了可以使用@Autowired注解之外,还可以使用@Resource注解,大家需要知道这两个注解的区别。
- @Autowired:是Spring中提供的注解,@Resource:是jdk中定义的注解,依靠的是java的标准
- @Autowired默认是按照类型进行装配,默认情况下要求依赖的对象必须存在,@Resource默认是按照名字进行匹配的,同时可以指定name属性。
- @Autowired只适合Spring框架,而@Resource扩展性更好
注意:当使用Autowired注解的时候,自动装配的时候是根据类型实现的。
- 如果只找到一个,则直接进行赋值,
- 如果没有找到,则直接抛出异常,
- 如果找到多个(子类继承父类,即类型一样,且都被注入,则会找到多个),那么会按照变量名作为id继续匹配,
- 匹配上直接进行装配
- 如果匹配不上则直接报异常
还可以使用@Qualifier注解来指定id的名称,让Spring不要使用变量名,当使用@Qualifier注解的时候也会有两种情况:
- 找到,则直接装配
- 找不到,就会报错
- 泛型依赖注入
这里 BaseDao 跟 BaseService 都不需使用 @Repository 或者 @Service
- 如果 BaseDao 类是抽象类或者接口,且 BaseService 类使用 @Service 注解,则在自动装配过程中会加载 BaseDao 的子类,但此时子类有两个,则会抛出异常。
例如:在 BaseService 中使用 @Service 注解时,在装载 BaseService 时候会提示
No qualifying bean of type 'com.dream.study.ioc.dao.BaseDao<?>' available: expected single matching bean but found 2: studentDao,teacherDao
这是因为注入的 BaseDao 里面存在两个相同类型的 bean 对象,但如果此时 BaseDao 不是抽象类,有具体的实现,则不会报此错误,在 BaseService 装载的时候就会装载 BaseDao 的 bean 对象。
- 如果 BaseDao 类是普通的java类,且 BaseService 类使用 @Service 注解,则在自动装配过程中会加载 BaseDao 类(BaseDao需要 @Repository 注解)。
例如:改写 BaseDao 为普通java类,且加上 @Repository ,BaseService 添加 @Service 注解时候不会报错,因为此时根据类型匹配则直接匹配到 BaseDao 。
@Repository
public class BaseDao<T> {
    public void save() {
        System.out.println("父类加载");
    }
}
泛型依赖注入具体代码:
BaseDao.java
public abstract class BaseDao<T> {
    public abstract void save();
}
StudentDao.java
@Repository
public class StudentDao extends BaseDao<Student>{
    public void save() {
        System.out.println("保存学生");
    }
}
TeacherDao.java
@Repository
public class TeacherDao extends BaseDao<Teacher> {
    public void save() {
        System.out.println("保存老师");
    }
}
BaseService.java
public class BaseService<T> {

    @Autowired
    BaseDao<T> baseDao;

    public void save(){
        System.out.println("自动注入的对象:" + baseDao);
        baseDao.save();
    }
}
StudentService.java
@Service
public class StudentService extends BaseService<Student> {
}
TeacherService.java
@Service
public class TeacherService extends BaseService<Teacher> {
}
MyTest.java
public class MyTest {
    public static void main(String[] args) {
        ApplicationContext context = new ClassPathXmlApplicationContext("application.xml");

        StudentService studentService = context.getBean("studentService", StudentService.class);
        studentService.save();

        TeacherService teacherService = context.getBean("teacherService", TeacherService.class);
        teacherService.save();

    }
}
AOP(Aspect Oriented Programming ):面向切面编程
介绍
- AOP:Aspect Oriented Programming 面向切面编程
- OOP:Object Oriented Programming 面向对象编程
面向切面编程:基于OOP基础之上新的编程思想,OOP面向的主要对象是类,而AOP面向的主要对象是切面,在处理日志、安全管理、事务管理等方面有非常重要的作用。AOP是Spring中重要的核心点,虽然IOC容器没有依赖AOP,但是AOP提供了非常强大的功能,用来对IOC做补充。通俗点说的话就是在程序运行期间,将某段代码动态切入到指定方法的指定位置进行运行的这种编程方式。
AOP的核心概念及术语
- 切面(Aspect):指关注点模块化,这个关注点可能会横切多个对象。事务管理是企业级Java应用中有关横切关注点的例子。 在Spring AOP中,切面可以使用通用类基于模式的方式(schema-based approach)或者在普通类中以@Aspect注解(@AspectJ 注解方式)来实现。
- 连接点(Join point):在程序执行过程中某个特定的点,例如某个方法调用的时间点或者处理异常的时间点。在Spring AOP中,一个连接点总是代表一个方法的执行。
- 通知(Advice):在切面的某个特定的连接点上执行的动作。通知有多种类型,包括“around”, “before” and “after”等等。通知的类型将在后面的章节进行讨论。 许多AOP框架,包括Spring在内,都是以拦截器做通知模型的,并维护着一个以连接点为中心的拦截器链。
- 切点(Pointcut):匹配连接点的断言。通知和切点表达式相关联,并在满足这个切点的连接点上运行(例如,当执行某个特定名称的方法时)。切点表达式如何和连接点匹配是AOP的核心:Spring默认使用AspectJ切点语义。
- 引入(Introduction):声明额外的方法或者某个类型的字段。Spring允许引入新的接口(以及一个对应的实现)到任何被通知的对象上。例如,可以使用引入来使bean实现 IsModified接口, 以便简化缓存机制(在AspectJ社区,引入也被称为内部类型声明(inter))。
- 目标对象(Target object):被一个或者多个切面所通知的对象。也被称作被通知(advised)对象。既然Spring AOP是通过运行时代理实现的,那么这个对象永远是一个被代理(proxied)的对象。
- AOP代理(AOP proxy):AOP框架创建的对象,用来实现切面契约(aspect contract)(包括通知方法执行等功能)。在Spring中,AOP代理可以是JDK动态代理或CGLIB代理。
- 织入(Weaving):把切面连接到其它的应用程序类型或者对象上,并创建一个被被通知的对象的过程。这个过程可以在编译时(例如使用AspectJ编译器)、类加载时或运行时中完成。 Spring和其他纯Java AOP框架一样,是在运行时完成织入的。
AOP的通知类型
- 前置通知(Before advice):在连接点之前运行但无法阻止执行流程进入连接点的通知(除非它引发异常)。
- 后置通知(总会执行)(After (finally) advice): 当连接点退出的时候执行的通知(无论是正常返回还是异常退出)。
- 后置返回通知(After returning advice):在连接点正常完成后执行的通知(例如,当方法没有抛出任何异常并正常返回时)。
- 后置异常通知(After throwing advice):在方法抛出异常退出时执行的通知。
- 环绕通知(Around Advice):环绕连接点的通知,例如方法调用。这是最强大的一种通知类型,。环绕通知可以在方法调用前后完成自定义的行为。它可以选择是否继续执行连接点或直接返回自定义的返回值又或抛出异常将执行结束。
AOP的应用场景
- 日志管理
- 权限认证
- 安全检查
- 事务控制
Spring AOP简单配置
配置步骤
- 添加pom依赖
<!-- https://mvnrepository.com/artifact/org.springframework/spring-context -->
<dependency>
    <groupId>org.springframework</groupId>
    <artifactId>spring-context</artifactId>
    <version>5.3.3</version>
</dependency>
<!-- https://mvnrepository.com/artifact/org.springframework/spring-aop -->
<dependency>
    <groupId>org.springframework</groupId>
    <artifactId>spring-aop</artifactId>
    <version>5.3.3</version>
</dependency>
<!-- https://mvnrepository.com/artifact/cglib/cglib -->
<dependency>
    <groupId>cglib</groupId>
    <artifactId>cglib</artifactId>
    <version>3.3.0</version>
</dependency>
<!-- https://mvnrepository.com/artifact/org.aspectj/aspectjweaver -->
<dependency>
    <groupId>org.aspectj</groupId>
    <artifactId>aspectjweaver</artifactId>
    <version>1.9.5</version>
</dependency>
<!-- https://mvnrepository.com/artifact/aopalliance/aopalliance -->
<dependency>
    <groupId>aopalliance</groupId>
    <artifactId>aopalliance</artifactId>
    <version>1.0</version>
</dependency>
<!-- https://mvnrepository.com/artifact/org.springframework/spring-aspects -->
<dependency>
    <groupId>org.springframework</groupId>
    <artifactId>spring-aspects</artifactId>
    <version>5.2.3.RELEASE</version>
</dependency>
- 配置application.xml
<?xml version="1.0" encoding="UTF-8"?>
<beans xmlns="http://www.springframework.org/schema/beans"
       xmlns:xsi="http://www.w3.org/2001/XMLSchema-instance"
       xmlns:context="http://www.springframework.org/schema/context"
       xmlns:aop="http://www.springframework.org/schema/aop"
       xsi:schemaLocation="http://www.springframework.org/schema/beans http://www.springframework.org/schema/beans/spring-beans.xsd http://www.springframework.org/schema/context https://www.springframework.org/schema/context/spring-context.xsd http://www.springframework.org/schema/aop https://www.springframework.org/schema/aop/spring-aop.xsd">

    <!-- 配置使用Spring AOP -->
    <aop:aspectj-autoproxy/>

    <!-- 配置扫描bean目录 -->
    <context:component-scan base-package="com.dream.study"/>
</beans>
- 定义接口和实现类
Calculator.java
public interface Calculator {

    int add(int i, int j);

    int sub(int i, int j);

    int mult(int i, int j);

    int div(int i, int j);
}
ComCalculator.java
@Component
public class ComCalculator implements Calculator {
    public int add(int i, int j) {
        return i + j;
    }

    public int sub(int i, int j) {
        return i - j;
    }

    public int mult(int i, int j) {
        return i * j;
    }

    public int div(int i, int j) {
        return i / j;
    }
}
- 配置切面类
@Aspect
@Component
public class LogUtil {
/**
* 通知类型:
* 1. @Before
* 前置通知,在目标方法之前运行
* 2. @After
* 后置通知,在目标方法之后运行
* 3. @AfterReturning
* 返回通知,在目标方法正常返回之后
* 4. @AfterThrowing
* 异常通知,在目标方法抛出异常后开始运行
* 5. @Around
* 环绕通知
* <p>
* 表达式:
* execution(访问修饰符 返回值类型 方法全称)
* 最精确的匹配方式:
* execution(public int com.dream.study.aop.ComCalculator.add(int,int))
* 最精简的匹配方式:
* execution(* *(..)) 或者 execution(* *.*(..))
* *:
* 1. 匹配一个或者多个字符
* execution(public int com.dream.study.aop.*Calculator.*(int,int))
* 2. 匹配任意一个参数
* execution(public int com.dream.study.aop.ComCalculator.*(int,*))
* 3. 匹配返回值
* execution(public * com.dream.study.aop.ComCalculator.*(int,*))
* 4. 只能匹配一层路径,如果项目路径下有多层目录,那么*只能匹配一层路径
* execution(public int com.dream.*.*.*Calculator.*(int,*))
* 5. 不能够匹配访问修饰符,如果不确定访问修饰符是什么,可以直接省略不写
* execution(int com.dream.study.aop.ComCalculator.*(int,*))
* ..:
* 1. 匹配多个参数,任意类型参数
* execution(public int com.dream.study.aop.ComCalculator.*(..))
* 2. 匹配任意多层路径
* execution(public int com.dream..ComCalculator.*(..))
*
* 除此之外,在表达式中还支持 &&、||、!的方式
* &&: 两个表达式同时满足
* execution(public int com.dream.study.aop.ComCalculator.*(..)) && execution(* *.*(int,int) )
* ||: 任意满足一个表达式即可
* execution(public Integer com.dream.study.aop.ComCalculator.*(..)) || execution(* *(..))
* !: 只要不是这个位置都可以进行切入
* !execution(public int com.dream.study.aop.ComCalculator.add(int,int))
* <p>
* 通知方式执行顺序:
* 1. 正常执行:@Before-->@After-->@AfterReturning
* 2. 异常执行:@Before-->@After-->@AfterThrowing
* <p>
* 获取方法的详细信息:
* 添加参数 JoinPoint joinPoint
* joinPoint.getArgs() 获取切入方法请求参数
* joinPoint.getSignature().getName() 获取切入方法名称
* returning = "result" 获取切入方法返回结果,这个 result 名称需要跟 Object result 的名称保持一致
* throwing = "exception" 获取切入方法异常信息,这个 exception 名称需要跟 Exception exception 的名称保持一致
* <p>
* Spring对通知方法的要求:
* Spring对于通知方法的要求并不是很高,你可以任意改变方法的返回值和方法的访问修饰符,
* 但是唯一不能修改的就是方法的参数,会出现参数绑定的错误,原因在于通知方法是Spring利用反射调用的,每次方法调用得确定这个方法的参数的值
* <p>
* 表达式抽取:
* 如果在实际使用过程中,多个方法的表达式是一致的话,那么可以考虑将切入点表达式抽取出来:
* 1. 随便生命一个没有实现的返回void的空方法
* 2. 给方法上标注@Potintcut注解
* <p>
* 环绕通知:
* 环绕通知的执行顺序是优于普通通知的,具体的执行顺序如下:
* 1. 正常执行
* 环绕前置通知-->@Before-->环绕后置通知-->环绕返回通知-->@After-->@AfterReturning
* 2. 异常执行
* 环绕前置通知-->@Before-->环绕异常通知-->环绕返回通知-->@After-->@AfterReturning
* 如果出现异常的时候,在环绕通知中解决了,那么普通通知是接受不到的,如果想让普通通知接收到需要进行抛出 throw throwable
* 执行顺序改为:
* 环绕前置通知-->@Before-->环绕异常通知-->环绕返回通知-->@After-->@AfterThrowing
* <p>
* 应用程序中包含多个切面类时执行顺序:
* 1. 按照切面类的名称的首字母进行排序操作,按照字典序
* 2. 如果需要认为的规定顺序,可以在切面类上添加@Order注解同时可以添加具体的值(值越小,越优先)
*/
@Pointcut("execution( public int com.dream.*.*.*Calculator.*(..))")
public void calPoint() {
}
@Before(value = "calPoint()")
public void before(JoinPoint joinPoint) {
Object[] args = joinPoint.getArgs();
String name = joinPoint.getSignature().getName();
System.out.println(name + " 前置通知,参数是:" + Arrays.asList(args));
}
@After(value = "calPoint()")
private void after(JoinPoint joinPoint) {
String name = joinPoint.getSignature().getName();
System.out.println(name + " 后置通知");
}
@AfterReturning(value = "calPoint()", returning = "result")
public void afterReturning(JoinPoint joinPoint, Object result) {
String name = joinPoint.getSignature().getName();
System.out.println(name + " 返回通知,结果是:" + result);
}
@AfterThrowing(value = "calPoint()", throwing = "exception")
public void afterThrowing(JoinPoint joinPoint, Exception exception) {
String name = joinPoint.getSignature().getName();
System.out.println(name + " 异常通知:" + exception.getMessage());
}
@Around(value = "calPoint()")
public Object around(ProceedingJoinPoint proceedingJoinPoint) {
Object[] args = proceedingJoinPoint.getArgs();
String name = proceedingJoinPoint.getSignature().getName();
Object proceed = null;
try {
System.out.println("环绕前置通知:" + name + " 方法开始,参数是:" + Arrays.asList(args));
// 利用反射调用目标方法,就是method.invoke()
proceed = proceedingJoinPoint.proceed(args);
System.out.println("环绕后置通知:" + name + " 方法结束");
} catch (Throwable e) {
System.out.println("环绕异常通知:" + name + " 方法出现异常,异常信息是:" + e);
} finally {
System.out.println("环绕返回通知:" + name + " 方法返回,返回值是:" + proceed);
}
return proceed;
}
}
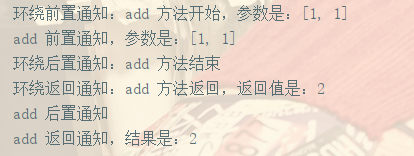
- 测试
public class MyTest {
    public static void main(String[] args) {
        ApplicationContext context = new ClassPathXmlApplicationContext("application.xml");
        Calculator bean = context.getBean(Calculator.class);
        bean.add(1, 1);
    }
}
配置总结
-
通知类型
-
@Before
前置通知,在目标方法之前运行
-
@After
后置通知,在目标方法之后运行
-
@AfterReturning
返回通知,在目标方法正常返回之后
-
@AfterThrowing
异常通知,在目标方法抛出异常后开始运行
-
@Around
环绕通知
-
-
表达式
execution(访问修饰符 返回值类型 方法全称)
最精确的匹配方式:
execution(public int com.dream.study.aop.ComCalculator.add(int,int))最精简的匹配方式:
execution(* *(..)) 或者 execution(* *.*(..))"*"
- 匹配一个或者多个字符
execution(public int com.dream.study.aop.*Calculator.*(int,int))- 匹配任意一个参数
execution(public int com.dream.study.aop.ComCalculator.*(int,*))- 匹配返回值
execution(public * com.dream.study.aop.ComCalculator.*(int,*))- 只能匹配一层路径,如果项目路径下有多层目录,那么*只能匹配一层路径
execution(public int com.dream.*.*.*Calculator.*(int,*))- 不能够匹配访问修饰符,如果不确定访问修饰符是什么,可以直接省略不写
execution(int com.dream.study.aop.ComCalculator.*(int,*))".."
- 匹配多个参数,任意类型参数
execution(public int com.dream.study.aop.ComCalculator.*(..))- 匹配任意多层路径
execution(public int com.dream..ComCalculator.*(..))除此之外,在表达式中还支持 &&、||、!的方式
- &&: 两个表达式同时满足
execution(public int com.dream.study.aop.ComCalculator.*(..)) && execution(* *.*(int,int) )- ||: 任意满足一个表达式即可
execution(public Integer com.dream.study.aop.ComCalculator.*(..)) || execution(* *(..))- !: 只要不是这个位置都可以进行切入
!execution(public int com.dream.study.aop.ComCalculator.add(int,int)) -
通知方式执行顺序
- 正常执行:@Before-->@After-->@AfterReturning
- 异常执行:@Before-->@After-->@AfterThrowing
-
获取方法的详细信息
添加参数 JoinPoint joinPoint
- joinPoint.getArgs() 获取切入方法请求参数
- joinPoint.getSignature().getName() 获取切入方法名称
- returning = "result" 获取切入方法返回结果,这个 result 名称需要跟 Object result 的名称保持一致
- throwing = "exception" 获取切入方法异常信息,这个 exception 名称需要跟 Exception exception 的名称保持一致
-
Spring对通知方法的要求
Spring对于通知方法的要求并不是很高,你可以任意改变方法的返回值和方法的访问修饰符,但是唯一不能修改的就是方法的参数,会出现参数绑定的错误,原因在于通知方法是Spring利用反射调用的,每次方法调用得确定这个方法的参数的值
-
表达式抽取
如果在实际使用过程中,多个方法的表达式是一致的话,那么可以考虑将切入点表达式抽取出来:
- 随便生命一个没有实现的返回void的空方法
- 给方法上标注@Potintcut注解
-
环绕通知
环绕通知的执行顺序是优于普通通知的,具体的执行顺序如下:
-
正常执行
环绕前置通知-->@Before-->环绕后置通知-->环绕返回通知-->@After-->@AfterReturning
-
异常执行
环绕前置通知-->@Before-->环绕异常通知-->环绕返回通知-->@After-->@AfterReturning
如果出现异常的时候,在环绕通知中解决了,那么普通通知是接受不到的,如果想让普通通知接收到需要进行抛出 throw throwable
执行顺序改为:
环绕前置通知-->@Before-->环绕异常通知-->环绕返回通知-->@After-->@AfterThrowing
-
-
应用程序中包含多个切面类时执行顺序
- 按照切面类的名称的首字母进行排序操作,按照字典序
- 如果需要认为的规定顺序,可以在切面类上添加@Order注解同时可以添加具体的值(值越小,越优先)
基于XML文件配置
- 删除所有注解
- 配置XML
<?xml version="1.0" encoding="UTF-8"?>
<beans xmlns="http://www.springframework.org/schema/beans"
       xmlns:xsi="http://www.w3.org/2001/XMLSchema-instance"
       xmlns:context="http://www.springframework.org/schema/context"
       xmlns:aop="http://www.springframework.org/schema/aop"
       xsi:schemaLocation="http://www.springframework.org/schema/beans http://www.springframework.org/schema/beans/spring-beans.xsd http://www.springframework.org/schema/context https://www.springframework.org/schema/context/spring-context.xsd http://www.springframework.org/schema/aop https://www.springframework.org/schema/aop/spring-aop.xsd">

    <aop:aspectj-autoproxy/>
    <context:component-scan base-package="com.dream.study"/>

    <bean id="logUtil" class="com.dream.study.aop.LogUtil"/>
    <bean id="comCalculator" class="com.dream.study.aop.ComCalculator"/>
    <aop:config>
        <aop:pointcut id="globalPoint" expression="execution( public int com.dream.*.*.*Calculator.*(..))"/>
        <aop:aspect ref="logUtil">
            <!-- 也可以定义在里面 -->
            <!--<aop:pointcut id="globalPoint" expression="execution( public int com.dream.*.*.*Calculator.*(..))"/>-->
            <aop:around method="around" pointcut-ref="globalPoint"/>
            <aop:before method="before" pointcut-ref="globalPoint"/>
            <aop:after method="after" pointcut-ref="globalPoint"/>
            <aop:after-returning method="afterReturning" pointcut-ref="globalPoint" returning="result"/>
            <aop:after-throwing method="afterThrowing" pointcut-ref="globalPoint" throwing="exception"/>
        </aop:aspect>
    </aop:config>
</beans>
Spring声明式事务以及传播特性
Spring声明式事务
介绍
在事务控制方面,主要有两个分类:
-
编程式事务
在代码中直接加入处理事务的逻辑,可能需要在代码中显式调用beginTransaction(),commit(),rollback()等事务管理相关的方法
-
声明式事务
在方法的外部添加注解或者直接在配置文件中定义,将事务管理代码从业务方法中分离出来,以声明的方式来实现事务管理。Spring的AOP恰好可以完成此功能:事务管理代码的固定模式作为一种横切关注点,通过AOP方法模块化,进而实现声明式事务。
声明式事务的简单配置
Spring从不同的事务管理API中抽象出了一整套事务管理机制,让事务管理代码从特定的事务技术中独立出来。开发人员通过配置的方式进行事务管理,而不必了解其底层是如何实现的。
Spring的核心事务管理抽象是PlatformTransactionManager。它为事务管理封装了一组独立于技术的方法。无论使用Spring的哪种事务管理策略(编程式或声明式),事务管理器都是必须的。
事务管理器可以以普通的bean的形式声明在Spring IOC容器中。
jdbc.username=root
jdbc.password=123456
jdbc.url=jdbc:mysql://localhost:3306/test
jdbc.driverClassName=com.mysql.jdbc.Driver
<?xml version="1.0" encoding="UTF-8"?>
<beans xmlns="http://www.springframework.org/schema/beans"
       xmlns:xsi="http://www.w3.org/2001/XMLSchema-instance"
       xmlns:context="http://www.springframework.org/schema/context"
       xmlns:aop="http://www.springframework.org/schema/aop" xmlns:tx="http://www.springframework.org/schema/tx"
       xsi:schemaLocation="http://www.springframework.org/schema/beans http://www.springframework.org/schema/beans/spring-beans.xsd http://www.springframework.org/schema/context https://www.springframework.org/schema/context/spring-context.xsd http://www.springframework.org/schema/aop https://www.springframework.org/schema/aop/spring-aop.xsd http://www.springframework.org/schema/tx http://www.springframework.org/schema/tx/spring-tx.xsd">

    <aop:aspectj-autoproxy/>
    <context:component-scan base-package="com.dream.study"/>

    <bean id="logUtil" class="com.dream.study.aop.LogUtil"/>
    <bean id="comCalculator" class="com.dream.study.aop.ComCalculator"/>
    <aop:config>
        <aop:pointcut id="globalPoint" expression="execution( public int com.dream.*.*.*Calculator.*(..))"/>
        <aop:aspect ref="logUtil">
            <!-- 也可以定义在里面 -->
            <!--<aop:pointcut id="globalPoint" expression="execution( public int com.dream.*.*.*Calculator.*(..))"/>-->
            <aop:around method="around" pointcut-ref="globalPoint"/>
            <aop:before method="before" pointcut-ref="globalPoint"/>
            <aop:after method="after" pointcut-ref="globalPoint"/>
            <aop:after-returning method="afterReturning" pointcut-ref="globalPoint" returning="result"/>
            <aop:after-throwing method="afterThrowing" pointcut-ref="globalPoint" throwing="exception"/>
        </aop:aspect>
    </aop:config>

    <context:property-placeholder location="classpath:dbconfig.properties"/>
    <bean id="dataSource" class="com.alibaba.druid.pool.DruidDataSource">
        <property name="username" value="${jdbc.username}"/>
        <property name="password" value="${jdbc.password}"/>
        <property name="url" value="${jdbc.url}"/>
        <property name="driverClassName" value="${jdbc.driverClassName}"/>
    </bean>

    <bean id="jdbcTemplate" class="org.springframework.jdbc.core.JdbcTemplate">
        <constructor-arg name="dataSource" ref="dataSource"/>
    </bean>

    <!--事务控制-->
    <!--配置事务管理器的bean-->
    <bean id="transactionManager" class="org.springframework.jdbc.datasource.DataSourceTransactionManager">
        <property name="dataSource" ref="dataSource"/>
    </bean>
    <!--开启基于注解的事务控制模式,依赖tx名称空间-->
    <tx:annotation-driven transaction-manager="transactionManager"/>
</beans>
@Service
public class BookService {

    @Autowired
    BookDao bookDao;

    /**
     * 结账:传入哪个用户买了哪本书
     * @param username
     * @param id
     */
    @Transactional
    public void checkout(String username,int id){

        bookDao.updateStock(id);
        int price = bookDao.getPrice(id);
        bookDao.updateBalance(username,price);
    }
}
事务配置的属性
- isolation:设置事务的隔离级别
- propagation:设置事务的传播特性
- rollbackFor:设置哪些异常事务需要回滚
- rollbackForClassName:设置哪些异常事务需要回滚(填写的参数是全类名)
- noRollbackFor:设置哪些异常事务可以不回滚
- noRollbackForClassName:设置哪些异常事务可以不回滚(填写的参数是全类名)
- readOnly:设置事务是否为只读事务
- timeout:设置事务超出指定执行时长后自动终止并回滚,单位是秒
只读事务
如果你一次执行单条查询语句,则没有必要启用事务支持,数据库默认支持SQL执行期间的读一致性;
如果你一次执行多条查询语句,例如统计查询,报表查询,在这种场景下,多条查询SQL必须保证整体的读一致性,否则,在前条SQL查询之后,后条SQL查询之前,数据被其他用户改变,则该次整体的统计查询将会出现读数据不一致的状态,此时,应该启用事务支持。
对于只读查询,可以指定事务类型为readonly,即只读事务。由于只读事务不存在数据的修改,因此数据库将会为只读事务提供一些优化手段
异常处理
==运行时异常默认回滚,编译时异常默认不回滚==
@Transactional
public void updateBook() throws FileNotFoundException {
    bookDao.updatePrice(1, 10);
    bookDao.updateStock(1);
    new FileInputStream("aaa.txt");
}
编译时异常默认不会滚,要想进行回滚操作,需添加 rollbackFor = FileNotFoundException.class
@Transactional
public void updateBook() {
    bookDao.updatePrice(1, 10);
    bookDao.updateStock(1);
    try {
        int i = 1 / 0;
    } catch (ArithmeticException e) {
        System.out.println(e.getMessage());
    }
}
针对于当前事务而言,如果自行对异常进行了捕获处理,并不向外抛出的话,那么将不会进行事务回滚
事务的隔离级别
| 隔离级别 | 解释 |
|---|---|
| ISOLATION_DEFAULT | 这是默认值,表示使用底层数据库的默认隔离级别。对大部分数据库而言,通常这值就是TransactionDefinition.ISOLATION_READ_COMMITTED。 |
| ISOLATION_READ_UNCOMMITTED | 该隔离级别表示一个事务可以读取另一个事务修改但还没有提交的数据。该级别不能防止脏读,不可重复读和幻读,因此很少使用该隔离级别。比如PostgreSQL实际上并没有此级别。 |
| ISOLATION_READ_COMMITTED | 该隔离级别表示一个事务只能读取另一个事务已经提交的数据。该级别可以防止脏读,这也是大多数情况下的推荐值。 |
| ISOLATION_REPEATABLE_READ | 该隔离级别表示一个事务在整个过程中可以多次重复执行某个查询,并且每次返回的记录都相同。该级别可以防止脏读和不可重复读。 |
| ISOLATION_SERIALIZABLE | 所有的事务依次逐个执行,这样事务之间就完全不可能产生干扰,也就是说,该级别可以防止脏读、不可重复读以及幻读。但是这将严重影响程序的性能。通常情况下也不会用到该级别。 |
| 隔离级别 | 脏读 | 不可重复读 | 幻读 |
|---|---|---|---|
| read uncommitted | √ | √ | √ |
| read committed | √ | √ | |
| repeatable read | √ | ||
| serializable |
事务的传播特性
| 传播行为 | 解释 |
|---|---|
| PROPAGATION_REQUIRED | 如果当前存在事务,则加入该事务;如果当前没有事务,则创建一个新的事务。这是默认值。 |
| PROPAGATION_REQUIRES_NEW | 创建一个新的事务,如果当前存在事务,则把当前事务挂起。 |
| PROPAGATION_NESTED | 如果当前存在事务,则创建一个事务作为当前事务的嵌套事务来运行;如果当前没有事务,则该取值等价于TransactionDefinition.PROPAGATION_REQUIRED。 |
| PROPAGATION_MANDATORY | 如果当前存在事务,则加入该事务;如果当前没有事务,则抛出异常。 |
| PROPAGATION_SUPPORTS | 如果当前存在事务,则加入该事务;如果当前没有事务,则以非事务的方式继续运行。 |
| PROPAGATION_NOT_SUPPORTED | 以非事务方式运行,如果当前存在事务,则把当前事务挂起。 |
| PROPAGATION_NEVER | 以非事务方式运行,如果当前存在事务,则抛出异常。 |
- 当使用REQUIRES_NEW的时候,其他事务发生异常不会影响当前事务
BookService.java
@Service
public class BookService {

    @Autowired
    MultService multService;

    @Transactional
    public void testTran() {
        multService.updateAccount();
        multService.updateBook();
    }
}
MultService.java
@Service
public class MultService {

    @Autowired
    BookDao bookDao;

    @Transactional(propagation = Propagation.REQUIRES_NEW)
    public void updateAccount() {
        bookDao.updateBalance("lisi", 100);
        // int i = 1 / 0;
    }

    @Transactional
    public void updateBook() {
        bookDao.updatePrice(1, 10);
        bookDao.updateStock(1);
        int i = 1 / 0;
    }
}
此时 updateBook() 因为使用的是默认事务处理机制,即使用的调用者的 testTran() 的当前事务,而 updateAccount() 开启了新事务,不受当前事务的影响,所以当 updateBook() 抛出异常时,此方法会回滚,但是不会影响而 updateAccount() 方法。但如果此时异常发生在 updateAccount() 里面,则 updateAccount() 事务会回滚,而且会抛出异常,异常被调用者 testTran() 捕获,则此时会触发 updateBook() 也进行回滚操作。
REQUIRED,REQUIRES_NEW和NESTED
-
当里面方法出现异常,外面方法没有使用 try catch 捕获时
- 无论里面使用REQUIRED,REQUIRES_NEW还是NESTED,所有事务都会进行回滚操作
@Transactional
public void testTran() {
    multService.updateAccount();
    multService.updateBook();
}
@Transactional(propagation = Propagation.REQUIRED)
public void updateAccount() {
    bookDao.updateBalance("lisi", 100);
    int i = 1 / 0;
}

@Transactional
public void updateBook() {
    bookDao.updatePrice(1, 10);
    bookDao.updateStock(1);
}
-
当里面方法出现异常,外面方法使用 try catch 捕获时
- 里面使用REQUIRED,所有事务都会进行回滚操作
- 里面使用REQUIRES_NEW或NESTED,updateAccount() 会进行回滚操作,updateBook() 不会进行回滚操作
@Transactional
public void testTran() {
    try {
        multService.updateAccount();
    } catch (Exception e) {

    }
    multService.updateBook();
}
@Transactional(propagation = Propagation.REQUIRES_NEW)
public void updateAccount() {
    bookDao.updateBalance("lisi", 100);
    int i = 1 / 0;
}

@Transactional
public void updateBook() {
    bookDao.updatePrice(1, 10);
    bookDao.updateStock(1);
}
-
当外面方法出现异常,外面方法不管有没有使用 try catch
- 里面使用REQUIRED或NESTED,所有事务都会进行回滚操作
- 里面使用REQUIRES_NEW,updateAccount() 不会进行回滚操作,updateBook() 会进行回滚操作
@Transactional
public void testTran() {
    // try {
        multService.updateAccount();
    // } catch (Exception e) {

    // }
    multService.updateBook();
    int i = 1 / 0;
}
@Transactional(propagation = Propagation.REQUIRES_NEW)
public void updateAccount() {
    bookDao.updateBalance("lisi", 100);
}

@Transactional
public void updateBook() {
    bookDao.updatePrice(1, 10);
    bookDao.updateStock(1);
}
总结
事务的传播特性是相较于多个嵌套事务而言的,针对于多个嵌套事务之间的事务处理机制。
@Transactional
public void testTran() {
    multService.updateAccount();
    multService.updateBook();
}
@Transactional(propagation = Propagation.REQUIRES_NEW)
public void updateAccount() {
    bookDao.updateBalance("lisi", 100);
}

@Transactional
public void updateBook() {
    bookDao.updatePrice(1, 10);
    bookDao.updateStock(1);
}
-
事务传播级别是REQUIRED,当 updateAccount() 被调用时,如果 updateAccount() 中的代码抛出异常,即便被捕获,updateBook() 方法也会进行 roll back。
-
事务传播级别是REQUIRES_NEW,当 updateAccount() 代码抛出异常,并且被捕获,updateBook() 不会进行 roll back;如果是 updateBook() 抛出异常,而且没有被捕获,不会导致 updateAccount() 进行 roll back。
-
事务传播级别是NESTED,当 updateAccount() 代码抛出异常,并且被捕获,updateBook() 不会进行 roll back;如果是 updateBook() 抛出异常,而且没有被捕获,会导致 updateAccount() 进行 roll back。
PROPAGATION_REQUIRES_NEW 启动一个新的,不依赖于环境的 "内部" 事务。 这个事务将被完全 commited 或 rolled back 而不依赖于外部事务, 它拥有自己的隔离范围,自己的锁,等等。当内部事务开始执行时,外部事务将被挂起,内务事务结束时,外部事务将继续执行。
另一方面,PROPAGATION_NESTED 开始一个 "嵌套的" 事务, 它是已经存在事务的一个真正的子事务。嵌套事务开始执行时,它将取得一个 savepoint。如果这个嵌套事务失败,我们将回滚到此 savepoint。 嵌套事务是外部事务的一部分,只有外部事务结束后它才会被提交。
由此可见,PROPAGATION_REQUIRES_NEW 和 PROPAGATION_NESTED 的最大区别在于, PROPAGATION_REQUIRES_NEW 完全是一个新的事务,而 PROPAGATION_NESTED 则是外部事务的子事务,如果外部事务 commit,嵌套事务也会被 commit, 这个规则同样适用于 roll back。